
Subscribe to Our Youtube Channel
Related Manuals for Juniper JSA1500


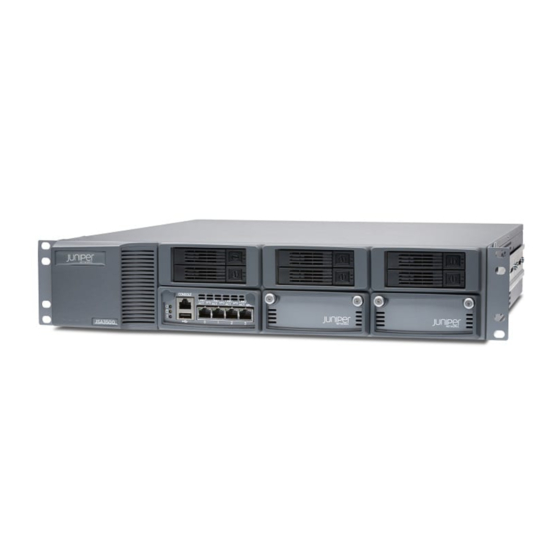
Summary of Contents for Juniper JSA1500
- Page 1 Juniper Secure Analytics Hardware Guide Modified: 2018-09-05 Copyright © 2018, Juniper Networks, Inc.
- Page 2 END USER LICENSE AGREEMENT The Juniper Networks product that is the subject of this technical documentation consists of (or is intended for use with) Juniper Networks software. Use of such software is subject to the terms and conditions of the End User License Agreement (“EULA”) posted at https://www.juniper.net/support/eula/.
-
Page 3: Table Of Contents
JSA7500 Back Panel ..........32 Copyright © 2018, Juniper Networks, Inc. - Page 4 Action to Take After an Electrical Accident ....... 82 Copyright © 2018, Juniper Networks, Inc.
- Page 5 Mid-Mounting the JSA Appliance in a Two-Post Rack ..... 109 Installing the CNA Module on the JSA1500 Appliance ..... 110 Chapter 18 Configuring Basic Settings .
- Page 6 Chapter 22 Juniper Networks Technical Assistance Center ..... . . 137 Contacting Juniper Networks Technical Assistance Center ....137...
- Page 7 Figure 19: JSA1500 Front Panel ........
- Page 8 Figure 27: Mid-Mount in Two-Post Equipment Rack ..... . . 110 Figure 28: JSA1500 with the CNA Card Inserted ......111...
- Page 9 Table 5: JSA Appliance Transceiver Interface Types ......9 Table 6: RJ-45 Console Connector Pinouts for JSA1500, JSA3500, and JSA5500 .
- Page 10 Table 29: Asset Identification ......... 114 Copyright © 2018, Juniper Networks, Inc.
-
Page 11: About The Documentation
® To obtain the most current version of all Juniper Networks technical documentation, see the product documentation page on the Juniper Networks website at https://www.juniper.net/documentation/ If the information in the latest release notes differs from the information in the documentation, follow the product Release Notes. -
Page 12: Table 1: Notice Icons
RFC 1997, BGP Communities Attribute Italic text like this Represents variables (options for which Configure the machine’s domain name: you substitute a value) in commands or [edit] configuration statements. root@# set system domain-name domain-name Copyright © 2018, Juniper Networks, Inc. -
Page 13: Documentation Feedback
We encourage you to provide feedback so that we can improve our documentation. You can use either of the following methods: Online feedback system—Click TechLibrary Feedback, on the lower right of any page on the Juniper Networks TechLibrary site, and do one of the following: Copyright © 2018, Juniper Networks, Inc. xiii... -
Page 14: Requesting Technical Support
7 days a week, 365 days a year. Self-Help Online Tools and Resources For quick and easy problem resolution, Juniper Networks has designed an online self-service portal called the Customer Support Center (CSC) that provides you with the following features: Find CSC offerings: https://www.juniper.net/customers/support/... -
Page 15: Opening A Case With Jtac
About the Documentation Join and participate in the Juniper Networks Community Forum: https://www.juniper.net/company/communities/ Open a case online in the CSC Case Management tool: https://www.juniper.net/cm/ To verify service entitlement by product serial number, use our Serial Number Entitlement (SNE) Tool: https://entitlementsearch.juniper.net/entitlementsearch/ Opening a Case with JTAC You can open a case with JTAC on the Web or by telephone. - Page 16 Juniper Secure Analytics Hardware Guide Copyright © 2018, Juniper Networks, Inc.
-
Page 17: Overview
PART 1 Overview Introduction on page 3 Copyright © 2018, Juniper Networks, Inc. - Page 18 Juniper Secure Analytics Hardware Guide Copyright © 2018, Juniper Networks, Inc.
-
Page 19: Introduction
JSA Appliance Hardware Features on page 4 JSA Appliance Models Juniper Secure Analytics (JSA) appliances are designed to respond to the right threats at the right time through effective analysis of networks, events, and audit log files. JSA has the ability to identify environmental anomalies in the network, an attack path, and the source of a threat. -
Page 20: Jsa Appliance Hardware Features
JSA Appliance Hardware Features on page 4 Additional Hardware Requirements on page 37 JSA Appliance Hardware Features The Juniper Secure Analytics (JSA) appliance provides the following features: Monitor utility for power supply unit (PSU) and fans Add setup logs automatically... -
Page 21: Components
PART 2 Components Hardware Components and Specifications on page 7 JSA3500 on page 11 JSA3800 on page 15 JSA5500 on page 21 JSA5800 on page 25 JSA7500 on page 31 Copyright © 2018, Juniper Networks, Inc. - Page 22 Juniper Secure Analytics Hardware Guide Copyright © 2018, Juniper Networks, Inc.
-
Page 23: Hardware Components And Specifications
Hardware Specifications on page 7 JSA Transceiver Interface on page 9 Chassis Console Port Pinouts on page 9 Hardware Specifications Table 4 on page 7 lists the hardware specifications for the JSA1500, JSA3500, JSA5500, and JSA7500 appliances. Table 4: Hardware Specifications Specification JSA1500... - Page 24 10000 ft max. 10000 ft max. 10000 ft max. operating Altitude 40000 ft max. 40000 ft max. 40000 ft max. 40000 ft max. storage Related JSA Appliance Description Documentation JSA Appliance Models on page 3 Copyright © 2018, Juniper Networks, Inc.
-
Page 25: Jsa Transceiver Interface
Related JSA Appliance Description Documentation JSA Appliance Models on page 3 Installing the CNA Module on the JSA1500 Appliance on page 110 Hardware Specifications on page 7 Chassis Console Port Pinouts Table 6 on page 10 describes the details of RJ-45 chassis console port pinouts for JSA1500, JSA3500, and JSA5500. -
Page 26: Table 6: Rj-45 Console Connector Pinouts For Jsa1500, Jsa3500, And Jsa5500
Juniper Secure Analytics Hardware Guide Table 6: RJ-45 Console Connector Pinouts for JSA1500, JSA3500, and JSA5500 Signal Description RTS Output Request to Send DTR Output Data Terminal Ready TxD Output Transmit Data Chassis Ground Chassis Ground RxD Input Receive Data... -
Page 27: Jsa3500
Table 7: JSA3500 Front Panel Ports Callout Component Description Hard drive Six 1-TB HDDs: Drive3 (top left) and Drive0 (bottom left) Drive4 (top middle) and Drive1 (bottom middle) Drive5 (top right) and Drive2 (bottom right) Copyright © 2018, Juniper Networks, Inc. -
Page 28: Jsa3500 Back Panel
Related JSA Appliance Description Documentation JSA Appliance Models on page 3 JSA3500 Back Panel on page 12 JSA3500 Back Panel Figure 2 on page 13 shows the back panel components of the JSA3500 appliance. Copyright © 2018, Juniper Networks, Inc. -
Page 29: Figure 2: Jsa3500 Back Panel
Provides power to all components. Redundant power supply slot Provides power to all components. Power supply Provides power to all components. Related JSA Appliance Description Documentation JSA Appliance Models on page 3 JSA3500 Front Panel on page 11 Copyright © 2018, Juniper Networks, Inc. - Page 30 Juniper Secure Analytics Hardware Guide Copyright © 2018, Juniper Networks, Inc.
-
Page 31: Jsa3800
Table 10 on page 15 provides information about the front panel components of the JSA3800 appliance. Table 10: JSA3800 Front Panel Components Callout Component Description Front bezel Protects the appliance. Lock Locks the appliance. Copyright © 2018, Juniper Networks, Inc. -
Page 32: Figure 4: Jsa3800 Front Panel Leds
Empty hard drive slots. Figure 4 on page 16 shows the front panel LEDs of the JSA3800 appliance. Figure 4: JSA3800 Front Panel LEDs Table 11 on page 17 lists the JSA3800 front panel LEDs. Copyright © 2018, Juniper Networks, Inc. -
Page 33: Jsa3800 Appliance Back Panel Description
Figure 5 on page 17 shows the back panel components of the JSA3800 appliance. Figure 5: JSA3800 Back Panel Table 12 on page 18 provides information about the back panel components of the JSA3800 appliance. Copyright © 2018, Juniper Networks, Inc. -
Page 34: Figure 6: Jsa3800 Ethernet Port Leds
Off—Indicates no connection or the speed of the connection is 10 Mbps. Green—Indicates that the speed of the connection is 100 Mbps. Amber—Indicates that the speed of the connection is 1 Gbps. Activity Indicates link activity. Copyright © 2018, Juniper Networks, Inc. - Page 35 Chapter 4: JSA3800 Related JSA3800 Appliance Description Documentation JSA3800 Appliance Front Panel Description on page 15 Copyright © 2018, Juniper Networks, Inc.
- Page 36 Juniper Secure Analytics Hardware Guide Copyright © 2018, Juniper Networks, Inc.
-
Page 37: Jsa5500
JSA5500 appliance. Figure 7: JSA5500 Front Panel JSA5500 Table 14 on page 22 Table 15 on page 22 list the front panel components of the JSA5500 appliance. Copyright © 2018, Juniper Networks, Inc. -
Page 38: Table 14: Jsa5500 Front Panel Components
Left LED (green)—Indicates that the link is active Right LED (green)—Indicates the link Hard disk module Top (green)—For disk activity Bottom (red)—For disk failure Related JSA Appliance Description Documentation JSA Appliance Models on page 3 Copyright © 2018, Juniper Networks, Inc. -
Page 39: Jsa5500 Back Panel
Provides power to all components Redundant power supply Provides power to all components Redundant power supply Provides power to all components Related JSA Appliance Description Documentation JSA Appliance Models on page 3 JSA5500 Front Panel on page 21 Copyright © 2018, Juniper Networks, Inc. - Page 40 Juniper Secure Analytics Hardware Guide Copyright © 2018, Juniper Networks, Inc.
-
Page 41: Jsa5800
JSA5800 appliance. Table 17: JSA5800 Front Panel Components Callout Component Description Front Bezel Protects the appliance. Lock Locks the appliance. Power button Powers on or powers off the appliance. Copyright © 2018, Juniper Networks, Inc. -
Page 42: Figure 10: Jsa5800 Front Panel Leds
Alert/Power fail Red—Indicates a power supply failure. Amber—Indicates that the appliance is operating normally. The LED might glow amber if a rescue configuration is not set. This is not a panic condition. Hard drive Unused. Copyright © 2018, Juniper Networks, Inc. -
Page 43: Jsa5800 Appliance Back Panel Description
JSA5800 Appliance Back Panel Description Figure 8 on page 23 shows the back panel components of the JSA5800 appliance. Figure 11: JSA5800 Back Panel Table 16 on page 23 lists the back panel components of the JSA5800 appliance. Copyright © 2018, Juniper Networks, Inc. -
Page 44: Figure 12: Jsa5800 Ethernet Port Leds
Description Link Off—Indicates no connection or the speed of the connection is 10 Mbps. Green—Indicates that the speed of the connection is 100 Mbps. Amber—Indicates that the speed of the connection is 1 Gbps. Copyright © 2018, Juniper Networks, Inc. - Page 45 Chapter 6: JSA5800 Table 20: JSA5800 Ethernet Port LEDs (continued) Callout LEDs Description Activity Indicates link activity. Related JSA5800 Appliance Description Documentation JSA5800 Appliance Front Panel Description on page 25 Copyright © 2018, Juniper Networks, Inc.
- Page 46 Juniper Secure Analytics Hardware Guide Copyright © 2018, Juniper Networks, Inc.
-
Page 47: Jsa7500
Table 21: JSA7500 Front Panel Components Callout Component Description ESD wrist strap grounding jack Connect the equipment end of your ESD grounding strap to the ESD point on the chassis to minimize the potential for electrostatic discharge (ESD) damage. Copyright © 2018, Juniper Networks, Inc. -
Page 48: Jsa7500 Back Panel
JSA7500 Back Panel Figure 14 on page 32 shows the back panel components of the JSA7500 appliance. Figure 14: JSA7500 Back Panel Table 22 on page 33 lists the back panel components of the JSA7500 appliance. Copyright © 2018, Juniper Networks, Inc. -
Page 49: Table 22: Jsa7500 Back Panel Components
Provides power to all components Redundant power supply Provides power to all components Redundant power supply Provides power to all components Related JSA Appliance Description Documentation JSA Appliance Models on page 3 JSA7500 Front Panel on page 31 Copyright © 2018, Juniper Networks, Inc. - Page 50 Juniper Secure Analytics Hardware Guide Copyright © 2018, Juniper Networks, Inc.
-
Page 51: Planning
PART 3 Planning Site Preparation on page 37 Copyright © 2018, Juniper Networks, Inc. - Page 52 Juniper Secure Analytics Hardware Guide Copyright © 2018, Juniper Networks, Inc.
-
Page 53: Site Preparation
General Site Installation Guidelines for the JSA Appliance on page 38 JSA Appliance Rack Requirements on page 38 Additional Hardware Requirements Before installing your Juniper Secure Analytics (JSA) systems, ensure that you have access to the following additional hardware components: A serial console. -
Page 54: General Site Installation Guidelines For The Jsa Appliance
JSA3800 Appliance Rack Requirements JSA3800 Appliance Physical Specifications JSA Appliance Rack Requirements The Juniper Secure Analytics (JSA) appliance can be installed in a rack. Many types of racks are acceptable, including front-mount racks and two-post (telco) racks. Copyright © 2018, Juniper Networks, Inc. -
Page 55: Table 24: Rack Requirements For The Jsa Appliance
For maximum stability, also secure the rack to ceiling brackets. Related Additional Hardware Requirements on page 37 Documentation Hardware Specifications on page 7 General Site Installation Guidelines for the JSA Appliance on page 38 Grounding the JSA7500 Appliance on page 97 Copyright © 2018, Juniper Networks, Inc. - Page 56 Juniper Secure Analytics Hardware Guide Copyright © 2018, Juniper Networks, Inc.
-
Page 57: Part 4 Safety
General Safety and Regulatory Information on page 43 Radiation and Laser Warnings on page 51 Installation and Maintenance Safety Information on page 55 Power and Electrical Safety Information on page 69 Compliance Statements on page 83 Copyright © 2018, Juniper Networks, Inc. - Page 58 Juniper Secure Analytics Hardware Guide Copyright © 2018, Juniper Networks, Inc.
-
Page 59: General Safety And Regulatory Information
Never attempt to lift an object that is too heavy for one person to handle. Never install or manipulate wiring during electrical storms. Never install electrical jacks in wet locations unless the jacks are specifically designed for wet environments. Copyright © 2018, Juniper Networks, Inc. -
Page 60: Definitions Of Safety Warning Levels
This symbol alerts you to the risk of personal injury from a laser. WARNING: This symbol means danger. You are in a situation that could cause bodily injury. Before you work on any equipment, be aware of the hazards Copyright © 2018, Juniper Networks, Inc. - Page 61 Varning! Denna varningssymbol signalerar fara. Du befinner dig i en situation som kan leda till personskada. Innan du utför arbete på någon utrustning Copyright © 2018, Juniper Networks, Inc.
-
Page 62: Fire Safety Requirements
In addition, you should establish procedures to protect your equipment in the event of a fire emergency. Juniper Networks products should be installed in an environment suitable for electronic equipment. We recommend that fire suppression equipment be available in the event of a fire in the vicinity of the equipment and that all local fire, safety, and electrical codes and ordinances be observed when you install and operate your equipment. -
Page 63: Qualified Personnel Warning
To keep warranties effective, do not use a dry chemical fire extinguisher to control a fire at or near a Juniper Networks JSA appliance or other network device provided by Juniper. If a dry chemical fire extinguisher is used, the unit is no longer eligible for coverage under a service agreement. -
Page 64: Warning Statement For Norway And Sweden
Fire Safety Requirements on page 46 Qualified Personnel Warning on page 47 Agency Approvals for JSA JSA1500, JSA3500, JSA5500, and JSA7500 comply with the following standards: Safety CAN/CSA-C22.2 No. 60950-1 (2007) Information Technology Equipment UL 60950-1 (2nd Ed.) Information Technology Equipment... - Page 65 National Electrical Code (NEC) Related Compliance Statements for EMC Requirements for JSA on page 83 Documentation Compliance Statements for NEBS Standards for JSA7500 on page 86 Compliance Statements for Acoustic Noise for JSA on page 85 Copyright © 2018, Juniper Networks, Inc.
- Page 66 Juniper Secure Analytics Hardware Guide Copyright © 2018, Juniper Networks, Inc.
-
Page 67: Radiation And Laser Warnings
Class 1 Laser Product Warning WARNING: Class 1 laser product. Waarschuwing Klasse-1 laser produkt. Varoitus Luokan 1 lasertuote. Copyright © 2018, Juniper Networks, Inc. -
Page 68: Class 1 Led Product Warning
Aviso Produto de classe 1 com LED. ¡Atención! Aviso sobre producto LED de Clase 1. Varning! Lysdiodprodukt av klass 1. Laser Beam Warning WARNING: Do not stare into the laser beam or view it directly with optical instruments. Copyright © 2018, Juniper Networks, Inc. - Page 69 Varning! Rikta inte blicken in mot strålen och titta inte direkt på den genom optiska instrument. Related Radiation from Open Port Apertures Warning on page 54 Documentation Maintenance and Operational Safety Guidelines and Warnings on page 62 Installation Instructions Warning on page 55 Copyright © 2018, Juniper Networks, Inc.
-
Page 70: Radiation From Open Port Apertures Warning
öppningar. Related Laser and LED Safety Guidelines and Warnings for JSA on page 51 Documentation Maintenance and Operational Safety Guidelines and Warnings on page 62 Installation Instructions Warning on page 55 Copyright © 2018, Juniper Networks, Inc. -
Page 71: Installation And Maintenance Safety Information
Advarsel Les installasjonsinstruksjonene før systemet kobles til strømkilden. Aviso Leia as instruções de instalação antes de ligar o sistema à sua fonte de energia. ¡Atención! Ver las instrucciones de instalación antes de conectar el sistema a la red de alimentación. Copyright © 2018, Juniper Networks, Inc. -
Page 72: Chassis Lifting Guidelines For Jsa
Maintenance and Operational Safety Guidelines and Warnings on page 62 Chassis Lifting Guidelines for JSA The weight of a fully loaded Juniper Secure Analytics (JSA) appliance is approximately 27 lb (12 kg). Observe the following guidelines for lifting and moving a JSA appliance: Before installing a JSA appliance, read the guidelines in “General Site Installation... -
Page 73: Rack-Mounting Warnings
Waarschuwing Om lichamelijk letsel te voorkomen wanneer u dit toestel in een rek monteert of het daar een servicebeurt geeft, moet u speciale voorzorgsmaatregelen nemen om ervoor te zorgen dat het toestel stabiel blijft. De onderstaande richtlijnen worden verstrekt om uw veiligheid te verzekeren: Copyright © 2018, Juniper Networks, Inc. - Page 74 Les directives ci-dessous sont destinées à assurer la protection du personnel: Le rack sur lequel est monté le Juniper Networks device doit être fixé à la structure du bâtiment. Si cette unité constitue la seule unité montée en casier, elle doit être placée dans le bas.
- Page 75 Le seguenti direttive vengono fornite per garantire la sicurezza personale: Il Juniper Networks device deve essere installato in un telaio, il quale deve essere fissato alla struttura dell'edificio. Questa unità deve venire montata sul fondo del supporto, se si tratta dell'unica unità...
- Page 76 Para garantizar su seguridad, proceda según las siguientes instrucciones: El Juniper Networks device debe instalarse en un bastidor fijado a la estructura del edificio. Colocar el equipo en la parte inferior del bastidor, cuando sea la única unidad en el mismo.
-
Page 77: Grounded Equipment Warning
Varning! Denna utrustning är avsedd att jordas. Se till att värdenheten är jordad vid normal användning. Related Installation Instructions Warning on page 55 Documentation Ramp Warning on page 56 Rack-Mounting Warnings on page 57 Maintenance and Operational Safety Guidelines and Warnings on page 62 Copyright © 2018, Juniper Networks, Inc. -
Page 78: Maintenance And Operational Safety Guidelines And Warnings
Eliminare le batterie usate secondo le istruzioni del produttore. Aviso Existe perigo de explosão se a bateria for substituída incorrectamente. Substitua a bateria por uma bateria igual ou de um tipo equivalente Copyright © 2018, Juniper Networks, Inc. -
Page 79: Jewelry Removal Warning
(inclusi anelli, collane, braccialetti ed orologi). Gli oggetti metallici si riscaldano quando sono collegati tra punti di alimentazione e massa: possono causare ustioni gravi oppure il metallo può saldarsi ai terminali. Copyright © 2018, Juniper Networks, Inc. -
Page 80: Lightning Activity Warning
Advarsel Utfør aldri arbeid på systemet, eller koble kabler til eller fra systemet når det tordner eller lyner. Aviso Não trabalhe no sistema ou ligue e desligue cabos durante períodos de mau tempo (trovoada). Copyright © 2018, Juniper Networks, Inc. -
Page 81: Operating Temperature Warning
To prevent the device from overheating, do not operate it in an area that exceeds the maximum recommended ambient temperature of 104° F (40° C) for network devices of Juniper Networks. To prevent airflow restriction, allow at least 6 in. (15.2 cm) of clearance around the ventilation openings. -
Page 82: Product Disposal Warning
15,2 cm à volta das aberturas de ventilação. ¡Atención! Para impedir que un encaminador de la serie Juniper Networks device se recaliente, no lo haga funcionar en un área en la que se supere la temperatura ambiente máxima recomendada de 40°... - Page 83 Chapter 11: Installation and Maintenance Safety Information Related Installation Instructions Warning on page 55 Documentation Ramp Warning on page 56 Rack-Mounting Warnings on page 57 Grounded Equipment Warning on page 61 Copyright © 2018, Juniper Networks, Inc.
- Page 84 Juniper Secure Analytics Hardware Guide Copyright © 2018, Juniper Networks, Inc.
-
Page 85: Power And Electrical Safety Information
OSP wiring. WARNING: The intrabuilding port(s) (40G DACS and USB ports) of the equipment or subassembly must use shielded intrabuilding cabling or wiring that is grounded at both ends. Copyright © 2018, Juniper Networks, Inc. - Page 86 Never install an equipment that it appears to be damaged. Related Prevention of Electrostatic Discharge Damage on page 71 Documentation Multiple Power Supplies Disconnection Warning on page 81 TN Power Warning on page 81 Copyright © 2018, Juniper Networks, Inc.
-
Page 87: Prevention Of Electrostatic Discharge Damage
(see Figure 15 on page 72). If you are returning a component, place it in an antistatic bag before packing it. Copyright © 2018, Juniper Networks, Inc. -
Page 88: Ac Power Electrical Safety Guidelines
AC-powered devices are shipped with a three-wire electrical cord with a grounding-type plug that fits only a grounding-type power outlet. Do not circumvent this safety feature. Equipment grounding must comply with local and national electrical codes. Copyright © 2018, Juniper Networks, Inc. -
Page 89: Ac Power Disconnection Warning
Attention Avant de travailler sur un châssis ou à proximité d'une alimentation électrique, débrancher le cordon d'alimentation des unités en courant alternatif. Warnung Bevor Sie an einem Chassis oder in der Nähe von Netzgeräten arbeiten, ziehen Sie bei Wechselstromeinheiten das Netzkabel ab bzw. Copyright © 2018, Juniper Networks, Inc. -
Page 90: Dc Power Electrical Safety Guidelines
A DC-powered device that is equipped with a DC terminal block is intended only for installation in a restricted access location. In the United States, a restricted access area is one in accordance with Articles 110-16, 110-17, and 110-18 of the National Electrical Code ANSI/NFPA 70. Copyright © 2018, Juniper Networks, Inc. -
Page 91: Dc Power Disconnection Warning
Varoitus Varmista, että tasavirtapiirissä ei ole virtaa ennen seuraavien toimenpiteiden suorittamista. Varmistaaksesi, että virta on KATKAISTU täysin, paikanna tasavirrasta huolehtivassa kojetaulussa sijaitseva suojakytkin, käännä suojakytkin KATKAISTU-asentoon ja teippaa suojakytkimen varsi niin, että se pysyy KATKAISTU-asennossa. Copyright © 2018, Juniper Networks, Inc. - Page 92 är bruten. Kontrollera att all strömförsörjning är BRUTEN genom att slå AV det överspänningsskydd som skyddar likströmskretsen och tejpa fast överspänningsskyddets omkopplare i FRÅN-läget. Related General Electrical Safety Guidelines and Warnings Documentation Prevention of Electrostatic Discharge Damage Copyright © 2018, Juniper Networks, Inc.
-
Page 93: Dc Power Grounding Requirements And Warning
última. Varning! Vid installation av enheten måste jordledningen alltid anslutas först och kopplas bort sist. Related General Electrical Safety Guidelines and Warnings Documentation Prevention of Electrostatic Discharge Damage AC Power Electrical Safety Guidelines Copyright © 2018, Juniper Networks, Inc. -
Page 94: Dc Power Wiring Sequence Warning
Advarsel Riktig tilkoples tilkoplingssekvens er jord til jord, +RTN til +RTN, –40 V til –60 V. Riktig frakoples tilkoplingssekvens er –40 V til –60 V, +RTN til +RTN, jord til jord. Copyright © 2018, Juniper Networks, Inc. -
Page 95: Dc Power Wiring Terminations Warning
Varoitus Jos säikeellinen johdin on tarpeen, käytä hyväksyttyä johdinliitäntää, esimerkiksi suljettua silmukkaa tai kourumaista liitäntää, jossa on ylöspäin käännetyt kiinnityskorvat. Tällaisten liitäntöjen tulee olla kooltaan johtimiin sopivia ja niiden tulee puristaa yhteen sekä eristeen että johdinosan. Copyright © 2018, Juniper Networks, Inc. - Page 96 AC Power Electrical Safety Guidelines on page 72 DC Power Electrical Safety Guidelines on page 74 DC Power Disconnection Warning on page 75 DC Power Grounding Requirements and Warning on page 77 DC Power Wiring Sequence Warning on page 78 Copyright © 2018, Juniper Networks, Inc.
-
Page 97: Multiple Power Supplies Disconnection Warning
¡Atención! El equipo está diseñado para trabajar con sistemas de alimentación tipo TN. Varning! Enheten är konstruerad för användning tillsammans med elkraftssystem av TN-typ. Related General Electrical Safety Guidelines and Warnings on page 69 Documentation Prevention of Electrostatic Discharge Damage on page 71 Copyright © 2018, Juniper Networks, Inc. -
Page 98: Action To Take After An Electrical Accident
Related General Electrical Safety Guidelines and Warnings on page 69 Documentation Prevention of Electrostatic Discharge Damage on page 71 Multiple Power Supplies Disconnection Warning on page 81 TN Power Warning on page 81 Copyright © 2018, Juniper Networks, Inc. -
Page 99: Compliance Statements
Compliance Statements for Acoustic Noise for JSA on page 85 Compliance Statements for NEBS Standards for JSA7500 on page 86 Compliance Statements for EMC Requirements for JSA This topic describes the EMC requirements for the Juniper Secure Analytics (JSA) appliances: Canada on page 83... -
Page 100: European Community
United States The device has been tested and found to comply with the limits for a Class A digital device, pursuant to Part 15 of the FCC Rules. These limits are designed to provide Copyright © 2018, Juniper Networks, Inc. -
Page 101: Fcc Part 15 Statement
Agency Approvals for the JSA5800 Appliance Installation Instructions Warning on page 55 Compliance Statements for Acoustic Noise for JSA This topic applies to JSA1500, JSA3500, JSA5500, and JSA7500 in the Juniper Secure Analytics (JSA) product family. Maschinenlärminformations-Verordnung - 3. GPSGV, der höchste Schalldruckpegel beträgt 70 dB(A) oder weniger gemäss EN ISO 7779... -
Page 102: Compliance Statements For Nebs Standards For Jsa7500
Related Compliance Statements for Acoustic Noise for JSA on page 85 Documentation Compliance Statements for EMC Requirements for JSA on page 83 Agency Approvals for JSA on page 48 Copyright © 2018, Juniper Networks, Inc. -
Page 103: Chapter 17 Installing The Jsa Appliance
Hardware Installation Overview on page 89 Software Installation Overview on page 91 Connecting the JSA Appliance on page 97 Installing the JSA Appliance on page 103 Configuring Basic Settings on page 113 Configuring Secure Web Access on page 117 Copyright © 2018, Juniper Networks, Inc. - Page 104 Juniper Secure Analytics Hardware Guide Copyright © 2018, Juniper Networks, Inc.
-
Page 105: Hardware Installation Overview
Front-and-Rear-Mounting the JSA Appliance Recessed in a Rack on page 105 Mid-Mounting the JSA Appliance in a Two-Post Rack on page 109 The following rack type is supported for the Juniper Secure Analytics (JSA) appliance: 19-in. 4-post rack 19-in. 2-post rack... -
Page 106: Chapter 16 Connecting The Jsa Appliance
Documentation Front-and-Rear-Mounting the JSA Appliance Flush to a Rack on page 104 Front-and-Rear-Mounting the JSA Appliance Recessed in a Rack on page 105 Mid-Mounting the JSA Appliance in a Two-Post Rack on page 109 Copyright © 2018, Juniper Networks, Inc. -
Page 107: Software Installation Overview
Browser Support on page 92 Preparing the Network Hierarchy on page 93 JSA Components Juniper Secure Analytics (JSA) includes the following deployment components: NOTE: When deploying a Juniper Secure Analytics (JSA) appliance with image 2013.2.r3.607582, you must reimage the appliance to the common image 2013.2.r3.615469 or above. -
Page 108: Browser Support
Identifying Security Monitoring Devices and Flow Data Sources on page 114 Identifying Network Assets on page 114 Browser Support To access the Juniper Secure Analytics (JSA) interface, you must have a Web browser installed on your client system. JSA supports the following browsers: ®... -
Page 109: Preparing The Network Hierarchy
Identifying Network Assets on page 114 Preparing the Network Hierarchy Juniper Secure Analytics (JSA) uses the network hierarchy to understand your network traffic and provides you with the ability to view network activity for your entire deployment. JSA supports any network hierarchy that can be defined by a range of IP addresses. -
Page 110: Identifying Network Settings
Identifying Security Monitoring Devices and Flow Data Sources on page 94 Identifying Network Assets on page 95 Identifying Network Settings Before you install Juniper Secure Analytics (JSA), you must have the following information for each system you want to install: NOTE:... -
Page 111: Identifying Network Assets
Log Sources Users Guide. Identifying Network Assets Juniper Secure Analytics (JSA) can learn about your network and server infrastructure based on flow data. The Server Discovery function uses the JSA Asset Profile database to discover many types of servers. - Page 112 Juniper Secure Analytics Hardware Guide Copyright © 2018, Juniper Networks, Inc.
-
Page 113: Connecting The Jsa Appliance
10-32 x 1/4-in. pan-head screws and 1 mm washers. A grounding cable with an incorrectly attached lug or screws can damage the appliance (for example, by causing a short circuit). Copyright © 2018, Juniper Networks, Inc. -
Page 114: Connecting Jsa To A Dc Power Source
Installing the JSA Hardware on page 103 Chassis Console Port Pinouts on page 9 Connecting JSA to a DC Power Source Before connecting your Juniper Secure Analytics (JSA) appliance to a DC power source: Copyright © 2018, Juniper Networks, Inc. -
Page 115: Connecting The Jsa Appliance
0 V, so that the cable leads will not become active while you are connecting DC power. Connect the stripped and twisted wires to wire clamps under DC terminal screws as shown in Figure 17 on page 100. Copyright © 2018, Juniper Networks, Inc. -
Page 116: Connecting To A Management Device
Related Connecting to a Management Device on page 100 Documentation Installing the CNA Module on the JSA1500 Appliance on page 110 Installing the JSA Hardware on page 103 Grounding the JSA7500 Appliance on page 97 Chassis Console Port Pinouts on page 9... - Page 117 Chapter 16: Connecting the JSA Appliance Refer to the JSA1500 Front Panel Components table for the location of the ports in JSA1500 Front Panel. Related Grounding the JSA7500 Appliance on page 97 Documentation Connecting JSA to a DC Power Source on page 98...
- Page 118 Juniper Secure Analytics Hardware Guide Copyright © 2018, Juniper Networks, Inc.
-
Page 119: Installing The Jsa Appliance
Front-and-Rear-Mounting the JSA7500 in a 4-Post Sliding Rail Rack on page 106 Mid-Mounting the JSA Appliance in a Two-Post Rack on page 109 Installing the CNA Module on the JSA1500 Appliance on page 110 Installing the JSA Hardware Place the shipping container on a flat surface and carefully remove the hardware components. -
Page 120: Front-And-Rear-Mounting The Jsa Appliance Flush To A Rack
Related Connecting to a Management Device on page 100 Documentation Installing the CNA Module on the JSA1500 Appliance on page 110 Grounding the JSA7500 Appliance on page 97 Connecting JSA to a DC Power Source on page 98 Chassis Console Port Pinouts on page 9... -
Page 121: Front-And-Rear-Mounting The Jsa Appliance Recessed In A Rack
Remove the rear screws on each side of the system’s front rails and the two small screws toward the front of the chassis. Loosen the side-rail screws of the chassis and slide the front rails of the system backward, as far as they will move. Copyright © 2018, Juniper Networks, Inc. -
Page 122: Front-And-Rear-Mounting The Jsa7500 In A 4-Post Sliding Rail Rack
NOTE: The front-to-back rail spacing must be at least 48.3 cm (19-in.) from the outside face of the front rail to the outside face of the back rail. Copyright © 2018, Juniper Networks, Inc. -
Page 123: Figure 22: Securing Mounting Brackets
Attach the glide to the sides of the appliance as shown in Figure 22 on page 107. Attach the slide sets to the desired position of front and rear of the rack cabinet as shown in Figure 24 on page 108. Copyright © 2018, Juniper Networks, Inc. -
Page 124: Figure 24: Attaching The Slide Sets
108. Figure 25: Sliding the Appliance into the Rack JS A7 Secure the front-mount rail brackets to your equipment rack with two rack mount screws each as shown in Figure 26 on page 109. Copyright © 2018, Juniper Networks, Inc. -
Page 125: Mid-Mounting The Jsa Appliance In A Two-Post Rack
Attach the chassis to the equipment rack and insert the other two mid-mount brackets on either side of the system to secure the chassis to the backs of the post. See Figure 27 on page 110. Copyright © 2018, Juniper Networks, Inc. -
Page 126: Installing The Cna Module On The Jsa1500 Appliance
Front-and-Rear-Mounting the JSA Appliance Recessed in a Rack on page 105 Installing the CNA Module on the JSA1500 Appliance To install the Converged Network Adapter (CNA) module on a JSA1500: Power down the JSA1500 unit. Unscrew the two thumbscrews on the right-most blank IOC modules and remove the dummy tray. -
Page 127: Figure 28: Jsa1500 With The Cna Card Inserted
10— Power LED Power on the JSA1500 unit and watch it boot on the serial console. Verify that the link and activity LED on the new 2-port 10G CNA module light up when you connect the ports to your Ethernet switch with a duplex multi mode LC/LC MMF fiber optic cable. - Page 128 Juniper Secure Analytics Hardware Guide Copyright © 2018, Juniper Networks, Inc.
-
Page 129: Configuring Basic Settings
Identifying Security Monitoring Devices and Flow Data Sources on page 114 Identifying Network Assets on page 114 Identifying Network Settings Before you install Juniper Secure Analytics (JSA), you must have the following information for each system you want to install: NOTE:... -
Page 130: Identifying Security Monitoring Devices And Flow Data Sources
Identifying Network Assets on page 114 Identifying Security Monitoring Devices and Flow Data Sources Juniper Secure Analytics (JSA) can collect and correlate events received from external sources such as security equipment (for example, firewalls, VPNs, or IDSs) and host or application security logs, such as Windows logs. - Page 131 JSA Components on page 91 Documentation Browser Support on page 92 Preparing the Network Hierarchy on page 93 Identifying Network Settings on page 113 Identifying Security Monitoring Devices and Flow Data Sources on page 114 Copyright © 2018, Juniper Networks, Inc.
- Page 132 Juniper Secure Analytics Hardware Guide Copyright © 2018, Juniper Networks, Inc.
-
Page 133: Configuring Secure Web Access
Accessing the JSA Interface on page 120 Configuring the Basic Settings NOTE: When deploying a Juniper Secure Analytics (JSA) appliance with image 2013.2.r3.607582, you must reimage the appliance to the common image 2013.2.r3.615469 or above. For more information, see Installing JSA Using a Bootable USB Flash-Drive Technical Note. - Page 134 Select your time zone region, and select Next . The options appearing in this window are regions associated with the continent or area previously selected. Select one of the following Internet protocols: IPv6—Internet Protocol version 6 Copyright © 2018, Juniper Networks, Inc.
- Page 135 A series of messages appears as JSA continues with the installation. This is typically a three-to-five-minute process. When the JSA installation process is complete, the message window appears. Press Enter and select to complete the installation. Copyright © 2018, Juniper Networks, Inc.
-
Page 136: Accessing The Jsa Interface
<root password> Click Login To JSA. The JSA interface appears. You are now ready to start tuning JSA and high availability (HA) settings. For more information, see the Juniper Secure Analytics Administration Guide. NOTE: You will need a permanent license for the JSA appliance to upgrade to a higher version. - Page 137 PART 6 Maintenance Maintaining the Hardware on page 123 Copyright © 2018, Juniper Networks, Inc.
- Page 138 Juniper Secure Analytics Hardware Guide Copyright © 2018, Juniper Networks, Inc.
-
Page 139: Maintaining The Hardware
Replacing DC Power Supply Cables on the JSA Appliance on page 129 Field-Replaceable Units on the JSA Appliance Field-replaceable units (FRUs) are Juniper Secure Analytics (JSA) hardware components that can be replaced at the customer site. Hot-swappable FRUs are the components that you can remove and replace without powering off the device or disrupting the functions of the device. -
Page 140: Replacing The Fan On The Jsa Appliance
Juniper Secure Analytics Hardware Guide Replacing the Fan on the JSA Appliance The JSA1500 and JSA3500 appliances have two cooling fans. The JSA5500 has three and the JSA7500 has eight cooling fans. The fans are hot-swappable. NOTE: JSA7500 has internal hot-swappable cooling fans. -
Page 141: Chapter 20 Maintaining The Hardware
Replace the fan and then close the lever as shown in Figure 31 on page 125. Figure 31: Replacing the Fan Install the fan in the device as shown in Figure 31 on page 125. Copyright © 2018, Juniper Networks, Inc. -
Page 142: Replacing The Air Filter On The Jsa7500 Appliance
Tighten the captive screws on the air filter cover. Related JSA7500 Front Panel on page 31 Documentation Field-Replaceable Units on the JSA Appliance on page 123 Replacing the Fan on the JSA Appliance on page 124 Copyright © 2018, Juniper Networks, Inc. -
Page 143: Replacing An Ac Power Supply On The Jsa Appliance
Attach an ESD grounding strap to your bare wrist and connect the strap to one of the ESD points on the chassis. Unplug the power cord from the appliance inlet on the power supply. Copyright © 2018, Juniper Networks, Inc. -
Page 144: Replacing A Dc Power Supply On The Jsa Appliance
Remove the clear plastic cover protecting the terminal studs on the faceplate. Remove the screws from the terminals. Use a number-2 Phillips screwdriver to loosen and remove the screws. Remove the cable lugs from the terminals. Carefully move the power cables out of the way. Copyright © 2018, Juniper Networks, Inc. -
Page 145: Replacing Dc Power Supply Cables On The Jsa Appliance
Attach the power cable to the DC power source. For more information, see “Connecting JSA to a DC Power Source” on page Copyright © 2018, Juniper Networks, Inc. - Page 146 Replacing AC Power Supply Cables on the JSA Appliance on page 127 Replacing a DC Power Supply on the JSA Appliance on page 128 Connecting JSA to a DC Power Source on page 98 Copyright © 2018, Juniper Networks, Inc.
-
Page 147: Troubleshooting
PART 7 Troubleshooting Monitoring Hardware Components on page 133 Juniper Networks Technical Assistance Center on page 137 Copyright © 2018, Juniper Networks, Inc. - Page 148 Juniper Secure Analytics Hardware Guide Copyright © 2018, Juniper Networks, Inc.
-
Page 149: Monitoring Hardware Components
RAID Array The JSA appliance ships with hot-swappable hard disks to offer component redundancy. The JSA1500 appliance has a RAID1 configuration. The second (redundant) disk maintains a copy of the software image and configuration information on the working hard disk. If the working hard disk fails, the redundant hard disk immediately assumes responsibility for JSA operations. -
Page 150: Power Supply
JSA7500 Back Panel on page 32 Power Supply The JSA1500 and JSA3500 appliances ship with single AC power supply module and support the second AC power supply for redundancy. If one power supply fails, the optional second power supply assumes responsibility for the entire power load. The JSA5500 appliance ships with redundant AC power supplies. -
Page 151: Cooling Fans
JSA7500 Front Panel on page 31 JSA7500 Back Panel on page 32 Cooling Fans The JSA1500 and JSA3500 appliances have two cooling fans. The JSA5500 has three and the JSA7500 has eight cooling fans. The fans are hot-swappable. NOTE: JSA7500 has internal hot-swappable cooling fans. -
Page 152: Maintaining The Jsa7500 Air Filter
Juniper Secure Analytics Hardware Guide # chkconfig lm_sensors on For JSA1500 and JSA3500 fan status, use # sensors For JSA5500 and JSA7500, use the following commands: To enable IPMI and boot, use # chkconfig ipmi on To start IPMI service, use... -
Page 153: Juniper Networks Technical Assistance Center
CHAPTER 22 Juniper Networks Technical Assistance Center Contacting Juniper Networks Technical Assistance Center on page 137 Contacting Juniper Networks Technical Assistance Center If you need assistance while troubleshooting a JSA appliance, open a support case using the Case Manager link at , or call 1-888-314-JTAC (within https://www.juniper.net/support/... - Page 154 Juniper Secure Analytics Hardware Guide Copyright © 2018, Juniper Networks, Inc.
Need help?
Do you have a question about the JSA1500 and is the answer not in the manual?
Questions and answers