smith&nephew RENASYS GO User Manual
Negative pressure wound therapy
Hide thumbs
Also See for RENASYS GO:
- User manual (40 pages) ,
- User manual (28 pages) ,
- Quick start manual

Subscribe to Our Youtube Channel
Related Manuals for smith&nephew RENASYS GO


Summary of Contents for smith&nephew RENASYS GO
- Page 1 *smith&nephew RENASYS™ GO Negative Pressure Wound Therapy *smith&nephew RENASYS™ GO Negative Pressure Wound Therapy 300ml 200ml 100ml 50ml Home Healthcare User Manual only REF 66021496...
- Page 2 Healthcare provider's name: Healthcare provider's telephone number: Healthcare provider's mobile number:...
-
Page 3: Table Of Contents
Proper use/orientation Carry bag Power inlet and power supply 8. Cleaning, maintenance and expected life of device 38 4. RENASYS GO device operation 9. Technical specifications How do I know if the 10. Caution statements device is working? Battery operation 11. -
Page 4: Introduction
This system is prescribed to you by a trained and licensed healthcare provider. This home healthcare user manual will help you operate and monitor your device. The RENASYS GO device should only be used with compatible Smith & Nephew RENASYS products. - Page 5 What is RENASYS™ GO Negative Pressure Wound Therapy (NPWT)? RENASYS GO is a therapy system that is applied to your wound and may promote wound healing by removing fluid, including wound exudates and infectious materials. This form of treatment is being widely used in both hospitals and the home.
- Page 6 Will it be painful? The first time therapy is turned on, you may feel a slight pulling sensation, but it should not be painful. If you experience any pain, speak to your healthcare provider. They may recommend changing the settings on your device or prescribe pain relief medication.
-
Page 7: When The Device Should Or Should Not Be Used
• Partial-thickness burns • Flaps and grafts When the device should not be used (Contraindications) RENASYS GO should not be used on the following: • Untreated osteomyelitis • Exposed arteries, veins, organs or nerves • Necrotic tissue with eschar present •... -
Page 8: Warnings
Warnings 1. This product should only be used as prescribed by your healthcare provider. Do not use it on anyone other than the prescribed patient. 2. If you see blood within the canister, turn off the device and contact your healthcare provider immediately. 3. -
Page 9: Precautions
Precautions 1. Do not change any of the settings on the device. The settings are prescribed by your healthcare provider. 300ml 200ml 100ml 50ml 2. To provide proper delivery of your prescribed therapy, the tubing that connects the dressing to the canister should not be twisted, tangled or kinked. - Page 10 3. When showering or bathing, turn off your device, then disconnect the tubing and insert attached caps into tubing connectors. The device is electronic and cannot be exposed to water. If water or other liquids get inside the device, turn off device and contact your healthcare provider. *smith&nephew RENASYS™...
- Page 11 Contact your healthcare provider for a replacement power supply and cord. 7. The RENASYS GO device is only to be used with Smith & Nephew authorized components. Use of any other products have not been proven safe and effective with the RENASYS GO device.
-
Page 12: Renasys Go System Features
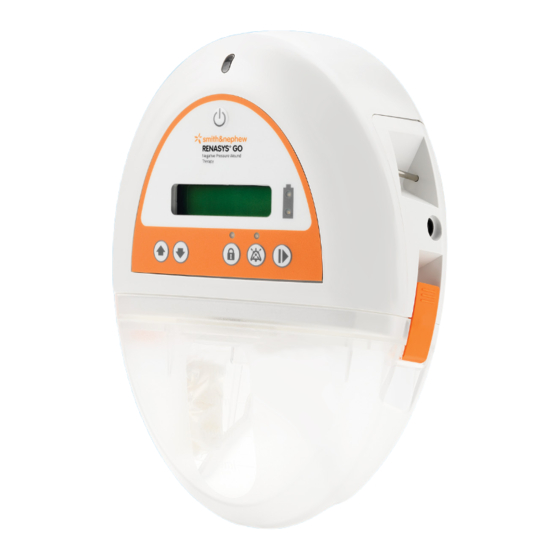
3. RENASYS™ GO system features Device overview Status/alarm indicator Power button Battery status Display screen indicator Up and down Start/pause therapy and selectors select O-ring Inlet port Keypad lock Audio pause 300ml 200ml 100ml Note: When the device is turned on, the Status/alarm indicator will 50ml illuminate solid green to indicate therapy is being provided. -
Page 13: Canisters
Canisters – 300ml and 750ml (300ml canister is shown) Canister clips 300ml 200ml Viewing 100ml window 50ml End caps Orange quick click connector Note: Change or replace canisters that have been dropped or mishandled even if no visible signs of damage are present to ensure correct opertion of software alarms for leak and blockage. -
Page 14: Proper Use/Orientation
Proper use/correct orientation Incorrect orientation RENASYS™ GO device may also be used in a horizontal orientation, with device facing upward. However, to maximize canister volume and optimize canister over- capacity alarm, upright device orientation is recommended. -
Page 15: Power Inlet And Power Supply
Power inlet and power supply Power inlet DC cord Power supply Power cord inlet... -
Page 16: Renasys Go Device Operation
► Turn ON the RENASYS GO device by pressing and holding the Power button for 2 seconds. Turning ON the device will start therapy. Turn OFF the RENASYS GO device by pressing and holding the Power... -
Page 17: How Do I Know If The Device Is Working
How do I know if the RENASYS™ GO device is working? While RENASYS GO is turned on: 1. The Status/alarm indicator will illuminate solid green. 2. The top line of the display screen will read either CONTINUOUS or INTERMITTENT based on your prescribed therapy. The second line on the display screen will indicate the pressure setting. - Page 18 Note: Even if fluid is not actively moving though the system tubing, negative pressure is still being delivered. It is important to monitor activity of the device while you are using therapy. IMPORTANT: Items to monitor include: • The dressing. It should have a raisin-like appearance and be firm to the touch.
-
Page 19: Battery Operation
The device will operate while the battery charges. RENASYS GO contains systems intended to prevent charging of the battery at high temperatures. When charging at high ambient temperatures (approximately 86°F/30°C), the device may suspend charging, therefore... -
Page 20: System Setup
5. System setup There are times when you will need to disconnect from your device, such as when you shower or wash, or when your canister needs to be replaced. Your device is electrical and cannot come into contact with water. To avoid exposure, turn off the device and disconnect the dressing tubing from the canister tubing before showering or washing. -
Page 21: Disconnecting Your Dressing
Disconnecting your dressing 1. Turn off the device. 2. Hold orange quick click connectors above the wound to allow gravity to help ensure fluid does not leak from the tubing. 3. Disconnect the canister tubing from the dressing tubing by applying pressure to the connectors as shown: 4. -
Page 22: Attaching A New Canister
Attaching a new canister 1. Turn off the device. 2. Disconnect the dressing from the canister tubing as described in the Disconnecting Your Dressing section. 3. Open the orange canister clips on either side of the canister and gently pull the canister away from the device. 4. -
Page 23: Reconnecting Your Dressing
11. To confirm correct system setup, turn device on and insert attached cap of canister tubing into orange quick click connector. Activation of complete blockage alarm confirms correct system setup. If an alarm does not activate within 5 minutes, check canister installation and contact your healthcare provider. -
Page 24: Alarms And Troubleshooting
6. Alarms and troubleshooting A description of the device alarms and indicators is provided below. Use this section as a reference in the case your device alarms. If the alarm does not stop, contact your healthcare provider to inform them of the alarm condition. - Page 25 Battery full Alarm/indicator ► The battery is fully charged and has up to 20 hours Device Status therapy time remaining. Indicator light/ Battery status top indicator: Solid green audio Impact to Device is operating normally. therapy Steps to remedy No action required Full charge and the Battery Full display may not be possible when charging at high ambient temperatures Precaution...
- Page 26 Alarm/indicator Device is not plugged into an electrical outlet and battery Device Status has up to 6 hours therapy time remaining. Battery status top indicator: Flash green Indicator light/ audio Battery status bottom indicator: Solid yellow Impact to Device is operating normally. therapy Steps to remedy No action required Alarm/indicator...
- Page 27 Alarm/indicator Device is not plugged into an electrical outlet and battery Device Status is very low. Status/alarm indicator: Solid yellow Battery status bottom indicator: Solid yellow Indicator light/ audio The audible alarm will sound. The audible alarm cannot be paused. Impact to Device will continue to operate normally for 1 hour and therapy...
- Page 28 Alarm/indicator ► Device is plugged into an electrical outlet and battery is Device Status charging. Indicator light/ Battery status top indicator: Flash green audio Impact to Device is operating normally. therapy Steps to remedy No action required. Full charge and the Battery Full display may not be possible when charging at high ambient temperatures Precaution (approximately 86°F/30°C).
- Page 29 Over vacuum alarm Alarm/indicator Device vacuum exceeds a pressure of 255mmHg and Device Status device has stopped delivering therapy. Status/alarm indicator: Solid yellow Indicator light/ The audible alarm will sound. audio The audible alarm cannot be paused. Impact to Device will stop delivering therapy. therapy Steps to remedy Contact your healthcare provider.
- Page 30 High flow/leak alarm Alarm/indicator Device Status Device detects a significant air leak. Status/alarm indicator: Solid yellow The audible alarm will sound. Indicator light/ The audible alarm can be paused by pressing the Audio audio pause button. When pressed, the light above the button will illuminate solid yellow.
- Page 31 Low vacuum alarm Alarm/indicator Device Status Device vacuum level is lower than the prescribed therapy. Status/alarm indicator: Solid yellow The audible alarm will sound. Indicator light/ The audible alarm can be paused by pressing the audio audio pause button. When pressed the light above the button will illuminate solid yellow.
- Page 32 High vacuum alarm Alarm/indicator Device vacuum level is higher than the prescribed Device Status therapy and device has stopped delivering therapy. Status/alarm indicator: Solid yellow Indicator light/ The audible alarm will sound. audio The audible alarm cannot be paused. Impact to Device will stop delivering therapy.
- Page 33 Complete blockage/canister over-capacity alarm Alarm/indicator The canister needs replacement or there is a complete Device Status blockage in the system. Status/alarm indicator: Solid yellow The audible alarm will sound. Indicator light/ The audible alarm can be paused by pressing the audio audio pause button.
- Page 34 Keypad lock on Alarm/indicator ► Device user interface has been placed in home Device Status healthcare mode. Indicator light/ The light above the keypad lock button will illuminate solid audio blue. Impact to Device is operating normally. therapy Device has been locked and can only be unlocked by Steps to remedy your healthcare provider.
- Page 35 Device failed alarm Alarm/indicator Device Status Device will not operate. Indicator light/ Status/alarm indicator: Solid yellow audio Impact to Device is not delivering therapy. therapy Steps to remedy Contact your healthcare provider.
-
Page 36: Accessories
7. Accessories Carry strap Your device may be used with a carry strap. To attach the carry strap to the device: 1. Feed the end of the open strap behind the metal bar on the side of the device. 2. Pull the strap through and feed the end behind the clip. 3. -
Page 37: Carry Bag
Carry bag (available for 300ml canister) Your device may be used with a carry bag. To place the device in the bag: 1. Open the zipper on both sides of the bag and place on a flat surface with viewing flaps on top. 2. -
Page 38: Cleaning, Maintenance And Expected Life Of Device
8. Cleaning, maintenance and expected life Cleaning As you use the RENASYS™ GO device, your healthcare provider should clean it on a regular basis to ensure good hygiene. The device may be wiped clean with a diluted bleach solution [5mL (1tsp) bleach to 1L (.26gal) water], wiped again with a damp cloth using clean water, and dried with a clean cloth to ensure the device does not remain wet. -
Page 39: Caution Statements
10. Caution statements In order to ensure safe and proper performance, the following conditions must be met: • All assembly, operation, adjustment, maintenance and/or repair should be carried out by qualified personnel. • No modification of this equipment is allowed. •... -
Page 40: Contact Information
United States 24 hours Tel: 1 800 876 1261 Language: English For more information regarding RENASYS GO, or for additional customer assistance, please refer to the following Smith & Nephew contact information: Smith & Nephew Customer Care contact: Smith & Nephew, Inc. - Page 42 Smith & Nephew Medical Limited 101 Hessle Road, Hull HU3 2BN England www.smith-nephew.com 10967 www.globalwoundacademy.com 01/2017 66021815 only ©2017 Smith & Nephew ™Trademark of Smith & Nephew (01)00040565127392(240)10967 Certain marks Reg. US Pat. & TM Off.
Need help?
Do you have a question about the RENASYS GO and is the answer not in the manual?
Questions and answers