NUTRIBULLET Juicer User Manual
Hide thumbs
Also See for Juicer:
- User manual & recipe book (88 pages) ,
- User manual (388 pages) ,
- User manual
Table of Contents
Advertisement
Advertisement
Table of Contents

Subscribe to Our Youtube Channel
Related Manuals for NUTRIBULLET Juicer


Summary of Contents for NUTRIBULLET Juicer
- Page 1 User guide.
-
Page 3: Important Safeguards
Important safeguards. Warning! To avoid the risk of serious injury, carefully read all instructions before operating your NutriBullet Juicer™. When using any electrical appliance, basic safety precautions should always be observed, including the following important information. Save these instructions! FOR HOUSEHOLD USE ONLY... - Page 4 • Do not let the power cord • Do not use the juicer if the hang over the edge of a table rotating sieve is damaged. or counter-top. • Do not use the juicer without • Do not let the power cord...
- Page 5 • If extreme vibration occurs, further information. discontinue use and call Customer Service. Any maintenance other • If the juicer leaks or there than cleaning should be is a spill under or around performed by an authorized the juicer, or onto the juicer electrician.
-
Page 7: Table Of Contents
Contents. Important safeguards What’s included Assembly guide Assembly & use Usage instructions Control dial Juicing tips Disassembly Care instructions Replacement parts How to store NutriBullet Juicer™ one-year limited warranty Warranty registration Thank you for purchasing the NutriBullet Juicer™. -
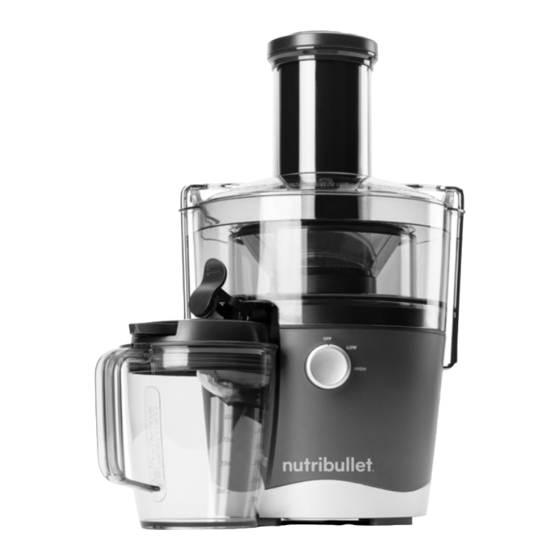
Page 8: What's Included
What’s included. FOOD PUSHER 800 WATT MOTOR PULP BASIN COVER BASE WITH WITH 3" FEED CHUTE LOCKING HANDLE 1.5L PULP BASIN WITH STAINLESS STEEL SIEVE 27 OZ JUICE PITCHER NO-DRIP SPOUT JUICE PITCHER LID CLEANING BRUSH WITH FROTH SEPARATOR... -
Page 9: Assembly Guide
Assembly guide. food pusher 3” feed chute basin cover stainless steel sieve (inside basin) 1.5L pulp basin locking handle no-drip spout juice pitcher lid dual-speed control dial motor base 27oz juice pitcher... - Page 10 Assembly. Motor Base Place the Pulp Basin Place the on top a dry, level counter top. of the Motor Base. Align the Ensure the dial is set to the Pulp Basin with the Motor "OFF" position and the unit Base so that the spout is is unplugged.
- Page 11 NOTE: Locking Handle if the is not securely in place, the juicer will not power on. Juice Juice Pitcher Slightly angle the Place the Pitcher and place it under on top of the Juice the juice spout.
-
Page 12: Usage Instructions
Usage instructions. Gather all of your desired After the juicer is fully ingredients and wash them. assembled, plug the power Prepare the ingredients cord into an outlet. Use to be juiced by cutting, Dual-Speed Control skinning, or removing the Dial to select a speed to rind, stems, or stone seeds. - Page 13 While the motor is running, Juice will begin to flow out begin gently guiding your of the spout and into the Juice Pitcher, while the ingredients into the feed Food Pusher. chute using the pulp will be separated and Pulp Basin.
- Page 14 Juice Pitcher onto the unit or onto the if desired. surface below the juicer. NOTE: To do this, you’ll first need Juice Pitcher to tip the forward...
-
Page 15: Control Dial
Control dial. DUAL-SPEED CONTROL DIAL & JUICING SETTINGS OFF: Power is OFF, the juicer is not running. HIGH LOW: Best for juicing softer fruits HIGH and vegetables. HIGH: Best for harder produce like HIGH carrots and beets. -
Page 16: Juicing Tips
Juicing tips. JUICING SPEED SELECTION GUIDE INGREDIENTS SPEEDS SEASONS Apple High All Year Beets High Summer / Fall / Winter Blueberry High Summer Broccoli High Fall / Spring Brussels Sprouts High Fall / Winter Cabbage Fall / Winter / Spring Carrots High All Year... - Page 17 VITAMINS / NUTRIENTS source of quercetin excellent source of folate good source of vitamin C high in vitamin C, high in folate, good source of potassium high in vitamin C, good source of folate high in vitamin C excellent source of vitamin A, good source of vitamin C high in vitamin C, good source of folate good source of vitamin C, good source of vitamin A good source of vitamin C...
- Page 18 • Properly clean produce (rinse the appliance. with lukewarm water, produce wash, or water and apple • Always start the juicer before cider vinegar). adding food to the feed chute. The juicer must be • Peel or remove skin as running when items enter it.
- Page 19 48 OVERHEATING hours of juicing. • If the motor overheats, the juicer will turn off. • If the juicer stops working, unplug it and allow it to cool down for at least fifteen minutes before attempting to use again.
-
Page 20: Disassembly
Disassembly. Ensure the unit is Remove the pitcher from powered down, turned under the spout. To prevent “OFF,” and unplugged. No-Drip Spout drips use the cover to close the juice spout. Pulp Basin Locking Handle Remove the Unlock the Basin Cover from the Motor Base by from the pulling the handle backward... - Page 21 Food Pusher Remove the Lift the Basin Cover vertically lifting it out of the feed chute. off of the Pulp Basin and remove any pulp from the inside of the cover. You may use the flat end of the Cleaning Brush to scrape pulp off of the cover.
-
Page 22: Care Instructions
Sieve properly clean the TIP: Do not use the Sterilize cycle on every time you juice. Left your dishwasher to clean your juicer over traces of fruits and as it may cause parts to deform. vegetables can cause Motor Base... -
Page 23: Nutribullet Juicer
If a defect exists and subject and submit the customer contact to this limited warranty, at its form and we will be glad to option NutriBullet will (1) repair help you. When you contact our the product at no charge, Customer Service Department... - Page 24 NutriBullet is not liable for any NutriBullet products distributed ® damage to products not covered by or for NutriBullet that can be by this warranty (e.g., cups, identified by the “NutriBullet” book, User Guide). trademark, trade name, logo This limited warranty does not and bar code.
- Page 25 AND CONDITIONS, WHETHER LIMITED WARRANTY. ORAL OR WRITTEN, EXPRESS OR IMPLIED. NUTRIBULLET Some states and provinces SPECIFICALLY DISCLAIMS ANY do not allow the exclusion AND ALL IMPLIED WARRANTIES, or limitation of incidental or INCLUDING, WITHOUT consequential damages or LIMITATION, WARRANTIES...
-
Page 26: Warranty Registration
Please visit warranty-registration or call 1 (800) 523-5993 to register your new NutriBullet Juicer™. You will be asked to enter the Serial Number* of your product, along with the purchase date and place of purchase. The registration will enable... - Page 28 1 (800) 523-5993 | nutribullet.com NUTRIBULLET is the registered trademark of CAPBRAN HOLDINGS, LLC ® Copyright © 2020 CAPBRAN HOLDINGS, LLC. Distributed by CAPITAL BRANDS DISTRIBUTION, LLC. LOS ANGELES, CA 90025 USA All Rights Reserved. MADE IN CHINA Illustrations may differ from the actual product. We are constantly striving to improve our products, therefore the specifications contained herein are subject to change without notice.
Need help?
Do you have a question about the Juicer and is the answer not in the manual?
Questions and answers
How to replace the bottom rubber pad on Nutribullet juicer Model NBJ-100A