Abbott ID NOW NAT-024 Instrument User Manual
Hide thumbs
Also See for ID NOW NAT-024:
- Quick start manual (12 pages) ,
- Quick start manual (13 pages)
Table of Contents
Advertisement
Quick Links
Advertisement
Table of Contents

Related Manuals for Abbott ID NOW NAT-024


Summary of Contents for Abbott ID NOW NAT-024
- Page 1 ID NOW ™ INSTRUMENT USER MANUAL NAT-024...
- Page 3 ID NOW Instrument User Manual ™ ID NOW Instrument User Manual...
- Page 4 INITIAL ADMIN SETUP USB with Power on & Software Update loading Initial Admin Software User Clock Admin password Update Login reset Setup reset Home ID NOW Instrument User Manual...
- Page 5 HOME SCREEN MENUS Home 30/Jan/2018 User ID 10:12am Run QC Review Test Test Memory Preferences Setup Log Out Home Review Preferences Setup Logout Test QC Test Memory Patient Test Language Login User Results QC Test User Sound Users Results Name Search Assay Import...
-
Page 7: Table Of Contents
CONTENTS Warnings and Safe Use ............... 4 Introduction ................6 Intended Use ....................6 Product Description ..................6 Instrument Specifications ................7 1.3.1 Instrument ....................7 1.3.2 12V Power Supply ..................8 Unpacking ....................... 8 Instrument Calibration .................. 8 Maintenance & Cleaning ................9 Components ....................9 ID NOW Instrument at a Glance........10 ™... - Page 8 4.11 Connectivity Setup Screen (Admin Access Only) ........25 4.11.1 IP Address (Admin Access Only) ............25 4.11.2 Port Number (Admin Access Only) ........... 25 4.11.3 Clear Settings (Admin Access Only) ..........25 4.12 Status Screen ....................26 4.13 Auto-Sending Screen (Admin Access Only) ..........26 4.14 Clear Sent History (Admin Access Only) ..........
- Page 9 10 Software Updates ...............45 11 Accessories ................. 47 11.1 Universal Printer ..................47 11.2 Barcode Scanner ..................47 11.3 ID NOW USB Drive ................. 47 ™ 12 Errors and Warnings ............48 12.1 Errors ......................48 12.1.1 Power On & Loading Error ..............48 12.1.2 Initial Admin Setup Error ..............
-
Page 10: Warnings And Safe Use
WARNINGS and SAFE USE The following warnings are to be used as an aide in risk mitigation. Caution: Use only the power supply that is provided with the instrument. Use the appropriate power supply for the region. The correct power supply is required to maintain the safety and electromagnetic compatibility of the system. - Page 11 The mains socket outlet intended for use with ID NOW power supply should be located near the instrument and be readily accessible. Abbott recommends that cables are disconnected when not in use for an extended period.
-
Page 12: Introduction
INTRODUCTION Intended Use The ID NOW Instrument is a fluorescence-based instrument for the processing ™ and analysis of ID NOW tests. This document describes the setup, configuration and operation of the ID NOW Instrument, which utilizes isothermal nucleic acid technology for the qualitative detection of a range of infectious diseases. -
Page 13: Instrument Specifications
1.3 Instrument Specifications 1.3.1 Instrument Color Touch Screen 3.5” 10/100 Mbps Ethernet Port for Data Transfer Communications 3 x USB Ports for data export, barcode reader and printer 999 patient test results 99 QC test results Data storage Memory allows search and retrieval Archive or export via USB 12V DC from external AC/DC supplied plug pack... -
Page 14: Power Supply
Place instrument in a location where the air vents located in the back of the instrument will not be blocked. Avoid placing the instrument in direct sunlight. Inspect for any obvious signs of damage. Report any damage immediately to Abbott. Allow the instrument to equilibrate to room temperature for at least 30 minutes. -
Page 15: Maintenance & Cleaning
Do not spray or pour solution directly onto instrument when cleaning. Ensure no excess liquid is used when cleaning as it may damage the instrument. Abbott recommends that the exterior instrument surfaces and the surfaces visible under the open lid be cleaned daily. Clean surrounding bench area. Clean instrument and surrounding areas immediately after possible patient sample contamination. -
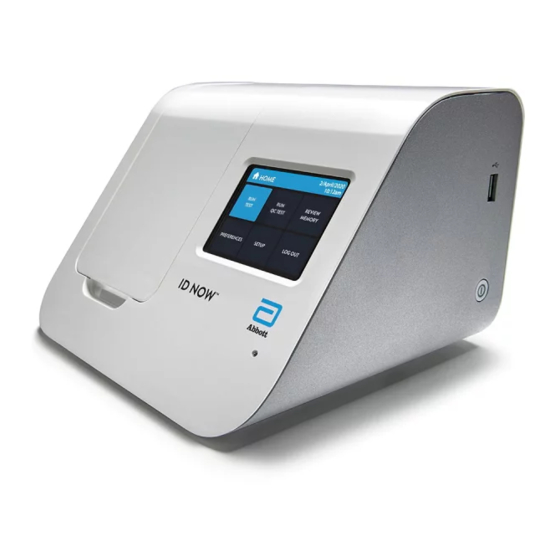
Page 16: Id Now
2 ID NOW INSTRUMENT at a ™ GLANCE ID NOW Instrument, Front View ™ LCD Color Display Screen Test Base Holder Sample Receiver Holder Audio Speaker LED Status Indicator 10 ID NOW Instrument User Manual... - Page 17 ID NOW Instrument, Back View ™ USB Connection Carrying Handle Power Connection Power Button Ethernet Connection USB Connection x 2 ID NOW Instrument User Manual 11...
-
Page 18: Getting Started - Setup
3 GETTING STARTED - SETUP For unpacking and calibration, see Sections 1.4 and 1.5. 3.1 Initial Setup Connect the 12V power supply to the instrument. Plug the appropriate, country specific adapter into an appropriate electrical outlet. Power Up: Once the power is connected, press and hold the Power Button on the right side of the instrument to power up and start the instrument. -
Page 19: Home Screen
3.4 Home Screen Home Screen: Displays buttons for access to: • Run Test Home 30/Jan/2018 User ID 10:12am • Run QC Test Run QC Review • Review Memory Test Test Memory • Preferences • Setup (Admin Access Only) Preferences Setup Log Out •... -
Page 20: Admin Setup
'Password Not Recognized' . Admin can choose 'Reset' ####-####-#### and a Recovery Key will be automatically generated by the instrument. Cancel Contact Abbott Technical Support with the Enter Reset Code [####-####-####] Recovery Key. A Reset Code will be provided. Use Keyboard to enter reset code and press to advance to Enter a New Password. - Page 21 Setting the Date Set the correct date using the up and down arrow keys Date and the touch screen to move between day, month and year. / NOV / 2013 This screen will be displayed automatically following creation of Admin Password. Press OK to advance.
- Page 22 QC test before patient testing is allowed. See Sections 6 and 7 for details. If not ready to continue set up or run tests, Abbott recommends that the Admin logs out by selecting Log Out.
-
Page 23: Setup Menu
4 SETUP MENU Home>Setup The Setup screen allows the Admin to configure the Setup instrument. Use the up and down arrows to scroll Login ID & Password Required through menus. Users Settings are saved even when power is off. Assay Preferences Settings include: Patient Details •... -
Page 24: Users
4.2 Users Home>Setup>Users Users Users New User ADMIN CINDY Import Users MARSHA Export Users The User Menu allows the Admin to add, delete and edit the list of instrument users. New User: Home>Setup>Users>New User (Admin Access Only) Enter the User ID (for example, the User’s name), Enter User ID or Scan or scan User ID using an electronic barcode, then press . - Page 25 Enter existing password and press . Enter Existing Password Then enter new password and press . Passwords are case-sensitive and must be alphanumeric. The password cannot contain spaces. Note: If the Admin user has been selected, neither the Enter New Password password nor the delete button will be displayed on this screen.
-
Page 26: Assay Preferences (Admin Access Only)
Export Users: Home>Setup>Users>Export Users Export all configured users to a USB drive Export Users connected to the instrument. Exporting users to USB device ... This user list can then be imported to another ID NOW Instrument, to the same instrument following a reset to factory settings or after software upgrades. -
Page 27: Sample Type Selection (Admin Access Only)
Home>Setup>Assay Preferences When the Assay Enabled indicator is set to on Strep A Preferences (default mode) the assay is selected and will appear Assay Enabled on the Assay menu choice. In this example, Strep A is enabled. Sample Type Swab 4.3.1 Sample Type Selection (Admin Access Only) Home>Setup>Assay Preferences>... -
Page 28: Patient Details (Admin Access Only)
4.4 Patient Details (Admin Access Only) Home>Setup>Patient Details Use the Patient Details menu option to enable Patient Details a confirmation step in the Read Test workflow Positive Patient ID to verify the identity of the patient. This Positive Patient ID feature is only enabled when Always Prompt connectivity is set to POCT-1A. -
Page 29: Auto Logout (Admin Access Only)
4.7 Auto Logout (Admin Access Only) Home>Setup>Auto-Logout The Auto-Logout Menu allows the Admin to select Auto-Logout when the instrument automatically logs a User out after 5 minute and up to 60 minutes of inactivity. Use the up and down arrow keys to change Auto- Logout time in 5 minute intervals. -
Page 30: Remote Mode (Admin Access Only)
4.9 Remote Mode (Admin Access Only) Home>Setup>Remote Mode Remote Mode is currently not available for use by Remote Mode end users. Remote Mode Enabled Client connections: 0 IP Address: 172.16.0.161 Cancel 4.10 Connectivity (Admin Access Only) Records may be transmitted to a Laboratory Information System (LIS) or Point of Care Data Management System (POC DMS). -
Page 31: Connectivity Setup Screen (Admin Access Only)
4.11 Connectivity Setup Screen (Admin Access Only) Home>Setup>Connectivity>Setup The Admin can set the IP Address and Port Setup corresponding to the Laboratory Information IP Address 100.100.100.100 System or Point of Care Data Management Port Number 51122 System. Test Connection Success Test Connection can be used to determine if the Clear Settings instrument can reach a compatible server at the... -
Page 32: Status Screen
4.12 Status Screen Home>Setup>Connectivity Status Status shows how many total records are Status in memory and how many have not been sent Unsent Results: to the connectivity server. This number includes Total Results: both QC test results and patient test results. Test Connection Success Test Connection tests connectivity to the server, as... - Page 33 Select each assay from the QC Lockout menu to QC Lockout configure QC Lockout. ID NOW Assay 1 ID NOW Assay 2 ID NOW Assay 3 The QC Lockout Menu allows the Admin to QC Lockout - ID NOW Assay 1 configure QC lockout options for the assay selected.
-
Page 34: Lot Management (Admin Access Only Or Via Poct Server)
The screen will indicate selected Units and QC Lockout - ID NOW Assay 1 Frequency. Press Cancel to return to previous screen. When parameters are set as desired, press Warn Lockout OK to confirm and continue. Units Days Frequency Cancel The QC Lockout screen will provide a summary for QC Lockout each assay enabled on the instrument. - Page 35 Lot Management allows Admin to: Lot Management • View All Lots on the instrument View All Lots • Search for specific lots using assay, Search Lots date range, or status Import QC Results Export QC Results • Import QC Results onto the instrument from USB Drive •...
-
Page 36: Auto Print (Admin Access Only)
This screen confirms Export completed successfully. Export QC Results Exported 8 lot QC Results. Choose Import QC Results to import lots from a Import QC Results USB drive that contains exported lot files. Importing lot QC Results 1. Enter USB drive to USB device... -
Page 37: Reset To Factory Default (Admin Access Only)
4.18 Reset To Factory Default (Admin Access Only) Home>Setup>Reset to Factory Default Reset to Factory Default can be accessed through Setup the Setup screen and allows the Admin to return Auto-Print the instrument to the default factory settings. Reset to Factory Default Caution: This will delete all users, patient test results, and QC results from the instrument. -
Page 38: Preferences Menu
5 PREFERENCES MENU Home>Preferences Preferences allow the modification of the Preferences instrument settings. Language English Settings include: Sound Enabled • Language Brightness • Sound About • Brightness The About screen displays information about the instrument. Chosen options are displayed to the right of each setting. 5.1 Language Home>Preferences>Language Language... -
Page 39: Brightness
Press Info to display further instrument information. Serial No. CB8EC413 Software © 2013-2019 Axxin, used under license. 2018-2019 Abbott. All rights reserved. All trademarks referenced are trademarks of either the Abbott group of companies or their respective owners. Back Info 5.5 Instrument Information Home>Preferences>About>Info... -
Page 40: Running A Test
6 RUNNING a TEST Caution: ID NOW assays may have varying CLIA Complexity levels. Please ensure the CLIA Complexity of the assay you are using is appropriate for your Laboratory. If the instrument is being used for the first time, it must be set up by the Admin before a test can be run. -
Page 41: Main Menu
6.2 Main Menu Once Self Test is complete, the Home screen is Home 30/Jan/2018 User ID 10:12am displayed. Run QC Review Test Test Memory Preferences Setup Log Out 6.3 First Time Use When an assay or the instrument is used for the first Run QC Test time the user is required to QC the instrument by Positive QC Test... - Page 42 Select your sample type. Run Test If the assay chosen has multiple sample types to Please Select Sample Type choose from, the user will be prompted to select their sample type. Sample type 1 Sample type 2 Enter Patient ID using on screen keyboard or barcode Enter or Scan Patient ID scanner.
-
Page 43: Running A Qc Test
7 RUNNING a QC TEST ID NOW test kits contain Positive and Negative External Controls. When an assay or the instrument is used for the first time, or when the software is upgraded, the User is required to run both a positive and a negative successful QC test before patient testing is allowed. -
Page 44: Qc Test Results
7.2 QC Test Results Positive QC Test Results Negative QC Test Results 1/Jan/2013 11:22am 1/Jan/2013 11:22am User ID: Abbottuser1 Procedural User ID: Abbottuser1 Procedural QC Sample ID: ######## Control Valid QC Sample ID: ######## Control Valid Flu A/B Positive QC Pass Flu A/B Negative QC Pass New Test Print... -
Page 45: Printing Test Results
Universal Printer. Instrument serial number: BAAC7715 ID NOW Abbott also recommends that only the Universal Printer be used with the ID NOW Instrument. Note: Data printed will vary depending on selections in Setup>Patient Details. ID NOW Instrument User Manual 39... -
Page 46: Review Memory
9 REVIEW MEMORY The ID NOW Instrument’s memory screens enable a user to search through the stored data. Select Review Memory from the Home menu screen. Home>Review Memory Navigate through the instrument memory by Review Memory viewing a list of Patient Tests or QC Tests. Patient Test Results QC Test Results Search Results... - Page 47 Caution: Saved data should be archived regularly to prevent loss. See Section 9.4, Export Results. Example of a Test Result, viewed in the instrument Test Results 10AX425 memory. 1/Jan/2014 11:22am User ID: Abbottuser1 Procedural Control Valid Flu A: Negative Flu B: Positive New Test Print When Connectivity has been configured, the...
-
Page 48: Actions Key
Repeat the test using new test pieces. An invalid test may occur due to: • Patient sample interference. • Instrument malfunction. • Malfunction of one or more of the test pieces. 9.1.1 Actions Key When Connectivity has been configured, instead of Test Results Print, the Actions key is displayed. -
Page 49: Search Results
Examples of Negative QC Test Results Negative QC Test Results QC Test Results, 1/Jan/2013 01/Jan/2013 04:32 pm 11:22 am User ID: Abbottuser1 Procedural User ID: Abbottuser1 Procedural viewed in the QC Sample ID: ######## Control Valid QC Sample ID: ####### Control Valid Sent: DD/MMM/YYYY hh/mm am/pm instrument memory. -
Page 50: Export Logfile
Export Log le into one of the instrument USB ports. Logfiles Log le exported. are not readable by users. Send log files to Abbott Technical Support to assist with instrument diagnosis. Press OK to return to the Review Memory screen. -
Page 51: Software Updates
3 seconds or longer. Step 3: Attach USB Flash Memory Drive with the required software update (provided by Abbott) to the instrument via the USB port located on the side of the instrument. Step 4: Power up the ID NOW Instrument by pressing and holding the power button. - Page 52 See Section 6. If expected QC results are not obtained or you are unable to complete the software update, please contact Abbott Technical Support. Note: Only one USB drive may be present during the software update process. 46 ID NOW Instrument User Manual...
-
Page 53: Accessories
Order Number: 26333 Replacement Sticker Roll: 005002 Data Cable: Refer to Universal Printer User Manual for more information. Abbott recommends using the Universal Printer with the ID NOW Instrument. 11.2 Barcode Scanner Order Number: OPR2001ZWU1-201 Refer to the Barcode Scanner User Manual for more information. Only use the Barcode Scanner provided by Abbott with the ID NOW Instrument. -
Page 54: Errors And Warnings
This section provides troubleshooting steps for specific error and warning codes. Once the steps listed below are executed, if the error or warning persists, contact Abbott Technical Support. Contact numbers can be found at the end of the User Manual. -
Page 55: User Login Errors
12.1.3 User Login Errors Error: User ID Not Recognized The instrument does not recognize the User ID entered. Action: Press OK to try again. If the error persists, the Admin must log in to check that the User ID has not been deleted. If it has, or if this is a new User, the Admin must set up the User ID: Home>Setup>Users or Home>Setup>Users>New User. - Page 56 12.1.3 User Login Errors Error: Reading Error – Empty Well The instrument has failed the Self Test due to the empty wells having a high fluorescence reading. Action: Ensure that the Test Base is not in the Test Base holder, and press OK to try again.
-
Page 57: Home Errors
Run Test / Run QC Test Errors Error: No Configuration File Installed A configuration file has not been installed on the instrument. Action: Press OK to return to the Home screen. Contact Abbott Technical Services. Error: Invalid Patient ID Patient ID must be 2 to 20 characters long, are not case-sensitive, and must be alphanumeric. - Page 58 12.1.5 Run Test / Run QC Test Errors Error: Timeout The instrument has timed out during any of the steps in the testing process. More than the defined amount of time elapsed during one of the steps outlined below. For example: Between inserting the Test Base and inserting the Sample Receiver.
-
Page 59: Printing Result Error
12.1.5 Run Test / Run QC Test Errors Error: Assay Locked Out If a frequency is set under lockout within the QC Lockout function, when the assay Frequency expires and a user attempts to conduct a patient test for that assay;... -
Page 60: Search Results Error
12.1.8 Search Results Error No Results Found. No results have been found matching the search criteria. Action: Press OK and try searching again using new search criteria 12.1.9 Export Results & Export Logfile Errors Error: USB Device Not Found The instrument has not recognized the USB drive. Action: If a USB drive is not connected, connect it. -
Page 61: User Details Errors
12.1.10 New User Errors Error: Invalid Password Passwords must be 2 to 20 characters long, are case-sensitive, and must be alphanumeric. The password cannot contain spaces. Action: Press OK to try again. Choose a password that meets the above criteria. 12.1.11 User Details Errors Error: Password Not Recognized... -
Page 62: Import Users Errors
12.1.12 Import Users Errors Error: USB Device Not Found The instrument has not recognized the USB drive. Action: If a USB drive is not connected, connect it. If it is connected, check the connection. If this error persists, use a different USB drive. Error: Import Failed The import was not successful. -
Page 63: Admin Password Errors
12.1.14 Network Errors Error: Subnet Mask Invalid The instrument does not recognize the Subnet Mask entered. Action: Press OK to try again. The Subnet Mask must consist of four sets of numbers, separated by “.” (i.e. 111.222.333.444). If this error persists, contact your Network Administrator or IT Help Desk to ensure that the Subnet Mask is correct. -
Page 64: Miscellaneous Errors
There was an error during the installation of a software update. Action: Power off the instrument, insert the USB containing the software update, power the instrument back on. If the issue persists, contact Abbott Technical Services to obtain the latest version of software. 58 ID NOW Instrument User Manual... -
Page 65: Warnings
12.2 Warnings [Note: These are arranged in order of the time they may appear in the process] Example Screen: Warning Memory Is Full 12.2.1 Home Warnings Warning: Memory Almost Full The instrument can run only 50 more patient tests or 9 more QC tests before the memory is full. -
Page 66: Run Test/Run Qc Test Warnings
12.2.2 Run Test/Run QC Test Warnings Warning: Incorrect Test Type A test base was inserted that does not match the test type initially selected from the menu. Action: The test must be restarted. Remove the test base and close the lid to allow the instrument to perform a self test. -
Page 67: Setup Warnings
The instrument will start up as it did when first received from the manufacturer, and can be reconfigured by the Admin. Abbott suggests exporting all user, patient and QC results to a USB drive prior to resetting to factory default. -
Page 68: Symbols
13 SYMBOLS USB 2.0 High Speed interface connector Wired Ethernet, 10/100 Mb/s connector DC Power connector, for connection with supplied 12V DC external. Power Supply and Adaptor. 12VDC, 3.0 Amp maximum Hot Surface Biological Hazard Caution, consult accompanying documents Restriction of Hazardous Substances Compliant Waste Electrical and Electronic Equipment Directive Compliant Serial Number... - Page 69 Manufacturer On-Off Power Button This device complies with part 15 of the FCC Rules. Operation is subject to the following two conditions: (1) This device may not cause harmful interference, and (2) this device must accept any interference received, including interference that may cause undesired operation.
-
Page 70: Ordering And Contact Information
+1 877 441 7440 Technical Support Advice Line Further information can be obtained from your distributor, or by contacting Technical Support on: +1 855 731 2288 ts.scr@abbott.com Africa, Russia, CIS +44 161 483 9032 EMEproductsupport@abbott.com Asia Pacific +61 7 3363 7711 APproductsupport@abbott.com... -
Page 71: Warranty
15 WARRANTY Warranty Limited 2 Year Warranty Use of the ID NOW Instrument The ID NOW Instrument is a fluorescence-based instrument for the processing and analysis of ID NOW tests utilizing isothermal nucleic acid amplification technology for the qualitative detection of infectious diseases. Proper adherence to the instructions in the User Manual and package insert are critical to proper operation. - Page 72 MANUFACTURER'S ENTIRE LIABILITY IN CONNECTION WITH THE INSTRUMENT, REGARDLESS OF THE LEGAL OR EQUITABLE BASIS OF ANY CLAIM, IS LIMITED TO THE PURCHASE PRICE OF THE INSTRUMENT. IN NO EVENT WILL MANUFACTURER BE LIABLE FOR ANY INCIDENTAL, INDIRECT, SPECIAL, CONSEQUENTIAL, OR PUNITIVE LOSS OR DAMAGES IN ANY WAY RELATED TO THE INSTRUMENT, OR ANY THIRD PARTY CLAIMS, EVEN IF MANUFACTURER OR ITS DISTRIBUTORS ARE AWARE OF THE POSSIBILITY OF SUCH CLAIM OR DAMAGES AND NOTWITHSTANDING THE ESSENTIAL...
- Page 76 10 Southgate Road Scarborough, Maine 04074 USA www.abbott.com/poct © 2020 Abbott. All rights reserved. All trademarks referenced are trademarks of either the Abbott group of companies or their respective owners. Software © 2020 Axxin, used under license. All trademarks referenced are trademarks of their respective owners.
- Page 77 Abbott PN: INNAT024 PMS 2925 C Primary Blue ID NOW Rev: 9 Instrument User Manual (US) PMS 303 C Dark Blue Size: Date of Last Revision: 210 mm x 297 mm 9.8 2020/02/06 CMYK...
Need help?
Do you have a question about the ID NOW NAT-024 and is the answer not in the manual?
Questions and answers
Machine says it is unable to load application
The message "unable to load application" is not directly explained in the provided context. However, similar issues such as missing configuration files or system errors may cause this. One likely cause is that the configuration file is not installed. The recommended action in such cases is to press OK to return to the Home screen and contact Abbott Technical Services.
This answer is automatically generated
ID Now Machine will not load it just keeps saying that it is warming up
The Abbott ID NOW NAT-024 machine may be stuck on the warming up screen because the heater temperature is not at the required level to perform a test. To resolve this, ensure the lid is closed and wait 5 minutes for the heater to warm the sample receiver and test base receiver. If the issue persists, reboot the instrument by turning it off and then on again.
This answer is automatically generated
Our machine will not complete a self test. Error message: Reading Error-Empty Well. Our other machine completes the self test without problems.