Kaivac 1700 Series Operator's & Parts Manual
Hide thumbs
Also See for 1700 Series:
- Operator's & parts manual (48 pages) ,
- Operator's & parts manual (28 pages)

Related Manuals for Kaivac 1700 Series


Summary of Contents for Kaivac 1700 Series
- Page 1 Operator & Parts Manual ® KaiVac 1700 Series 1715 Serial Number 409- 1750 Serial Number 13409- CE1750 Serial Number 497- www.kaivac.com © 2006-2016 Kaivac, Inc. All Rights Reserved...
- Page 2 Please Note: Our online warranty registration form is to be completed within 14 days of purchase. Warranty period This warranty covers defects in workmanship or defects under normal use and service from the date of purchase. Spillz Pty Ltd, warrants Kaivac products to be free from defects in materials and workmanship for these time periods:...
- Page 3 KAIVAC WARRANTY REGISTRATION FORM To be completed and mailed or emailed by the customer purchasing equipment. Return this warranty card within 14 days of purchase. Please note that warranty registration forms can also be completed online. To ensure your warranty registration is lodged correctly, please ensure all fields of this form are completed.
- Page 4 Use extra care when cleaning on stairs. Keep the cord away from heated surfaces. Do not spray liquid from the Kaivac onto electrical outlets or on any electrical devices. Turn off the unit before unplugging. Do not pull on the cord to unplug. Grasp the plug at the outlet and pull.
- Page 5 Follow the maintenance instructions specified in the manual. Personal Protective Equipment (PPE): It is recommended to wear proper personal protective equipment as required by the chemical product label instructions used in conjunction with the Kaivac. FOR INDOOR USE ONLY INTENDED FOR COMMERCIAL USE www.kaivac.com...
- Page 6 © 2006-2016 Kaivac, Inc. All Rights Reserved Phone: 1-800-287-1136 Page 2-1...
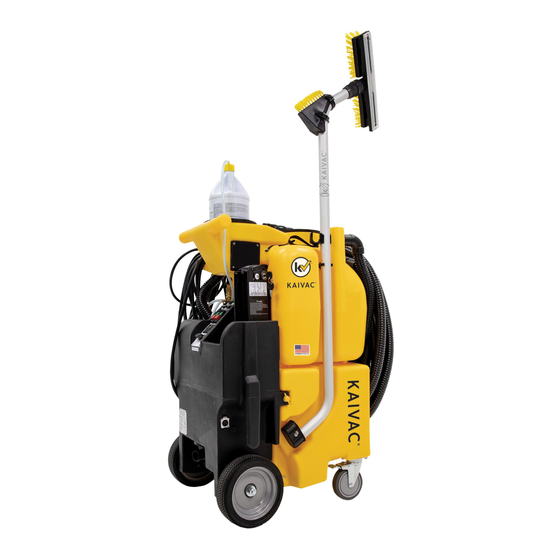
- Page 7 Squeegee Brush (VBRUSH) Bottom View Overhead View Front Vac Hose (VH25) Slinky Hose (VHST20) Left Right Window Squeegee (CAA06) KaiDrain (CVS14) Metering Tips HEPA Cover (MTIPSNEW) Placards (PLCRD) (HCOVER) www.kaivac.com © 2006-2016 Kaivac, Inc. All Rights Reserved Phone: 1-800-287-1136 Page 2-2...
- Page 8 If damage is found, do not continue until proper repairs are completed. 6. Plug in machine and test GFCI (Ground Fault Circuit Interrupter) to ensure it is working properly. You are now ready. Page 2-3 www.kaivac.com © 2006-2016 Kaivac, Inc. All Rights Reserved Phone: 1-800-287-1136...
- Page 9 After caster wheels have been locked, tip the machine to the left and slightly forward to allow the remaining water to drain. Re-attach dump hose and unlock wheels. www.kaivac.com © 2006-2016 Kaivac, Inc. All Rights Reserved Phone: 1-800-287-1136 Page 2-4...
- Page 10 (2 locations - one on each side) Slightly pull the bottom section of the vac tank out while tipping it backwards. Lift and pull the vac tank away from the unit. Page 2-5 www.kaivac.com © 2006-2016 Kaivac, Inc. All Rights Reserved Phone: 1-800-287-1136...
- Page 11 Chemicals nject Fan Spray Fan Spray LOW Pressure Mode Manually brush anual heavily soiled areas Brush Fresh Water ressure wash and Fan Spray rinse HIGH Pressure Mode xtract Page 2-6 www.kaivac.com © 2006-2016 Kaivac, Inc. All Rights Reserved Phone: 1-800-287-1136...
- Page 12 Use a wire brush or coarse brush with acid cleaner or other to remove residue from threads on the coupling and coupling nut. Apply grease when done. HEPA Filter Replace every 3-6 months depending on use www.kaivac.com © 2006-2016 Kaivac, Inc. All Rights Reserved Phone: 1-800-287-1136 Page 3-1...
- Page 13 Next, remove the 2 axle strap wing bolts machine. on either side of the machine behind the wheels. Slide assembly away from water www.kaivac.com © 2006-2016 Kaivac, Inc. All Rights Reserved Phone: 1-800-287-1136 Page 3-2...
- Page 14 Moisture from nozzle Water in blow hose Dry blow line Blow Dry System Suction, not blow action Vacuum hose connected Reconnect to vac motor exhaust hose to vac tank www.kaivac.com © 2006-2016 Kaivac, Inc. All Rights Reserved Phone: 1-800-287-1136 Page 3-3...
- Page 15 Remove and rein- stall Kink in Chemical line Replace Chemical line www.kaivac.com © 2006-2016 Kaivac, Inc. All Rights Reserved Phone: 1-800-287-1136 Page 3-4...
- Page 16 Replace Premature blade wear Squeegee wheels worn Check wheels for wear / replace Sucks to the floor too Squeegee wheels worn Check wheels for wear / tightly replace Page 3-5 www.kaivac.com © 2006-2016 Kaivac, Inc. All Rights Reserved Phone: 1-800-287-1136...
- Page 17 3.0 MAINTENANCE VACUUM DIAGRAM www.kaivac.com © 2006-2016 Kaivac, Inc. All Rights Reserved Phone: 1-800-287-1136 Page 3-6...
- Page 18 3.0 MAINTENANCE 3.4 PUMP DIAGRAM www.kaivac.com © 2006-2016 Kaivac, Inc. All Rights Reserved Phone: 1-800-287-1136 Page 3-7...
- Page 19 3.0 MAINTENANCE 3.4 ELECTRICAL DIAGRAM Page 3-8 www.kaivac.com © 2006-2016 Kaivac, Inc. All Rights Reserved Phone: 1-800-287-1136...
- Page 20 3.0 MAINTENANCE 3.4 MACHINE DIAGRAMS Page 3-9 www.kaivac.com © 2006-2016 Kaivac, Inc. All Rights Reserved Phone: 1-800-287-1136...
- Page 21 3.0 MAINTENANCE 3.4 MACHINE DIAGRAMS Page 3-10 www.kaivac.com © 2006-2016 Kaivac, Inc. All Rights Reserved Phone: 1-800-287-1136...
- Page 22 3.0 MAINTENANCE 3.4 MACHINE DIAGRAMS Page 3-11 www.kaivac.com © 2006-2016 Kaivac, Inc. All Rights Reserved Phone: 1-800-287-1136...
- Page 23 3.0 MAINTENANCE 3.4 MACHINE DIAGRAMS www.kaivac.com © 2006-2016 Kaivac, Inc. All Rights Reserved Phone: 1-800-287-1136 Page 3-12...
- Page 24 3.0 MAINTENANCE 3.4 MACHINE DIAGRAMS Page 3-13 www.kaivac.com © 2006-2016 Kaivac, Inc. All Rights Reserved Phone: 1-800-287-1136...
- Page 25 3.0 MAINTENANCE 3.4 MACHINE DIAGRAMS Page 3-14 www.kaivac.com © 2006-2016 Kaivac, Inc. All Rights Reserved Phone: 1-800-287-1136...
- Page 26 3.0 MAINTENANCE 3.4 MACHINE DIAGRAMS HEPA HOUSING ASSEMBLY (HEPAHA2) PART NO. PART DESCRIPTION HCOVER HEPA COVER FKEEP2 HEPA FILTER KEEPER HEPA HEPA FILTER HEPAH2 HEPA FILTER HOUSING Page 3-15 www.kaivac.com © 2006-2016 Kaivac, Inc. All Rights Reserved Phone: 1-800-287-1136...
- Page 27 3.0 MAINTENANCE 3.4 MACHINE DIAGRAMS www.kaivac.com © 2006-2016 Kaivac, Inc. All Rights Reserved Phone: 1-800-287-1136 Page 3-16...
- Page 28 3.0 MAINTENANCE 3.4 MACHINE DIAGRAMS Page 3-17 www.kaivac.com © 2006-2016 Kaivac, Inc. All Rights Reserved Phone: 1-800-287-1136...
- Page 29 CSS147 - MALE SNAP 18-8 SS 8-32 X 1/2 CSS145 - BRASS INSERT 8-32--21/64 LONG GR2 - KV LOGO STICKER NFSIL - NFSI LABEL FLAGLAB - ASSEMBLED IN AMERICA FLAG LABEL Page 3-18 www.kaivac.com © 2006-2016 Kaivac, Inc. All Rights Reserved Phone: 1-800-287-1136...
- Page 30 VMA1700R- HE 120V VMA 1700 VMASM240V - 1750 VAC MOTOR ASSEMBLY 240V VAC LID, JUG HOLDER ASSEM (VLJHA) VLJH - VAC LID , JUG HOLDER HGAS - HEPA BLOW COVER GASKET Page 3-19 www.kaivac.com © 2006-2016 Kaivac, Inc. All Rights Reserved Phone: 1-800-287-1136...
- Page 31 CPS68 - 90 DEG. 1/8 NPT MALE X CPS65 - 1/2 IN CLAMP SPH34 - SWITCH PANEL HOSE 34 IN SPH6 - 6 INCH 1/4 NYLON HOSE SPH14 - SWITCH PANAL HOSE 14 INCH www.kaivac.com © 2006-2016 Kaivac, Inc. All Rights Reserved Phone: 1-800-287-1136 Page 3-20...
- Page 32 3.0 MAINTENANCE PARTS LIST PART NUMBER - DESCRIPTION 1700 SERIES SWITCH PANEL ASSEMBLY (SPADC) SPDCSSB - SWITCH PNL DUALCHEM FOR BREAK- ER SWITCH HMETER - SNAP IN DIGITAL HOUR METER JWW - JUMPER WIRE WHITE 12 IN JWB5 - JUMPER WIRE BLACK 5 IN...
- Page 33 CVS14 - KAIDRAIN GULPER TOOL SUBBLHSST - 33 FT BLOW HOSE MANUAL1750 - MANUAL FOR 1700 SERIES KYQS - QUICK START CD 1700 SERIES KTDVD - KAITUTOR TRAINING DVD DISK PLCRD - PLACARD FOR 1200 1700 2100 UNITS STF - SMART TOWEL FLYER...
Need help?
Do you have a question about the 1700 Series and is the answer not in the manual?
Questions and answers