Advertisement
Available languages
Available languages
Quick Links
sauder.com
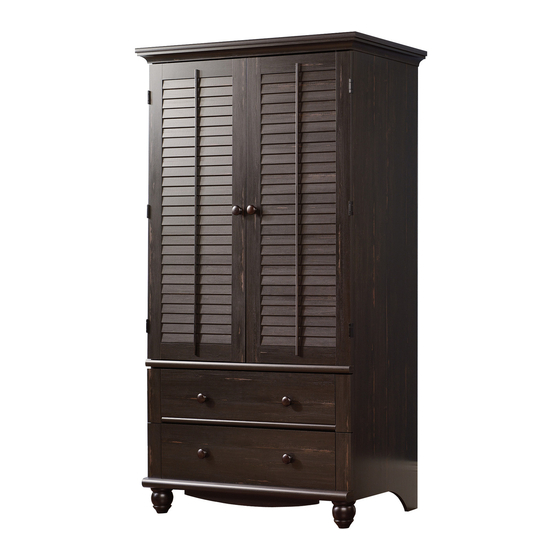
Armoire
Harbor View Collection | Model 401322
Need help? Visit Sauder.com to view video assembly tips or chat with a live rep.
Prefer the phone? Call 1-800-523-3987.
Share your journey!
You'll love what we
have in storage.
NOTE: THIS INSTRUCTION
BOOKLET CONTAINS IMPORTANT
SAFETY INFORMATION.
PLEASE READ AND KEEP FOR
FUTURE REFERENCE.
English pg 1-24
Français pg 25-28
Español pg 29-32
Lot # 388897
02/22/16
Purchased: __________________
Be sure to give us a ring before
making any returns. 1-800-523-3987
Advertisement

Related Manuals for Sauder Armoire Harbor View 401322


Summary of Contents for Sauder Armoire Harbor View 401322
- Page 1 Harbor View Collection | Model 401322 NOTE: THIS INSTRUCTION BOOKLET CONTAINS IMPORTANT SAFETY INFORMATION. Need help? Visit Sauder.com to view video assembly tips or chat with a live rep. PLEASE READ AND KEEP FOR FUTURE REFERENCE. Prefer the phone? Call 1-800-523-3987.
- Page 2 • Check the size and weight of your TV. Compare it to the diagram below – before you begin assembly! • This Sauder unit is designed for use with televisions weighing less than 50 pounds. Never use with a TV that weighs more.
- Page 3 DRAWER BRACE (2) ROD (1) D194 DRAWER BACK (2) UPRIGHT (1) LOUVER MOLDING (2) D618 DRAWER BOTTOM (2) RIGHT DOOR (1) FOOT (2) TV SHELF (1) LEFT DOOR (1) SHELF MOLDING (1) D194 D618 D194 D618 www.sauder.com/services 401322 Page 3...
- Page 4 Do not eliminate, the risk of tip-over. This is a permanent label. Do not attempt to remove! accidentally throw away. 04/10 332296 NAIL - 39 (Refer to Step 17 for proper location and application) Page 4 401322 www.sauder.com/services...
-
Page 5: Table Of Contents
30S BLACK 1-9/16" FLAT HEAD SCREW - 10 BLACK 2-1/4" FLAT HEAD SCREW - 4 BLACK 9/16" PAN HEAD SCREW - 2 SILVER 2" FLAT HEAD SCREW - 7 111S SILVER 3/4" FLAT HEAD SCREW - 6 www.sauder.com/services 401322 Page 5... - Page 6 Assemble your unit on a carpeted fl oor or on the empty å carton to avoid scratching your unit or the fl oor. To begin assembly, push a SAUDER TWIST-LOCK® å FASTENER (7F) into the large holes in the BOTTOM (F) and TV SHELF (E).
- Page 7 ENDS (A2 and B2). Use eight GOLD 5/16" FLAT HEAD SCREWS (3S) through holes #1 and #3. *patent pending glide system å GOLD 5/16" FLAT HEAD SCREW (8 used in this step) Finished edge Glide end Finished edge Glide end www.sauder.com/services 401322 Page 7...
- Page 8 Tap two MOLDING CONNECTORS (16F) into the notches å in the MOLDINGS (T, U, and V). Use your hammer to tap the MOLDING CONNECTORS (16F) into the notches in the MOLDINGS. Flat end Flat end Unfi nished surface Unfi nished surface Page 8 401322 www.sauder.com/services...
- Page 9 Step 4 Fasten the RIGHT END (A2) to the RIGHT MOLDING (U). å ® How to use the SAUDER TWIST-LOCK FASTENER Use two BLACK 2-1/4" FLAT HEAD SCREWS (26S). 1. Insert the dowel end of the FASTENER into the Fasten the TV SHELF (E) to the RIGHT END (A2). Tighten hole of the adjoining part.
-
Page 10: Black 9/16" Large Head Screw
® f a c S u r - L O I S T E R S T E N F A S BLACK 9/16" LARGE HEAD SCREW (6 used for the ANGLE BRACKETS) Page 10 401322 www.sauder.com/services... -
Page 11: Black 2-1/4" Flat Head Screw
® f a c S u r - L O I S T E R S T E N F A S BLACK 1-7/8" FLAT HEAD SCREW (3 used for the LOWER BACK) www.sauder.com/services 401322 Page 11... - Page 12 Use two BLACK 9/16" LARGE HEAD SCREWS (1S). NOTE: Be sure the ROD HANGERS are positioned å as shown. SILVER 2" FLAT HEAD SCREW (7 used for the TOP) BLACK 9/16" LARGE HEAD SCREW (2 used for the ROD HANGERS) Rounded edge Page 12 401322 www.sauder.com/services...
- Page 13 Step 8 Fasten the SKIRT (S) to the BOTTOM MOLDING (R). Use å three BLACK 1-7/8" FLAT HEAD SCREWS (2S). BLACK 1-7/8" FLAT HEAD SCREW (3 used in this step) Flat surface Rounded edge Unfi nished surface www.sauder.com/services 401322 Page 13...
-
Page 14: Black 9/16" Pan Head Screw
Fasten the MAGNETIC CATCH (1I) to the FRONT å MOLDING (T). Use two BLACK 9/16" PAN HEAD SCREWS (51S). BLACK 9/16" PAN HEAD SCREW (2 used in this step) Rounded edge BLACK 1-1/8" PAN HEAD SCREW (4 used in this step) Page 14 401322 www.sauder.com/services... - Page 15 SCREW (23F). Turn the FEET clockwise until the FOOT SCREWS are tight in the BOTTOM MOLDING and each FOOT. NOTE: Do not overtighten the FOOT SCREWS. å These holes must line up over the TV SHELF (E). www.sauder.com/services 401322 Page 15...
- Page 16 Fasten two STRIKE PLATES (6I) to the DOORS (P å and Q). Use two BLACK 1/2" FLAT HEAD SCREWS (11S). BLACK 9/16" LARGE HEAD SCREW BLACK 1/2" FLAT HEAD SCREW (12 used for the HINGES) (2 used for the STRIKE PLATES) Indented holes Page 16 401322 www.sauder.com/services...
-
Page 17: Silver 3/4" Flat Head Screw
NOTE: To make adjustments to the DOORS, loosen the SCREWS in å on sauder.com. the HINGES, make needed adjustments, and tighten the SCREWS. Fasten a KNOB (93K) to the LEFT DOOR (Q). Use a BLACK 1-1/4" å... - Page 18 Then, insert the metal end of a CAM DOWEL (2F) into each HIDDEN CAM. Do not tighten the HIDDEN CAMS in this step. Arrow Arrow Insert the metal end of the CAM DOWEL into the HIDDEN CAM. Page 18 401322 www.sauder.com/services...
- Page 19 SIDES (D30 and D31) and DRAWER BRACE (M67). DRAWER FRONT (I2). Tighten one HIDDEN CAM. Use five BLACK 1-9/16" FLAT HEAD SCREWS (30S). Repeat this step for the other DRAWER using the LOWER DRAWER FRONT (J2). www.sauder.com/services 401322 Page 19...
- Page 20 (4 used for the KNOBS) Glide end Screw head - turn CAM to line up holes in the SLIDES with holes in DRAWER SIDES Glide end GOLD 5/16" FLAT HEAD SCREW (8 used in this step) Page 20 401322 www.sauder.com/services...
- Page 21 NOTE: This is a permanent label intended to last for the å life of the product. Once applied, do not try to remove it. No load 40 lbs. Place the glide on the SLIDE behind the glide on the RAIL. www.sauder.com/services 401322 Page 21...
- Page 22 -Never open more than one drawer at a time. -If equipped with a drawer interlock system, do not defeat or remove it. Use of tip-over restraints may only reduce, but not eliminate, the risk of tip-over. 50 lbs. 40 lbs. total 35 lbs. each Page 22 401322 www.sauder.com/services...
- Page 23 NOTE: Before moving your unit to a diff erent location, unscrew the SAFETY DRYWALL ANCHOR (61M) from your wall. å The nylon sheath will remain behind your wall. BLACK 9/16" LARGE HEAD SCREW (1 used in this step) www.sauder.com/services 401322 Page 23...
- Page 24 #2. The higher the screw in the oblong hole, the higher your drawer front will be. The lower the screw, the lower the drawer front. Page 24 401322 www.sauder.com/services...
- Page 25 EXTRÉMITÉ DROITE ..........1 FIXATION TWIST-LOCK® ........17 pour future référence. EXTRÉMITÉ GAUCHE ..........1 16F CONNECTEUR DE MOULURE......2 Pour contacter Sauder DESSUS ................1 23F VIS DE PIED ..............2 en ce qui concerne cet TABLETTE ................1 CONSOLE À ÉQUERRE .........3 élément, faire référence...
- Page 26 ! Utilisation de la FIXATION TWIST-LOCK® SAUDER • Cette unité Sauder est conçue pour les téléviseurs pesant moins 1. Insérer l'extrémité fi letée de la FIXATION dans le trou de la de 43 kg. Ne jamais utiliser avec des téléviseurs plus lourds.
- Page 27 VIS DE PIED (23F). Faire tourner les PIEDS dans le sens des aiguilles d’une montre jusqu’à ce que la VIS DE PIED soit serrée dans la MOULURE DE DESSOUS et chaque PIED. REMARQUE : Ne pas trop serrer les VIS DE PIED. www.sauder.com/services 401322 Page 27...
- Page 28 GAUCHE DE TIROIR (D31) supérieure. Cette étiquette doit être pour meubles ou d’un chiff on humide. Essuyer. lisible lorsque le tiroir est ouvert. Lorsque le tiroir est fermé, il doit la dissimuler. Décoller le fi lm protecteur et apposer l'étiquette comme l'indique le schéma. Page 28 401322 www.sauder.com/services...
- Page 29 PANEL SUPERIOR ............1 PLACA DE CONTACTO .........2 necesita ponerse en ESTANTE ................1 93K POMO ..................6 contacto con Sauder en D30 LADO DERECHO DE CAJÓN ......2 ETIQUETA DE ADVERTENCIA DEL TV ..1 LADO IZQUIERDO DE CAJÓN ......2 cuanto a esta unidad, (Consulte el paso 16 para la ubicación e...
- Page 30 - antes de comenzar el ensamblaje! Cómo utilizar el SUJETADOR TWIST-LOCK® SAUDER • Esta unidad Sauder está diseñada para ser usada con 1. Inserte el extremo con cabilla del SUJETADOR en el agujero de televisores cuyo peso sea inferior a 43 Kg. Nunca la use para un la parte adjunta.
- Page 31 "cuadrada." Fije el DORSO (G2) a la unidad utilizando los CLAVOS (1N). NOTA: Asegúrese de clavar ligeramente los CLAVOS dentro de los agujeros que se alinean sobre el ESTANTE TELEVISOR (E). www.sauder.com/services 401322 Page 31...
- Page 32 NOTA: Por favor, lea las páginas de atrás del folleto de instrucciones en cuanto a importante información de seguridad. Esto completa el ensamblaje. Limpie con su pulimento para muebles preferido o un paño húmedo. Seque con un paño. Page 32 401322 www.sauder.com/services...
- Page 33 TOUJOURS décharger les tablettes et les tiroirs, en commençant par les surface supérieures, avant de déplacer le meuble. NE JAMAIS pousser ou tirer un meuble sur de la moquette. Demander à une autre personne de le soulever correctement pour le déplacer et/ou le repositionner. www.sauder.com/services 401322 Page 33...
- Page 34 SIEMPRE descargue los estantes y cajones, empezando con las superfi cies superiores, antes de moverlo. NUNCA empuje ni tire de los muebles sobre una alfombra. Obtenga que un amigo le ayude a levantarlo correctamente para moverlo y/o reposicionarlo. Page 34 401322 www.sauder.com/services...
- Page 35 à compter de la date d'achat la première fois et qui sont signalés à Sauder dans les limites de couverture de la contre tout défaut de matériaux ou de fabrication des composantes de mobilier Sauder.
- Page 36 Dear Valued Customer: So, how did it go? Thanks so much for choosing Sauder® furniture. I hope the Set a world record for speed? purchase and assembly process was a positive experience Feeling good about yourself? and you feel good about the furniture you just built. If you Nice.
Need help?
Do you have a question about the Armoire Harbor View 401322 and is the answer not in the manual?
Questions and answers