Advertisement
Manufacturer:
Address:
Representative:
Address:
Declaration of conformity
Application ofCouncil directive
2006/42/EG
Fillauer
LLC
2710
Amnicola Hwy
Chattanooga
TN 37406
Fillauer
Europe AB
Kung Hans
v
2
S-192 68 Sollentuna
Model
no:
5001-1-50, 5005-1-50,
2100/50,
2300/50,2305/50,2500/50,2600/50,2605/50,
Hereby
certifies
that the
Trautman carvers
and
Sanders
machines complies
with:
Machinery
Directive 2006/42
/
EC
EMC
Directive
2004/108
/
EC
Low
Voltage
Directive
2006/95
/
EC
Date:
\
1--10
(q
Advertisement

Summary of Contents for OTS PDQ Rollabout 5A
- Page 2 MACHINES FOUR INFRAROUGE OTS Le Four infrarouge est une excellente solution pour chauffer de grandes pièces de plastique, par exemple pour la hanche. Le four existe en 4 différentes tailles pour répondre à tous les besoins de thermoformage. Chacun comporte un plateau réglable en hauteur assisté hydrauliquement pour un fonctionnement facile.
- Page 3 Rollabout Models 5A,6B,7C,8D-2,8E E n g l i s h M a n u a l...
-
Page 4: Table Of Contents
Contents: 1. Contents 2. Safety Warnings (please read first) 3. Oven Setup 4. Oven Setup 5. Oven Setup 6. Oven Setup 7. Electrical Connections 8. Electrical Connections Over Temperature Shut Off Device Check 9. Electrical and Warning Labels 10. Oven Controls Operation 11. - Page 5 Do not install or operate the PDQ Oven on or near flammable materials or gasses. Be sure to allow sufficient ventilation around oven surfaces. OTS Corp recommends 6” minimum. Cleaning: We recommend cleaning your PDQ Oven with either glass cleaner for water based stains, or a solvent such as acetone or mineral spirits for oil based stains.
-
Page 6: Oven Setup
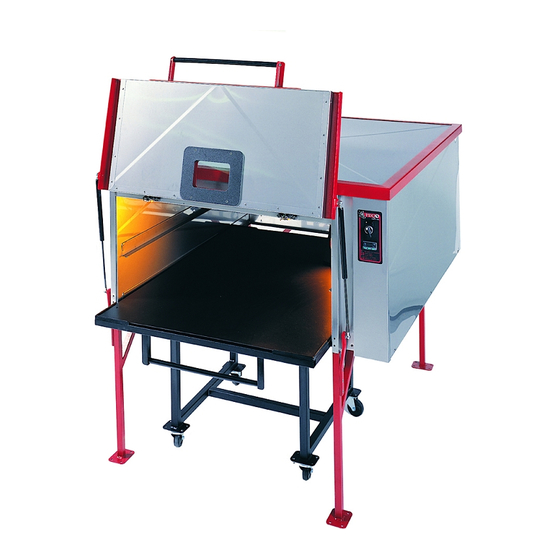
Oven Setup To save you freight cost and prevent damage to your new PDQ Oven, we have shipped it to you partially disassembled. These assembly instructions and diagrams should make setup fairly simple. You will require 2-4 people, a 7/16” wrench and a 1/8” and 5/32” hex wrench, along with the included hardware kit, to complete the setup. - Page 7 Oven Setup If you have a 5A model, install the casters on the cart using the hardware provided. Lift the lower section of the cart high enough to accept the gas spring, then rotate the gas spring upward until the male portion fits into the female portion of the cart.
-
Page 8: Oven Setup
Oven Setup Open the door (We suggest you secure the door in the open position with a length of rope. Since it has nothing to re- tain it at this point, it could potentially snap closed, caus- ing injury.) and snap the gas shocks on to the ball studs built into the door. -
Page 9: Oven Setup
Oven Setup Remove the 3 screws securing each light guard. CAUTION: INFRARED EMITTERS ARE FRAGILE. HANDLE WITH CARE 11. Insert the threaded ends of the emitter into the L-Brackets in the light panel. Holding the ceramic at the end of the emitter, so as not to disconnect it from the glass portion of the emitter, tighten the nuts at each end against the L-Bracket. -
Page 10: Electrical Connections
Electrical Connections All electrical connections must be performed by a certified electrician following all national and local codes and regulations. External Circuit Breaker and Shut Off Required 208-240 volt single phase units must be hardwired to your electrical system utilizing an external circuit breaker and shut off mounted as close as possible to the oven. -
Page 11: Electrical Connections
Electrical Connections CAUTION: SHEETMETAL EDGES MAY BE SHARP 1. Remove the electrical panel (right side panel) by removing the 3 screws on the back and the 3 screws across the lower edge of the panel with a 1/8” hex wrench 2. -
Page 12: Electrical And Warning Labels
Electrical and Warning Labels Main Terminal Blocks 208-240 380-400 volt volt 1 phase 3 phase Dangerous Caution, refer to Caution Electrical accompanying Hot Surface Voltage documents 630 MA 1 Amp Fuse Fuse 380-400V 208-240V Fan Control Oven Control Main Switch Control... -
Page 13: Oven Controls Operation
Oven Controls Operation 380-400 Volt Ovens: The MAIN SWITCH is located on the control panel on the front of the oven. Rotate the knob to the ON position to enable oven use. 208-240 and 380-400 Volt Ovens: The OVEN CONTROL SWITCH is located on the control panel on the front of the oven. -
Page 14: Operating Suggestions
Operating Suggestions Flat Plastic: Preheat the oven and tray/cart to the desired cooking temperature. Place the plastic in the center of the cooking tray and roll the tray/ cart into the oven. 3. Your new PDQ Oven will work best if set at 400°F or 204°C for plastics such as Polypropylene, Copolymer and Polyethylene. - Page 19 ELECTRIC OVEN CR-5000G* with radiation heating USERS MANUAL Introduction: 1. Concerning the Oven CR-5000G – technical characteristics: The apparatus is made from quality stainless steel sheet; other parts are conveniently protected against corrosion. All build-in elements have been tested. When opened, the specially designed door allows an easy approach to the interior and avoids any risk of burning.
- Page 20 Oven CR-5000G* page 2 7. Controller setting: The main four-digit display on the electronic temperature controller "K 48" indicates permanently the real temperature in the oven. The controller has two levels of programming. Level 1 - working temperature setting: By pressing twice shortly the key P, the actual set value ( SP1 ) appears.
- Page 21 Oven CR-5000G* page 3 Timer Main switch K 48 8. Operation: 8.1 Set the timer (3) on desired time in min. and tip the switch (2) on the position I, - or: 8.2 tip the switch on the ⊗ ⊗ ⊗ position II for manual operation.
- Page 22 Oven CR-5000G* page 4 11. Trouble shooting - Symptoms: By switching on the oven, the displays on The controller is probably burned off (over K 48 do not light up, but the three pilot lamps tension in the mains due to the storm, or are burning.
- Page 23 Oven 5000G* page 5 12 – General electric schema : Legend : Temperature sensor El.Temp.Controller K 48 F1, F3 Fuse DO 1, int. 10 A Fuse DO 1, int. 2 A Buzzer BE 220 2413001 Light 25W 230V H3-H5 Pilot lamp SL-656 ZB Contactor DIL EM 01/230V Industrial relay TRP 614 –...
- Page 24 Oven CR-5000G* page 6 15.- Dimensions of the oven on its feet: OVEN CR-5000G 400V, 4500W...
- Page 25 Oven 5000G* page 7 16. Feet and shelf: The oven CR-5000G is delivered with four removable stands and a stainless steel shelf. For facilitating the assembling and mounting the shelf, some details are given in exploded view. Upper part of the foot The shelf Middle part of the foot Lower part of the foot...
Need help?
Do you have a question about the PDQ Rollabout 5A and is the answer not in the manual?
Questions and answers