Table of Contents
Advertisement
Quick Links
Advertisement
Table of Contents

Related Manuals for Logik LDABCR11


Summary of Contents for Logik LDABCR11
- Page 1 DAB Clock Radio Instruction Manual LDABCR11...
-
Page 4: Table Of Contents
Contents Unpacking ............................5 Product Overview ..........................6 Top View ..................................6 Front View .................................. 7 Side View ..................................7 Rear View ................................... 7 Power Source ..........................8 Mains Power ................................8 Connections ...........................8 Connecting to the Earphones Socket......................8 Basic Operation ..........................9 Powering ON/OFF .............................. -
Page 5: Unpacking
Thank you for purchasing your new Logik DAB Clock Radio. We recommend that you spend some time reading this instruction manual in order that you fully understand all the operational features it offers. You will also find some hints and tips to help you resolve any issues. -
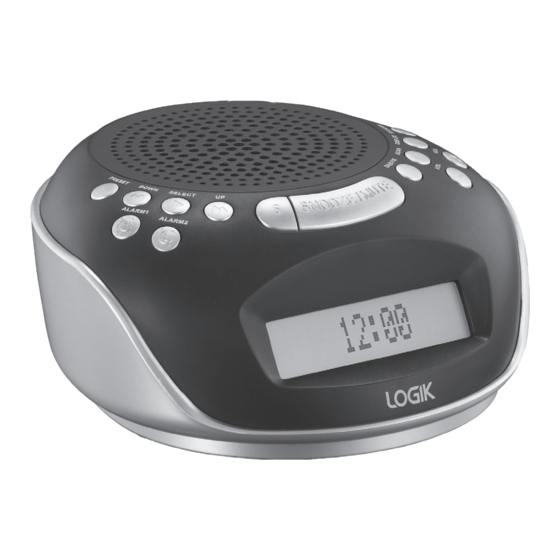
Page 6: Product Overview
Product Overview Top View Speakers 10. DISPLAY Button PRESET Button 11. VOL + Button Press to increase the volume. DOWN/ Button 12. SCAN Button ALARM1 Button 13. VOL – Button Press to turn the Alarm 1 on/off Press to decrease the volume. SELECT/ Button 14. -
Page 7: Front View
Front View LCD Display Side View Earphones Socket DC IN Socket Rear View DAB/FM Aerial... -
Page 8: Power Source
Power Source Mains Power 1. This unit operates with a mains adapter (included). 2. Connecting the unit to any other power source may cause damage to the unit. Unwind the mains adapter to its full length. Connect the mains adapter to the DC socket on the side of the unit and then a mains socket. -
Page 9: Basic Operation
Basic Operation Powering ON/OFF Press the STANDBY button to switch the unit on. • Press the STANDBY button again to switch the unit back to standby mode. • • Disconnect the mains adapter from the mains socket if you want to switch the unit off completely. -
Page 10: Setting The Alarm
Setting the Alarm This unit incorporates an alarm function. You can have dual alarm wake-up time and wake-up mode settings to wake you with a beep tone, or your favourite radio station. To set the alarm clock in STANDBY mode or ON mode: 1. -
Page 11: Dab Operation
DAB Operation If the unit is connected to the mains power and then switched on from standby for the first time, the unit will automatically enter DAB mode and perform the auto scan function. The display will show “Scan Services Quick Scan” and will start to show the frequencies and the station numbers being scanned. -
Page 12: Storing Stations
Secondary Services You may see a “ ” symbol after the name of the station. This indicates that there are secondary services available to that station. These secondary services contain extra services that are related to the primary station. e.g. a sports station may want to add extra commentaries. -
Page 13: System Reset
System Reset When you move the unit to another part of the country, your pre-tuned and stored DAB stations may no longer be available and you might need to reset the unit back to its original factory settings. To perform a factory reset, please do the following: 1. -
Page 14: Dab Display Modes
DAB Display Modes Every time you press the DISPLAY button, the display will cycle through the following display modes: Signal Strength, Time / Date, Programme Type, Audio Type / Bitrate, DLS, Channel no. / Frequency, Sleep Timer Status, Alarm Information, Ensemble Name. -
Page 15: Fm Operation
FM Operation Switching from DAB to FM Mode To switch the unit from DAB to FM mode, press the DAB/FM button once. The display will show FM and the frequency. Auto Scan To search for an FM station, press the SCAN button to start the auto scan. Once a station has been found, the scanning will stop automatically. -
Page 16: Recalling A Stored Station
Recalling a Stored Station 1. Once you have saved a station to one of the preset memories, you can recall it by pressing the PRESET button. 2. If you choose a preset that hasn’t been allocated a station, “Preset # Free“ will be displayed. -
Page 17: Fm Display Modes
FM Display Modes Every time you press the DISPLAY button, the display will cycle through the following display modes: Audio Mode, Frequency, Radio Text, Time/Date, Programme Type, Sleep Timer Status, Alarm 1 Status , Alarm 2 Status. Audio Mode Audio Mode When in FM mode, the display will show if the station being received is in mono or stereo. -
Page 18: Maintenance
Maintenance Cleaning the Unit Ensure to unplug the unit from the mains socket before cleaning. • To clean the unit, wipe the case with a slightly moist, lint-free cloth. • Do not use any cleaning fluids containing alcohol, ammonia or abrasives. •... -
Page 19: Specifications
Specifications Mains Supply Input: AC 100 – 240V~ 50/60Hz 0.18A(MAX) Output: 5V 1A Output Power 2.5W RMS Radio Frequency Range DAB 174.928 – 239.200 MHz FM 87.5 – 108 MHz Dimension 140 (L) x 135 (W) x 61 (H) mm Unit Weight 300g Features and specifications are subject to change without prior notice. -
Page 20: Safety Warnings
Safety Warnings Ventilation • Read all the instructions carefully before using the unit and keep them for future reference. • To prevent the risk of electric shock or fire hazard due to overheating, ensure that curtains and • Retain the manual. If you pass the unit onto a other materials do not obstruct the ventilation third party make sure to include this manual. - Page 21 CAUTION RISK OF ELECTRIC SHOCK DO NOT OPEN The lightning flash with arrowhead symbol, within an equilateral triangle, is intended to alert the user to the presence of uninsulated “dangerous voltage” within the unit’s enclosure that may be of sufficient magnitude to constitute a risk of electric shock.
- Page 22 There are separate collection systems for recycling in the EU. For more information, please contact the local authority or your retailer where you purchased the product. All trademarks are the property of their respective owners and all rights are acknowledged. DSG Retail Ltd • Maylands Avenue • Hemel Hempstead Herts • HP2 7TG • England (P.N.: LDABCR11-001)
Need help?
Do you have a question about the LDABCR11 and is the answer not in the manual?
Questions and answers