Table of Contents
Advertisement
Quick Links
Advertisement
Table of Contents

Related Manuals for Metrohm 806


Summary of Contents for Metrohm 806
- Page 1 806 Exchange Unit Manual 8.806.8003EN / 2019-09-26...
- Page 3 Metrohm AG CH-9100 Herisau Switzerland Phone +41 71 353 85 85 Fax +41 71 353 89 01 info@metrohm.com www.metrohm.com 806 Exchange Unit Manual 8.806.8003EN / 2019-09-26...
- Page 4 Technical Communication Metrohm AG CH-9100 Herisau techcom@metrohm.com This documentation is protected by copyright. All rights reserved. This documentation has been prepared with great care. However, errors can never be entirely ruled out. Please send comments regarding possible errors to the address above.
-
Page 5: Table Of Contents
Filling the dosing cylinder ............3 Recycling and disposal ............3 2 Construction of the 806 Exchange Unit Total view ................4 Components of the 806 Exchange Unit ......6 3 Installation Setting up the instrument ............ 9 3.1.1 Packaging ................9 3.1.2... - Page 6 GLP - Validation ..............26 6 Troubleshooting Problems ................27 7 Appendix Buret data ................30 Dosing accuracy ..............30 7.2.1 Typical measurement deviation ..........30 7.2.2 The ISO/EN/DIN standard 8655-3 ........... 31 8 Accessories Index ■■■■■■■■ 806 Exchange Unit...
- Page 7 ■■■■■■■■■■■■■■■■■■■■■■ Table of figures Table of figures Figure 1 806 Exchange Unit ................4 Figure 2 806 Exchange Unit - Components ............. 6 Figure 3 Thermostat casing ................15 Figure 4 Flat stopcock ................... 16 Figure 5 Dosing/Filling .................. 19 ■■■■■■■■...
-
Page 9: Introduction
■■■■■■■■■■■■■■■■■■■■■■ 1 Introduction 1 Introduction The 806 Exchange Unit is a versatile buret unit which can be operated with various Metrohm dosing devices or titrators. The 806 Exchange Unit is suitable for simple dosings or titrations. Specifications concerning the exchange unit and the reagent can be stored in the integrated data chip. -
Page 10: Safety Instructions
Set up the instrument in a well-ventilated location. ■ Keep all sources of flame far from the workplace. ■ Clean up spilled liquids and solids immediately. ■ Follow the safety instructions of the chemical manufacturer. ■ ■■■■■■■■ 806 Exchange Unit... -
Page 11: Filling The Dosing Cylinder
The correct disposal of your old instrument will help to prevent negative effects on the environment and public health. More details about the disposal of your old instrument can be obtained from your local authorities, from waste disposal companies or from your local dealer. ■■■■■■■■ 806 Exchange Unit... -
Page 12: Construction Of The 806 Exchange Unit
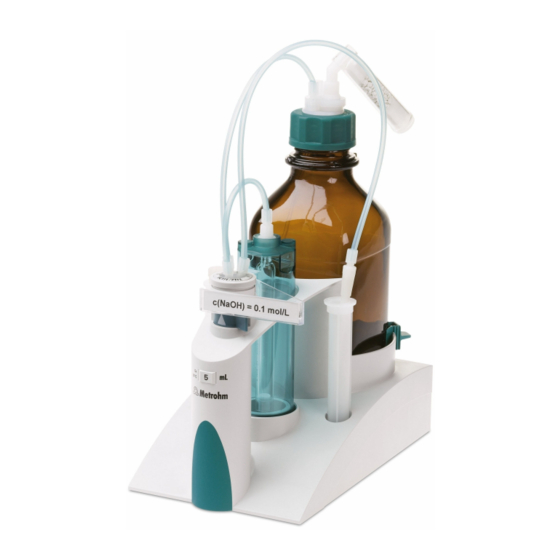
■■■■■■■■■■■■■■■■■■■■■■ 2.1 Total view 2 Construction of the 806 Exchange Unit Total view Figure 1 806 Exchange Unit Tubing connection (6.1805.080) Threaded stopper (6.1446.080) ■■■■■■■■ Length 25 cm 806 Exchange Unit... - Page 13 ■■■■■■■■■■■■■■■■■■■■■■ 2 Construction of the 806 Exchange Unit Bottle attachment (6.1602.105) Tubing connection (6.1805.010) Of PFA/PP, thread GL45 Length 13 cm (6.1805.050 with 1 mL cyl.) PCTFE/PTFE flat stopcock (6.1542.020) Storage vessel (6.1228.000) Or ceramic stopcock 6.1542.010 For buret tips or electrodes Plate holder (6.2046.070)
-
Page 14: Components Of The 806 Exchange Unit
■■■■■■■■■■■■■■■■■■■■■■ 2.2 Components of the 806 Exchange Unit Components of the 806 Exchange Unit Figure 2 806 Exchange Unit - Components Tubing connection (6.1805.080) Tubing connection (6.1805.100) Length 25 cm Length 40 cm Tubing connection (6.1805.010) Threaded stopper (6.1446.080) Length 13 cm (6.1805.050 with 1 mL cyl.) Torque key (6.2739.000) - Page 15 ■■■■■■■■■■■■■■■■■■■■■■ 2 Construction of the 806 Exchange Unit Mounting ring for the cylinder 10 Name plates (6.2244.020) (6.2045.XXX) For labeling the reagent, 10 x .000 for 5, 10 mL cylinder .010 for 20 mL cylinder .020 for 50 mL cylinder 11 Dosing cylinder (6.1518.XXX)
- Page 16 ■■■■■■■■■■■■■■■■■■■■■■ 2.2 Components of the 806 Exchange Unit 27 Dosing tip open (6.1543.060) 28 Link stopper (6.1446.030) of ETFE/FEP, for dosings 29 Body (6.1576.XXX) 30 Data chip .110 for 1 mL cylinder On the underside of the buret .150 for 5 mL cylinder .210 for 10 mL cylinder...
-
Page 17: Installation
Soda lime KF reagent: Molecular sieve If no special adsorber material is necessary, the adsorber tube may also be used as dust filter when filled with cotton. 4 Attach the filled adsorber tube onto the reagent bottle. ■■■■■■■■ 806 Exchange Unit... -
Page 18: Attaching The Exchange Unit
6.1602.105 / 6.1618.010 3.2.2 Attaching the exchange unit Attach an 806 Exchange Unit as follows: 1 Before attaching the exchange unit, check whether the stopcock can be switched manually by the switching lever. For attaching, the switching lever must be directed to the right (stop- cock in dosing position). - Page 19 4 Attach the exchange unit from the front onto the control device and push all the way to the rear, so that it snaps in and the LED Status flashes slowly. It must snap in audibly. ■■■■■■■■ 806 Exchange Unit...
-
Page 20: Filling The Tubings
The function Preparing or PREP of the control software is used to rinse the cylinder and tubings of the exchange unit and fill them air bubble-free. You should carry out this function before the first determination or once per day. ■■■■■■■■ 806 Exchange Unit... -
Page 21: Buret Tips
The backpressure of the dosed liquid is overcome during the dosing pro- cess. The membrane opens up the tubing end. The tubing end is sealed off again automatically after the dosing is completed. CAUTION Do not disassemble the antidiffusion tip. ■■■■■■■■ 806 Exchange Unit... -
Page 22: Removing The Exchange Unit
The thermostat casing may only be used with a thermostat equipped with a pressure and suction pump (the feeding pressure must not be too high). The thermostat casing may only be used in a temperature range from 15...50 °C. ■■■■■■■■ 806 Exchange Unit... -
Page 23: Figure 3 Thermostat Casing
8 Fasten the sealing ring with the screw nipple. 9 Insert the glass cylinder with holder into the thermostat casing and press firmly. 10 Tighten the thermostat casing with the cylinder in the body. 11 Connect the thermostat tubings. ■■■■■■■■ 806 Exchange Unit... -
Page 24: Mounting The Flat Stopcock
PCTFE/PTFE stopcock. The PCTFE/PTFE stopcock is subject to a certain wearing. This stopcock has to be replaced more often than the ceramic stopcock. We especially recommend the following type of flat stopcocks: ■■■■■■■■ 806 Exchange Unit... -
Page 25: Mounting The Tubings On The Flat Stopcock
3.3.3 Mounting the tubings on the flat stopcock Mounting the tubings on the flat stopcock 6.1805.080 6.1805.100 6.1805.010 1 Fasten the 6.1805.080 tubing on the flat stopcock and on the bottle attachment of the reagent bottle. ■■■■■■■■ 806 Exchange Unit... - Page 26 By the several dosings and fillings, the air bubbles are driven out. It is important that the tubing connection between the buret and the flat stopcock is bubble-free. If necessary, knocking against the tubings helps to remove the bubbles remained. ■■■■■■■■ 806 Exchange Unit...
-
Page 27: Mode Of Operation
With coupling. For moving the dosing piston in the dosing unit. Dosing tubing Flat stopcock For dosing the solvent via the dosing tip. For switching between filling and emptying the dosing cylinder. Switching lever For manually switching the flat stopcock. ■■■■■■■■ 806 Exchange Unit... - Page 28 The maximum and minimum filling and dosing rates are: Cylinder volume (mL) max. filling- dosing rate (mL/min) min. filling- dosing rate (µ L/ 10 (depending on device) min) NOTICE Enter lower rates for high-viscosity liquids. ■■■■■■■■ 806 Exchange Unit...
-
Page 29: Handling And Maintenance
1 Eject the reagent as far as possible without have the cylinder newly filled. 2 Loosen the tubing connection on the reagent bottle. 3 Move the piston to zero position, i.e. carry out 'Filling'. 4 Remove the exchange unit from the drive. ■■■■■■■■ 806 Exchange Unit... -
Page 30: Cleaning The Cylinder And Piston
Wipe off the edge of the piston to avoid that the reagent will be in contact with the grease. Wipe off excess grease with a soft, lint-free cloth. Do not grease the piston for pipettings. ■■■■■■■■ 806 Exchange Unit... -
Page 31: Assembling The Exchange Unit
4 Attach the exchange unit onto the control device. 5 Dose manually until the piston rod of the drive protrudes just out of the body of the exchange unit. 6 Insert the cylinder with light protection from above into the cylinder holder. ■■■■■■■■ 806 Exchange Unit... -
Page 32: Flat Stopcock Blocked
4 Eventually clean the stopcock with a suitable solvent (see above) in an ultrasonic bath and let it dry afterwards. 5 When the stopcock can be moved again, it can be inserted back into the exchange unit, see above. ■■■■■■■■ 806 Exchange Unit... -
Page 33: Chemical Resistance And Materials
5.2.1 Solutions With the 806 Exchange Unit various solutions can be dosed. The materials of the individual components used have been selected for maximum resistance to chemicals and functionality. It can however not be assumed that all types of aggressive or high-con- centration solutions can be conveyed without difficulty. -
Page 34: Glp - Validation
Good Laboratory Practice Metrohm Applications Bulletin 283/1 Validation of Metrohm burets ■ The validation of burets is carried out by the Metrohm service with special software. The Metrohm agents worldwide offer the possibility of on-site inspections and certifications of dosing units and Dosinos with respect toaccuracy. It is recommended that an accuracy inspection be performed when the dosing cylinders and dosing pistons of a dosing unit are replaced. -
Page 35: Troubleshooting
Check the correct placing of the exchange ■ unit. Check the piston and flat stopcock posi- ■ tion. Switch the instrument off and on again. ■ ■■■■■■■■ 806 Exchange Unit... - Page 36 ■■■■■■■■■■■■■■■■■■■■■■ 6.1 Problems Problem Cause Remedy If necessary contact the Metrohm Service ■ Dept. No dosing takes Tubing connections are Check whether the dosing tip is blocked. ■ place at all blocked or dosing unit is Check whether the dosing tubing is con- ■...
- Page 37 The data of the exchange Have the data chip being replaced by the unit cannot be read Metrohm service.Until the data chip is being because the data chip has replaced you can remove the data chip your- been damaged mechani- self in order to be able to still use the cally or by chemicals.
-
Page 38: Appendix
■■■■■■■■■■■■■■■■■■■■■■ 7.1 Buret data 7 Appendix Buret data The 806 Exchange Unit is equipped with a data chip which contains the specifications for the exchange unit, the tubing connections and the reagent used. Indications on exchange unit / tubing connections Order number of the exchange unit ■... -
Page 39: The Iso/En/Din Standard 8655-3
The Metrohm exchange units fulfil the requirements of the ISO/EN/DIN standard 8655-3 Volume measurement instruments with pistons – Part 3: Piston burets. Metrohm guarantees that its exchange units are in compliance with the following limit values at the time of shipment:... -
Page 40: Accessories
Downloading the accessories list 1 Enter https://www.metrohm.com/ into your Internet browser. 2 Enter the article number (e.g. 806) into the search field. The search result is displayed. 3 Click on the product. Detailed information regarding the product is shown on various tabs. -
Page 41: Index
Piston blocked ......29 Dosing tip Piston rod ....... 9, 11, 19 Open ........13 Production date ......30 Dosing tubing ......19 Validation ......... 26 Validation date ......30 Quality certificate ..... 26 Exchange unit ......29 ■■■■■■■■ 806 Exchange Unit...
Need help?
Do you have a question about the 806 and is the answer not in the manual?
Questions and answers