Table of Contents
Advertisement
Quick Links
AeroLift 100/150 220V
Ceiling-recessed projector lift with a 100 lb
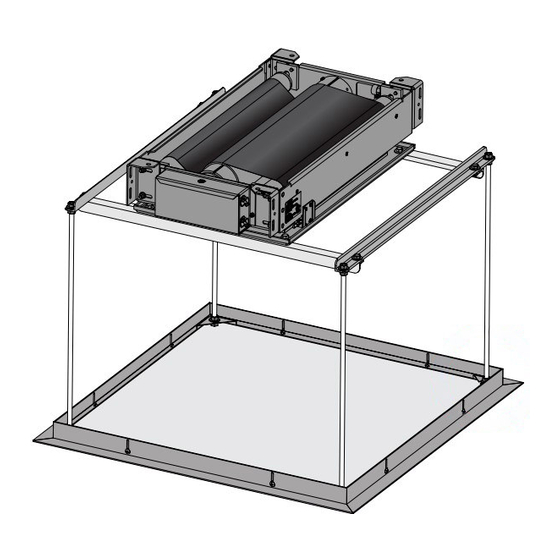
Overview - Components
Back
Closure
Bracket
Threaded
Rod
Read and understand all warnings
Overview - Planning
1. Based on screen location and projector
specifications, determine proper position for
projector installation.
2. Confirm that there is adequate space
for installation and operation. Minimum
clearance above ceiling level varies
according to height of projector, optional
projector mounting bracket, optional ceiling
closure and optional Environmental Housing.
Contents
Overview - Components, Planning .....................................................................1
Section 1 - Hanging Unit ......................................................................................2
PLEASE READ - Safety Information ....................................................................2
Section 2 - Environmental Air Space Housing for AeroLift 100 .....................3
Section 3 - Environmental Air Space Housing for AeroLift 150 .....................4
Section 4 - Installing Projector ...........................................................................5
or 150 lb
(45kg)
(Aerolift 100 shown)
Closure Panel
CAUTION
(Page 2 of this document)
3. Arrange to provide service access to the unit.
4. When installed with Environmental Air Space
Housing unit is suitable for use in an environmental
air space in accordance with Section 300.22
the National Electrical Code, and Section 2-128,
12-010
and 12-100 of the Canadian Electrical
(3)
Code, Part 1, CSA C22.1.
5. Total capacity of lift is 100 or 150 lbs, including
closure, projector, and bracket.
) lifting capacity
(68kg
Side
Closure
Bracket
Side
Closure
Bracket
before beginning installation.
(C)
Section 5 - Operation............................................................................................5
Section 6 - Testing Safety Limit Switches .........................................................5
Section 7 - Electrical Connections .....................................................................6
Section 8 - Wiring Diagrams ................................................................................6
Section 9 - Adjustments .......................................................................................7
Section 10 - Installing Ceiling Closure ...............................................................8
© 2020 All Rights Reserved
INSTRUCTIONS
INSTALLATION & OPERATION
Front
Closure
Bracket
TOOLS REQUIRED
PENCIL
POWER DRILL
Closure
Trim Frame
TAPE MEASURE
HEX WRENCH
As Soon As AeroLift 100 / 150 Arrives
1. Open carton and inspect for damage.
of
2. Locate the following parts:
A. The unit itself
B. Controls
C. Any optional equipment
If you have any difficulties installing or servicing your
AeroLift 100/150, call your dealer or Draper, Inc.
Draper, Inc. | 411 S. Pearl St. Spiceland, IN 47385
draperinc.com | 765.987.7999 | 800.238.7999
|
FORM: AeroLift100_150_220V_Inst20
LEVEL
HARDWARE
(by others)
PLIERS
SCREWDRIVER
Advertisement
Table of Contents

Related Manuals for Draper AeroLift 100 220V


Summary of Contents for Draper AeroLift 100 220V
-
Page 1: Table Of Contents
Section 10 - Installing Ceiling Closure ...............8 If you have any difficulties installing or servicing your AeroLift 100/150, call your dealer or Draper, Inc. Draper, Inc. | 411 S. Pearl St. Spiceland, IN 47385 draperinc.com | 765.987.7999 | 800.238.7999 FORM: AeroLift100_150_220V_Inst20... -
Page 2: Section 1 - Hanging Unit
16. All motors should be tested and limits set using test cord before unit is wired. instructions. Do not use attachments not recommended by the manufacturer. 17. Do not wire motors in parallel without written permission from Draper, Inc. 4. If AeroLift mounting system is not working properly, call your dealer or Draper, Inc., 987-7999. -
Page 3: Section 2 - Environmental Air Space Housing For Aerolift 100
AeroLift 100/150 220V page 3 of 8 Section 2 - Installing Optional Environmental Air Space Housing for AeroLift 100 Please Note: Before assembling the housing, you will need to determine which assembly holes you will use, and knock them out. The Environmental Air Space Housing is shipped unassembled, and must be assembled by the installer. -
Page 4: Section 3 - Environmental Air Space Housing For Aerolift 150
AeroLift 100/150 220V page 4 of 8 Section 3 - Installing Optional Environmental Air Space Housing for AeroLift 150 1. Attach Environmental Air Space Housing top frame to top of Please Note: Before assembling the housing, you will need to determine which assembly Lift with bolts provided. -
Page 5: Section 4 - Installing Projector
AeroLift 100/150 220V page 5 of 8 Section 4 - Installing Projector Draper’s optional Universal Projector Mount will hold up to 200 lb (90.7kg) 10” See Installation Instructions included with Universal Pojector Mount. (25.4cm) 3½” (8.9cm) If not using Draper’s Universal Projector Mount, generally the video projector should be suspended from the bottom pan according to projector manufacturer’s instructions. -
Page 6: Section 7 - Electrical Connections
AeroLift 100/150 220V page 6 of 8 Section 7 - Electrical Connections Lift operates on 220V, 60 Hz. current. Lift ships with internal wiring complete and control switch fully boxed. (es) Wire to connect lift to switch and switch to power supply should be furnished by installer. (es) (es) Please Note: Lift must be installed in accordance with requirements of Local Building Codes, Canadian Electrical Code... -
Page 7: Section 9 - Adjustments
(CLOSED position) ("closed") is preset at the factory, Draper does not recommend changing this position may occur, making unit descend rapidly and causing damage and/or injury. using the limit switch. The "up" position of the closure may be changed by changing the length of threaded rod. -
Page 8: Section 10 - Installing Ceiling Closure
AeroLift 100/150 220V page 8 of 8 Section 10 - Installing Ceiling Closure Section 11 - Installing Ceiling Trim Kit (Optional) If unit is equipped with a ceiling closure system, use either as is, or in conjunction with a piece of existing ceiling tile. 1.
Need help?
Do you have a question about the AeroLift 100 220V and is the answer not in the manual?
Questions and answers