Table of Contents
Advertisement
Quick Links
Advertisement
Table of Contents

Related Manuals for Olivetti FL X1


Summary of Contents for Olivetti FL X1
- Page 1 Termoscanner FL X1 User Manual Termoscanner FL X1 Document code: DOC0236...
- Page 2 PUBLICATION ISSUED BY: Olivetti S.p.A. Telecom Italia Group Via Monte Navale 2/C - 10015 Ivrea (TO) Copyright © 2020 Olivetti All rights reserved FL X1 User Manual...
-
Page 3: Table Of Contents
COMMUNICATION MANAGEMENT ....................20 2.3.6 SYSTEM MANAGEMENT ......................... 21 CONNECTION TO AN ACCESS CONTROL SYSTEM ................. 22 TECHNICAL FEATURES ....................... 24 FAQ ..............................26 SAFETY INFORMATION ....................... 27 SAFETY PRECAUTIONS ........................27 CE CONFORMITY ......................... 28 FL X1 User Manual... -
Page 4: Overview
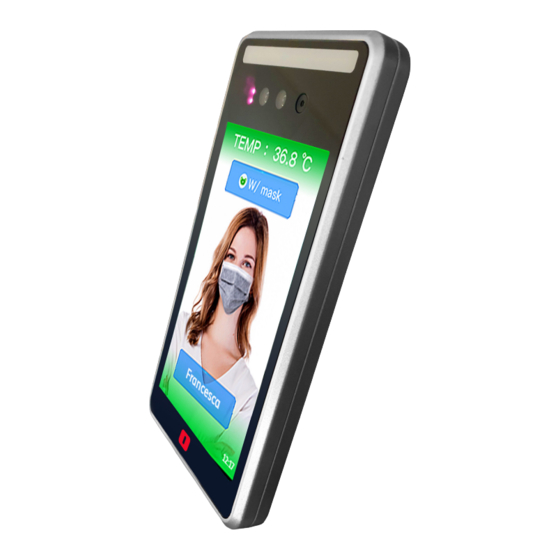
The FL X1 device has a dual camera - optical and infrared - to acquire and display the optical image and to detect body temperature data. - Page 5 Automatic gain and auto white balance, capable to display true color of image 2D/3D noise reduction and anti fog technology, Built in dimming light level sensor and front white light, to ensure low light recognition smoothening capability Support intelligent lightfilled setting FL X1 User Manual...
-
Page 6: The Device - General Features And Packing List
1.2 THE DEVICE – GENERAL FEATURES AND PACKING LIST The FL X1 termoscanner is shaped like a PAD, with an 8” colour display. Dimensions: 252(L)*136(W)*26(H)mm Weight: 1.7KG Enclosed accessories are: Power cord + DC12V 2A adapter The electric plug is CEE 7/4 type (commonly called Schuko) - Page 7 The flap can be mounted on the thermoscanner simply by fitting it from above, without fixing it FL X1 User Manual...
- Page 8 wall mount kit (50 mm x 70 mm – WxH; see par. 2) metal plate for mounting on Vesa Video Electronics Standards standard supports Association) FL X1 User Manual...
-
Page 9: Installation And Operations
2 INSTALLATION AND OPERATIONS 2.1 INSTALLATION 2.1.1 WALL MOUNT INSTALLATION The Olivetti FL X1 is provided with a Wall-Mount kit: FL X1 User Manual... - Page 10 3. Carefully align and push the main unit into the bracket mounted on the wall. 4. Align the bracket holes and gently slide it down tightly. After connecting the wires, fix the bottom cover with screws. FL X1 User Manual...
-
Page 11: Support Installation
2.1.2 SUPPORT INSTALLATION Optionally, it is possible to equip the Olivetti FL X1 with a support to position it on the table or on the ground. The available supports are: 1. FS1 Floor Stand (code B3980 000): it is a stand-alone column with the following characteristics ... -
Page 12: Connecting Network
2.2 CONNECTING NETWORK To configure the FL X1, it’s necessary to connect the device to a PC, either directly or using an Ethernet network, as described in the following paragraphs. 2.2.1 CONNECT TO PC DIRECTLY Connect device and PC with a network cable through RJ 45 port (Ethernet port), as shown below: The default IP address on device is 192.168.2.10. -
Page 13: Connect By Ethernet Lan
2.2.2 CONNECT BY ETHERNET LAN To connect the FL X1 to ad Ethernet LAN, proceed as follows: connect the FL X1 to an Ethernet LAN, using the RJ45 connector. The device supports the DHCP protocol, to obtain automatically a dynamic IP address. -
Page 14: Device Settings
JPG format; the recommended size is 500x500. Input the person’s name, job number, phone number and ID card . For permanent authorizations, select “Permanent” and click [OK] to register For temporarily authorizations, select “Non-permanent” and specify an expiration date . FL X1 User Manual... - Page 15 (Search) revise the personnel information, by clicking on Edit delete the personnel information, by clicking on Delete export the personnel database (Export) and save it as a file in PC FL X1 User Manual...
- Page 16 Access to facial recognition records, with or without mask (by selecting “Wear Mask” or “No Mask”) Register a person by using the related record, if this person not registered yet Export the access record as a file and save it in the PC FL X1 User Manual...
-
Page 17: Device Management
. In the factory default setting, the mask wearing control feature is disabled. Live detection: Select to recognize real human face only. This option prevents fake image from picture or mobile screen FL X1 User Manual... - Page 18 Logo settings: select Customized to upload a custom logo (.png format), which will be shown on the lower left corner of display Temperature calibration: face the FL X1 and click “Start measurement”; the device takes 3 temperature samples separately and automatically fills in the 3 columns. Fill the temperature detected by a forehead thermometer in “Forehead Thermometer...
-
Page 19: Access Control Settings
This section allows to set the interaction with an access control automatic system (eg turnstile, automatic door, automatic bar, etc). Once connected to the access control system, the FL X1 will send the trigger signal to enable a person’s access: ... -
Page 20: Communication Management
1. Platform access: this windows allows to insert the local/cloud server address, where to save the data. Optionally, all the field data will be centralized on the Olivetti Platform, to get an unique view of the different locations and to create custom dashboards. -
Page 21: System Management
(Select File Firmware Upgrade; this operation has to be carried out by an expert technician) and set the language (Device Language; the default language is English; available options are Italian, Spanish, Portuguese, Chinese, Japanese, Korean, Thai). FL X1 User Manual... -
Page 22: Connection To An Access Control System
The access control system will be normally set in Gate Closed mode and it will be enabled to allow a person’s access only when the FL X1 will send the trigger signal, i.e. when the termoscanner will test successfully the personnel temperature and the presence of the mask. In this case, the internal switch of the FL X1 will close the electrical circuit and send to the access control system the impulse to unblock the access (eg turnstile;... - Page 23 Olivetti FL X1 termoscanner The FL X1 internal switch is set to remain in an open mode until the device has successfully tested the personnel temperature and the mask presence: In this case, the internal switch of the FL X1 closes the...
-
Page 24: Technical Features
120db,ISP algorithm face partial exposure Image sensor 1/2.8" Progressive Scan CMOS Interfaces Digital Output 1 KZ_Out Interfacce di rete 1 RJ45 10M / 100M adaptive Ethernet port Wiegand 1 WG in, 1 WG out RS485 RS485+ / RS485 FL X1 User Manual... - Page 25 Display 8 inches Processor Dual-core processor+1G memory +16G Flash Linux Speaker Standard; pre-recorded contents Env. operating conditions 0~90% RH (Indoor recommended ) Antistatic Contact ±6KV, Air ±8KV Power requirement DC12V/3A Power Consumption 20W(MAX) Weight 1,7 Kg FL X1 User Manual...
-
Page 26: Faq
Connecting the device to a PC/Server, the records can be exported and saved (see par. 2.3.2 – 3). Optionally, all the field data will be centralized on the Olivetti Platform, to get an unique view of the different locations and to create custom dashboards. -
Page 27: Safety Information
Use only the standard power adapter supplied together with the device. The power supply is for indoor use Do not allow anything to rest on power cord. Do not locate this product where persons will walk on the cord. FL X1 User Manual... -
Page 28: Ce Conformity
Olivetti guarantees activation of treatment, collection, recycling and disposal procedures in compliancy with the Directive 2012/19/EU (and subsequent amendments).
Need help?
Do you have a question about the FL X1 and is the answer not in the manual?
Questions and answers