Table of Contents
Advertisement
Advertisement
Chapters
Table of Contents

Related Manuals for BH FITNESS BX60


Summary of Contents for BH FITNESS BX60
- Page 1 BX60 Upright Bike User Manual BX60 健身車中文說明書 BX60 健身车中文说明书...
- Page 2 BH Upright Bike BX60 User Manual...
-
Page 3: Table Of Contents
BX60 Bike Table of Contents 1. Exploded View ............... 2 2. Parts list .................. 3 3. Safety warning ............... 5 4. Instructions before use ............5 5. Assembly instructions ............7 6. Operating Instructions of the Electronic Watch ....15... -
Page 4: Exploded View
BX60 Bike 1. Exploded View... -
Page 5: Parts List
BX60 Bike 2. Parts list PARTS LIST NAME SPECIFICATION Q'TY NAME SPECIFICATION Q'TY Φ4×Φ10×1T Main frame Flat washer A2-1 Crank leg Hex head screw M8×30mm Φ198 A2-2 Iron tape reel Nylon nut Button head hex socket A2-3 Bearing bowl seat M8×10mm... - Page 6 BX60 Bike PARTS LIST NAME SPECIFICATION Q'TY NAME SPECIFICATION Q'TY Hex head screw M10×35mm Hand pulse cable Pan head self-tapping Magnet base 4×20mm screw Hexagonal head Button head hex socket M8×55mm M8×40mm screw screw Weight tape Hand pulse cable Φ8×Φ19×1.5T(R12.
-
Page 7: Safety Warning
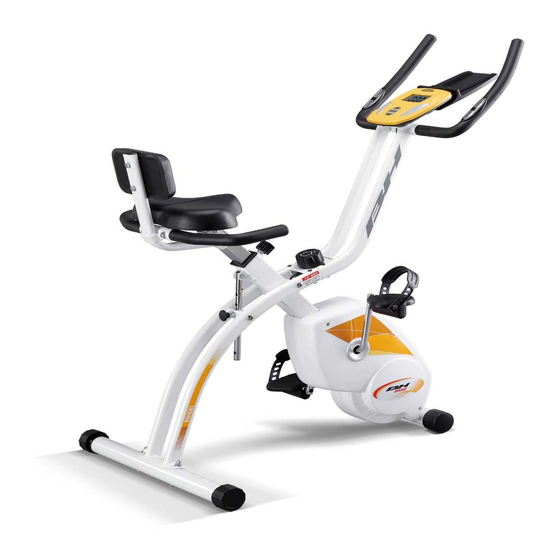
13. Noncompliance with the above regulations will void the warranty. 4. Instructions before use Congratulations on purchasing your own BH fitness equipment! We hope that you will enjoy the fashion, quality and exercise values brought by BH. The high-quality product you have chosen can meet your demands for various functional trainings. Please read the user manual carefully before use. - Page 8 BX60 Bike Bike Diagram Newspaper rack Electronic watch Hand pulse handle Resistance adjusting knob Seat cushion Back pad Left foot pedal Handrail handle Angle adjustment Moving wheel pull knob Height adjustment knob Right foot pedal...
-
Page 9: Assembly Instructions
BX60 Bike 5. Assembly instructions Bike components Parts kit Flat washer 平華司Φ 8XΦ 16X1.5T 9PIEZAS 8×Φ16×1.5T Pan head hex socket screw 大扁頭內六角螺絲M8X55L 5PIEZAS 9PIEZAS H4 M8X55L 2PIEZAS 2PIEZAS H6 Carriage bolt Button head washer 半圓華司Φ 8XΦ 19X1.5T 馬車螺絲M8X65L 2PIEZAS M8X65L Φ8×Φ19×1.5T... - Page 10 BX60 Bike STEP 1 Open-end wrench Lock the rear stabilizer (F1) onto the rear support frame tube set (B1) with M8X65L carriage bolts (F3), Φ8XΦ19X1.5T button head washers (F4) and M8 cap nuts (F5). STEP 2 Connect the sensor cable (A29) to the middle-section cable (C3), place the pipe plug (B10), insert the handrail support rod (C1) into the elliptic connecting plate (B8) on the rear support frame tube set (B1) and then lock it with the M6X20L countersunk hex socket screws (B11).
- Page 11 BX60 Bike STEP 3 Lock the handrail tube set (D1) and handrail support rod (C1) with the Φ8×Φ19×1.5T button head washers (D8) and M8×40L button head hex socket screws (D6). STEP 4 Make the connector on the electronic watch (G1) pass through the round hole on the electronic watch plate,...
- Page 12 BX60 Bike STEP 5 Lock the electronic watch (G1) and handrail support rod (C1) with the M5X16L cross recessed pan head screws (G2), and then fasten the newspaper rack (G3) on the electronic watch with the same screws. STEP 6 Lock the seat cushion (E2) onto the seat cushion extension tube set (E1) with the Φ8XΦ16X1.5T flat...
- Page 13 BX60 Bike STEP 7 Insert the seat tube set (E1) into the hollow pipe sleeve (A6) of the frame (A1) and then adjust the height with the pull pin (A5). STEP 8 A2-10L A2-1 A2-10R Fix the left and right foot pedal (A2-10 L and R) onto the crank legs (A2-1) with the Allen wrench.
- Page 14 BX60 Bike STEP 9 Fasten the back pad tube set (H1) onto the back pad (H2) with the Φ8XΦ16X1.5T flat washer (H4) and M8X30L button head hex socket screws (H5). STEP 10 Fasten the fixing handrail (H8) onto the back pad tube set (H1) with the Φ8×Φ19×1.5T button head washers...
- Page 15 BX60 Bike STEP 11 Lock the back pad tube set (H1) onto the seat tube set (E1) with the Φ8XΦ16X1.5T flat washers (H4), M8 nylon nuts (H5) and M8X55L pan head hex socket screws (H6). Congratulations! You have completed the installation of the bike.
- Page 16 BX60 Bike...
-
Page 17: Operating Instructions Of The Electronic Watch
BX60 Bike 6. Operating Instructions of the Electronic Watch A. Power mode Power ON: after loading the batteries, the LCD will display for 2 seconds and then enter the SCAN mode. Sleep: when there is no signal input within 5 minutes, the watch will enter the sleep mode. Pedaling or pressing the MODE key will wake up the watch. - Page 18 BX60 Bike TIME SPEED DIST PULSE...
- Page 19 BH 健身車 BX60 中文說明書...
- Page 20 BX60 Bike 目錄 1. 產品爆炸圖 ................2 2. 爆炸圖明細表 ............... 3 3. 安全警告 ................5 4. 使用前須知 ................5 5. 組裝說明 ................7 6. 電子錶操作说明 ..............14...
-
Page 21: 產品爆炸圖
BX60 Bike 1. 產品爆炸圖... -
Page 22: 爆炸圖明細表
BX60 Bike 2. 爆炸圖明細表 PARTS LIST NAME SPECIFICATION Q'TY NAME SPECIFICATION Q'TY 車架組 平華司 4×Φ10×1T Φ A2-1 曲柄腿 六角頭螺絲 M8×30mm A2-2 鐵皮帶盤 Φ198 尼帽 A2-3 軸承碗座 半圓頭內六角 M8×10mm A2-4 12 珠軸承 對鎖螺絲 M10×100mm A2-5 皮帶盤固定螺帽 右牙 皮帶 300 J5 A2-6 曲柄固定螺帽... - Page 23 BX60 Bike PARTS LIST NAME SPECIFICATION Q'TY NAME SPECIFICATION Q'TY 六角頭螺絲 M8×55mm 半圓頭內六角 M8×40mm 加重片 手握心跳線 圓頭十字螺絲 M4×35mm 半圓華司 Φ8×Φ19×1.5T(R12.7) 螺帽 座墊伸縮管組 座墊 平華司 8×Φ16×1.5T Φ 尼帽 後貼地管 Φ2"×1.5T×600mm 圓後腳墊 Φ50 馬車螺絲 M8×65mm 半圓華司 高袋帽 8×Φ19×1.5T(R30) Φ 電子錶 大扁頭十字 M5×16mm 書報架...
-
Page 24: 安全警告
BX60 Bike 3. 安全警告 警告:使用此機台或開始任何鍛煉之前,請諮詢您的醫生,尤其對目前有健康問題的人士。 安全預防措施 1. 使用者必須閱讀完使用手冊中安全預防。 2. 使用者最大體重不超過 100 公斤 3. 機台只能在室內使用,切必須放置在平整的地面上,機台不可放置在車庫,露臺。 也不可靠近水,使用者身上有水也不可使用。 4. 穿著舒服的運動鞋及合適的衣服,以下情況不得使用機台,光腳,只穿襪子,穿 涼鞋或高跟鞋。 5. 經常檢查機台以確保機台處於良好狀態。 6. 如需拆卸必須完全等機台完全停止。 7. 嚴禁寵物靠近機台。 8. 嚴禁無人看管下,讓兒童靠近或使用機台。 9. 不要在缺氧或有氣霧劑的環境下使用機台。 10. 機台的間隙不要漏入任何物品。 11. 機台只能一人使用。 12. 只能請有資質的人員來維修機台。 13. 如不遵守如上規定,將無法得到保修。 4. 使用前須知 恭喜您購買 BH 健身器材,我們希望您能享受到 BH 帶給您的時尚,品質和運動價值... - Page 25 BX60 Bike 請看那下圖以認識機台的配件 書報架 電子錶 手握心跳把手 阻力調整鈕 座墊 背墊 左腳踏板 扶手把手 移動輪 角度調整拉紐 高度調整鈕 右腳踏板...
-
Page 26: 組裝說明
BX60 Bike 5. 組裝說明 包裝箱 零件包 平華司Φ 8XΦ 16X1.5T 9PIEZAS 大扁頭內六角螺絲M8X55L 5PIEZAS 2PIEZAS 半圓華司Φ 8XΦ 19X1.5T 馬車螺絲M8X65L 2PIEZAS 6PIEZAS 2PIEZAS 半圓頭內六角螺絲M8X40L 4PIEZAS 30X60 開口板手... - Page 27 BX60 Bike 步驟一 開口板手 取後貼地管(F1),用馬車螺絲 M8X65L(F3) 半圓華司Φ 8XΦ 19X1.5T(F4)和高袋帽 M8(F5)鎖固在後支撐 架管組(B1)上。 步驟二 將感應線(A29)和中段線(C3)相接,套上管塞(B10),再將扶手支撐桿組(C1)插入後支撐架管組(B1)上的 橢圓連接片(B8),再用沙拉頭內六角螺絲 M6X20L(B11)鎖固。...
- Page 28 BX60 Bike 步驟三 將扶手管組(D1)和扶手支撐桿組(C1)用半圓華司Φ 8×Φ 19×1.5T(D8)半圓頭內六角螺絲 M8×40L(D6)鎖 固。 步驟四 將電子錶(G1)上的接頭穿過電子錶片的圓孔和中段線(C3)手握心跳線(D7)接合。...
- Page 29 BX60 Bike 步驟五 將電子錶(G1)和扶手支撐桿組(C1)用大扁十字螺絲 M5X16L(G2)鎖固;再將書報架(G3)用相同螺絲鎖固 在電子錶上。 步驟六 用平華司Φ 8XΦ 16X1.5T(E3)和尼帽 M8(E4)將座墊(E2)鎖固在座墊伸縮管組(E1)上。...
- Page 30 BX60 Bike 步驟七 將座管組(E1)插入車台(A1)的中空管套(A6)裡,再用拉銷(A5)調整高度。 步驟八 A2-10L A2-1 A2-10R 將左、右踏板(A2-10L、R)用六角板手固定在曲柄腿(A2-1)上。...
- Page 31 BX60 Bike 步驟九 將背墊管組(H1)用平華司Φ 8XΦ 16X1.5T(H4)和半圓頭內六角螺絲 M8X30L(H5)和背墊(H2)鎖固。 步驟十 將固定扶手組(H8)用半圓華司Φ 8×Φ 19×1.5T(D8)半圓頭內六角螺絲 M8X40L(D6)鎖固在背墊管組(H1) 上。...
- Page 32 BX60 Bike 步驟十一 將背墊管組(H1)用平華司Φ 8XΦ 16X1.5T(H4)尼帽 M8(H5)和大扁頭內六角螺絲 M8X55L(H6)鎖固在座 墊管組(E1)上。 恭喜! 您已經完成機台的安裝...
-
Page 33: 電子錶操作说明
BX60 Bike 6. 電子錶操作说明 A. 電源模式: 開機:裝上電池後,LCD 全顯 2 秒鍾,然後進入掃描(SCAN)模式。 休眠:若 5 分鍾內無信號輸入,會進入休眠模式,此時踩踏或按 MODE 鍵可喚醒。 復位:長按 MODE 鍵 3 秒鍾為 RESET,可復位時間,距離,卡路裡的值。 B. 功能說明: 在掃描模式下,默認顯示為時間且 6 秒鍾後顯示下一狀態如此循環; 按 MODE 鍵後切換到手動模式,每按一次 MODE 鍵即可切換一種顯示狀態。 TIME→SPD→DIST→CAL→ODO→RPM.→PULSE (1).TIME(時間):從運動開始到運動結束的時間.(當 4 秒內沒有信號時,時間暫停) 。 (2).SPEED(速度):運動時的當前速度。 (3).DIST (距離):從運動開始到運動結束的距離。 (4).CAL(卡路裡):從運動開始到運動結束所消耗的卡路裡。... - Page 34 BX60 Bike Page 2 11/26/2012 TIME SPEED DIST PULSE...
- Page 35 BH 健身车 BX60 中文说明书...
- Page 36 BX60 Bike 目录 产品爆炸图..............爆炸图明细表..............安全警告................使用前须知..............组装说明................电子表操作说明............
-
Page 37: 产品爆炸图
BX60 Bike 1. 产品爆炸图... -
Page 38: 爆炸图明细表
BX60 Bike 2. 爆炸图明细表 PARTS LIST NAME SPECIFICATION Q'TY NAME SPECIFICATION Q'TY 车架组 平华司 4×Φ10×1T Φ 曲柄腿 六角头螺丝 A2-1 M8×30mm 铁皮带盘 尼帽 A2-2 Φ198 轴承碗座 半圆头内六角 A2-3 M8×10mm 对锁螺丝 A2-4 12 珠轴承 M10×100mm 皮带盘固定螺帽 右牙 皮带 A2-5 300 J5 曲柄固定螺帽... - Page 39 BX60 Bike PARTS LIST NAME SPECIFICATION Q'TY NAME SPECIFICATION Q'TY M8×55mm M8×40mm 六角头螺丝 半圆头内六角 加重片 手握心跳线 M4×35mm 圆头十字螺丝 半圆华司 Φ8×Φ19×1.5T(R12.7) 螺帽 座垫伸缩管组 8×Φ16×1.5T 座垫 平华司 Φ 尼帽 后贴地管 Φ2"×1.5T× 600mm M8×65mm 圆后脚垫 马车螺丝 Φ50 8×Φ19× 半圆华司 高袋帽 Φ 1.5T(R30) M5×16mm 电子表...
-
Page 40: 安全警告
BX60 Bike 3. 安全警告 警告:使用此机台或开始任何锻炼之前,请咨询您的医生,尤其对目前有健康问题的人士。 安全预防措施 1. 使用者必须阅读完使用手册中安全预防。 2. 使用者最大体重不超过 100 公斤 3. 机台只能在室内使用,切必须放置在平整的地面上,机台不可放置在车库,露台。 也不可靠近水,使用者身上有水也不可使用。 4. 穿着舒服的运动鞋及合适的衣服,以下情况不得使用机台,光脚,只穿袜子,穿 凉鞋或高跟鞋。 5. 经常检查机台以确保机台处于良好状态。 6. 如需拆卸必须完全等机台完全停止。 7. 严禁宠物靠近机台。 8. 严禁无人看管下,让儿童靠近或使用机台。 9. 不要在缺氧或有气雾剂的环境下使用机台。 10. 机台的间隙不要漏入任何物品。 11. 机台只能一人使用。 12. 只能请有资质的人员来维修机台。 13. 如不遵守如上规定,将无法得到保修。 4. 使用前须知 恭喜您购买 BH 健身器材,我们希望您能享受到 BH 带给您的时尚,质量和运动价值... - Page 41 BX60 Bike 请看那下图以认识机台的配件 书报架 电子表 手握心跳把手 阻力调整钮 座垫 背垫 左脚踏板 扶手把手 移动轮 角度调整拉纽 高度调整钮 右脚踏板...
-
Page 42: 组装说明
BX60 Bike 5. 组装说明 包装箱 零件包 平華司Φ 8XΦ 16X1.5T 9PIEZAS 大扁頭內六角螺絲M8X55L 5PIEZAS 2PIEZAS 半圓華司Φ 8XΦ 19X1.5T 馬車螺絲M8X65L 2PIEZAS 6PIEZAS 2PIEZAS 半圓頭內六角螺絲M8X40L 4PIEZAS 30X60 開口板手... - Page 43 BX60 Bike 步骤一 开口板手 取后贴地管(F1),用马车螺丝 M8X65L(F3) 半圆华司Φ8XΦ19X1.5T(F4)和高袋帽 M8(F5)锁固在后支撑 架管组(B1)上。 步骤二 将感应线(A29)和中段线(C3)相接,套上管塞(B10),再将扶手支撑杆组(C1)插入后支撑架管组(B1)上的 椭圆连接片(B8),再用色拉头内六角螺丝 M6X20L(B11)锁固。...
- Page 44 BX60 Bike 步骤三 将扶手管组(D1)和扶手支撑杆组(C1)用半圆华司Φ8×Φ19×1.5T(D8)半圆头内六角螺丝 M8×40L(D6) 锁固。 步骤四 将电子表(G1)上的接头穿过电子表片的圆孔和中段线(C3)手握心跳线(D7)接合。...
- Page 45 BX60 Bike 步骤五 将电子表(G1)和扶手支撑杆组(C1)用大扁十字螺丝 M5X16L(G2)锁固;再将书报架(G3)用相同螺丝锁固 在电子表上。 步骤六 用平华司Φ8XΦ16X1.5T(E3)和尼帽 M8(E4)将座垫(E2)锁固在座垫伸缩管组(E1)上。...
- Page 46 BX60 Bike 步骤七 将座管组(E1)插入车台(A1)的中空管套(A6)里,再用拉销(A5)调整高度。 步骤八 A2-10L A2-1 A2-10R 将左、右踏板(A2-10L、R)用六角板手固定在曲柄腿(A2-1)上。...
- Page 47 BX60 Bike 步骤九 将背垫管组(H1)用平华司Φ8XΦ16X1.5T(H4)和半圆头内六角螺丝 M8X30L(H5)和背垫(H2)锁固。 步骤十 将固定扶手组(H8)用半圆华司Φ8×Φ19×1.5T(D8)半圆头内六角螺丝 M8X40L(D6)锁固在背垫管组(H1) 上。...
- Page 48 BX60 Bike 步骤十一 将背垫管组(H1)用平华司Φ8XΦ16X1.5T(H4)尼帽 M8(H5)和大扁头内六角螺丝 M8X55L(H6)锁固在座 垫管组(E1)上。 恭喜! 您已经完成机台的安装...
-
Page 49: 电子表操作说明
BX60 Bike 6. 电子表操作说明 A. 电源模式: 开机:装上电池后,LCD 全显 2 秒钟,然后进入扫描(SCAN)模式。 休眠:若 5 分钟内无信号输入,会进入休眠模式,此时踩踏或按 MODE 键可唤醒。 复位:长按 MODE 键 3 秒钟为 RESET,可复位时间,距离,卡路里的值。 B. 功能说明: 在扫描模式下,默认显示为时间且 6 秒钟后显示下一状态如此循环; 按 MODE 键后切换到手动模式,每按一次 MODE 键即可切换一种显示状态。 TIME→SPD→DIST→CAL→ODO→RPM.→PULSE (1).TIME(时间):从运动开始到运动结束的时间.(当 4 秒内没有信号时,时间暂停) 。 (2).SPEED(速度):运动时的当前速度。 (3).DIST (距离):从运动开始到运动结束的距离。 (4).CAL(卡路里):从运动开始到运动结束所消耗的卡路里。... - Page 50 BX60 Bike Page 2 11/26/2012 TIME SPEED DIST PULSE...
Need help?
Do you have a question about the BX60 and is the answer not in the manual?
Questions and answers