
Related Manuals for Wfly WFT08X


Summary of Contents for Wfly WFT08X
- Page 1 WFT08X RADIO CONTROL SYSTEM PCMS 1024 INSTRUCTION MANUAL NOTICE Read the instructions before operation!
- Page 2 WFT08X INSTRUCTION Thank you for purchasing WFLY products! WFT08X SERVICE 1.Retailers to provide free maintenance for one year (apart from artificial damage) 2. WFLY retailers will always provide life-long maintance...
-
Page 3: Table Of Contents
WFT08X INSTRUCTION CATALOGUE Contents------------------------------------------------------------------- WFT08X Spare parts----------------------------------------------------- Transmitter front---------------------------------------------------------- Transmitter back---------------------------------------------------------- Receiver for 2. 4GHz----------------------------------------------------- 2. 4GHz operation instructions----------------------------------------- Receiver for FM ---------------------------------------------------------- Trainer function----------------------------------------------------------- Flying safety warnings--------------------------------------------------- Features-------------------------------------------------------------------- Keys–----------------------------------------------------------------------- Adjust the stick head---------------------------------------------------- hange the throttle direction of mode1 or 2... - Page 4 WFT08X INSTRUCTION 5. Sub trim---------------------------------------------------------------- 6. Swash param setting------------------------------------------------ 7. Auxiliary channels setting------------------------------------------ 8. Throttle curve setting------------------------------------------------ 9. Pitch curve setting--------------------------------------------------- 10. Revolution mixing--------------------------------------------------- 11. Trim step setting----------------------------------------------------- 12. Throttle cut setting-------------------------------------------------- 13. Fly model switch----------------------------------------------------- 14. Throttle holding setting--------------------------------------------- 15.
- Page 5 WFT08X INSTRUCTION AIRPLANE SYS SETTING 1.Model selecting--------------------------------------------------- 2.Model name----------------------------------------------------------- 3.Model setting------------------------------------------------------- 4.Atl------------------------------------------------------------------------ 5.AIL-2--------------------------------------------------------------------- 6.Modulation setting---------------------------------------------- 7.Stick setting-------------------------------------------------------- 8.Adjustment------------------------------------------------------------- 9.Reset setting--------------------------------------------------------- 10.Send data------------------------------------------------------------ 11.Receive data------------------------------------------------------- 12.Sound------------------------------------------------------------------- 13.Contrast setting----------------------------------------------- 14.About------------------------------------------------------------------- 15.Language--------------------------------------------------------------- NORMAL SETTING 1.MONITOR---------------------------------------------------------------- 2.DUAL RATE & EXPONENTIAL SETTING--------------------------- 3.SERVO REVERSE------------------------------------------------------ 4.END POINT-------------------------------------------------------------- 5.SUB TRIM----------------------------------------------------------------...
- Page 6 WFT08X INSTRUCTION 13.THROTTLE CUT SETTING----------------------------------------- 14.IDLE DOWN----------------------------------------------------------- 15.FAIL SAFE------------------------------------------------------------- 16.TIMER------------------------------------------------------------------ 17.ADVANCED------------------------------------------------------------ ADVANCED 1.CURVE SETTING------------------------------------------------------- 2 - 6.PROG.NOR.MIX1-5------------------------------------------------- 7 - 8.PROG.CUR.MIX1-2------------------------------------------------- 9.AIR BRAKE--------------------------------------------------------------- 10.ELEVON------------------------------------------------------------------ 11.AILVATOR---------------------------------------------------------------- 12.V-TAIL------------------------------------------------------------------- 13.SNAP-ROLL------------------------------------------------------------- 14.DELAY------------------------------------------------------------------ 15.THROTTLE NEEDLE MIXING--------------------------------------- 16.GYRO SENS SETTING-----------------------------------------------...
-
Page 7: Contents
WFT08X INSTRUCTION Contents 1. WFT08X transmitter 2. 2.4GHz WFTRFS RF module 3. Battery holder for transmitter 4. Neckstrap 5. WFR09S 2.4GHz receiver 6. Li-po Voltage Regulator... -
Page 8: Wft08X Spare Parts
WFT08X INSTRUCTION WFT08X Spare Parts for 2.4GHz 1. Transmitter 2. WFTRFS 3. Battery Holder 2.4GHz RF module 4. Neckstrap 5. WFR09S receiver 6.li-po Voltage Regulator... -
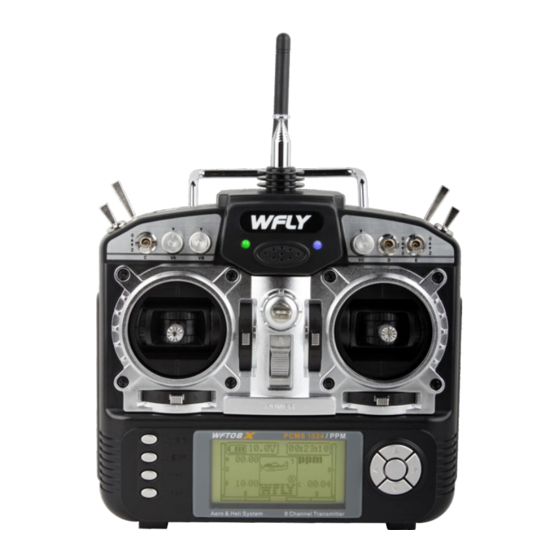
Page 9: Transmitter Front
WFT08X INSTRUCTION TRANSMITTER FRONT VIEW MODEL NO.: WFT08X MODULATION: PCMS 1024/ PPM OUTPUT POWER:≤100mW( 2. 4GHz); ≤ 700mW(35- 75MHz) POWER SUPPLY: 1.2V x 8 (9.6V) CURRENT DRAIN: 200mA Band: 35, 36, 40, 41, 72, 75MHz RF Antenna TRANSMITTER FRONT VIEW... -
Page 10: Transmitter Back
WFT08X INSTRUCTION TRANSMITTER BACK VIEW Handle RF module NORMAL Green LED lights :power Orange LED lights :incorrect input signal SET MODE: hold SET and power on radio Green LED lights :fail safe Orange LED lights :code matching Green LED glitters :fail safe is setting... -
Page 11: Receiver For 2. 4Ghz
TYPE: 9 CH PPM/PCMS 1024/PCMS 4096 POWER SUPPLY: 4.8-6V CURRENT DRAIN: 30mA RECEIVER SENSITIVITY: -97dBm BAND: 2.400GHz-2.4835GHz WFR09S 9 Channel Receiver The receiver is used for all WFLY transmitters. 1.AIL:Aileron (Channel 1)------------------------- 2.ELE:Elevator (Channel 2)---------------------- 3.THR:Throttle (Channel 3)------------------------ 4.RUD:Rudder (Channel 4)------------------------ 5.GYR:Landing Gear/Gyro (Channel 5)---------- 6.PIT:Pitch (Channel 6)------------------------------... -
Page 12: Ghz Operation Instructions
WFT08X INSTRUCTION WFLY 2.4GHz Operation Instructions 2.4GHz system can automatically recognize WFLY PCMS1024 and PPM. 1. Code matching A. Press SET to start the receiver. The orange LED flashes, indicating the receiver waits for the code matching signal. Flash The same setting for WFR07S and WFR09S B. -
Page 13: Receiver For Fm
INSTRUCTION WFT08X Note:If you need 35MHz to 75MHz, WFLY will supply FM receiver and FM RF module RECEIVER MODEL NO.: WFR08- P TYPE: 8CH Software decoding PPM POWER SUPPLY: 1.2V x 4 (4.8V) CURRENT DRAIN: 20mA WEIGHT: 19 g DIMENSION: 44.88mm x27.90mm x16.39mm... -
Page 14: Trainer Function
WFT08X INSTRUCTION Trainer function Two WFT08X transmitters can transfer data between each other or act as trainer. Setting Method: 1).Data transfer function: use Trainer/Data transfer cable to interconnect two WFT08X transmitters. Select “Send data/Receive data” in SYS setting to transfer the data. -
Page 15: Flying Safety Warnings
WFT08X INSTRUCTION FLYING SAFETY WARNINGS Special Symbol Instruction To use the product safely, please pay attention to the instructions as follows. Please pay special attention to the symbol as follows: Dangers If you use it without proper operation, it is possible that you hurt yourself or others seriously or may even cause death. -
Page 16: Features
All curves have up to 7 adjustable points. User-defined switches and knobs. Model parameters can be exchanged between transmitters. 8-model memories. The WFT08X transmitter is compatible with FUTABA and JR (PPM) receivers. Our Dual conversion receiver(PPM) is compatible with FUTABA and JR transmitters. -
Page 17: Keys
WFT08X INSTRUCTION Keys MENU Menu key brings you to the function list of the transmitter. EXIT Exit key brings you back to the previous menu or exit edit. This key will increase values. If you press long, the increasing speed will be faster. -
Page 18: Adjust The Stick Head
Adjust the stick head: Top thread Allen key stick head Put the stick head cover the control rod on the left and right sides,don't twist down Stick the stick head to the bottom, and then put top thread with allen key to adjust the height you need. -
Page 19: Change The Throttle Direction Of Mode1 Or 2
Change the throttle direction of mode1 or 2 Bolt Bolt Bolt Bolt Set up release link and spring, according your habit to addjust the the tightness of Put on the metal chip, according screw 2 to adjust the control your habit to adjust the elasticity feeling. - Page 20 WFT08X HELICOPTER INSTRUCTION Editing mode and function introduction 1. Start up Screen When turn on the power switch, the LCD displays as follows. Voltage Start time Modulation Timer A Model type Timer B Timer C Throttle trim Elevator trim display...
-
Page 21: Sys Setting
WFT08X HELICOPTER INSTRUCTION B. SYS SETTING When pressing Menu and turning on the power switch, the LCD displays the following. Setting method: 1. Use direction keys to edit, or use up/down keys to browse the functions. Left/right direction keys to switch pages. - Page 22 WFT08X HELICOPTER INSTRUCTION HELICOPTER Press Menu and turn on the transmitter to enter SYS SETTING. Select MODEL SETTING, press OK key to select the model type. Restart the transmitter after setting.
-
Page 23: Model Selecting
WFT08X HELICOPTER INSTRUCTION SYS SETTING 1.Model selectting There are 8 helicopter models. You can select any one to set. Setting Method: Press Menu and turn on the transmitter to enter “SYS SETTING”. Use up/down keys to select “Model selecting”, OK to enter editing. -
Page 24: Model Name
WFT08X HELICOPTER INSTRUCTION 2. Model name This function is to make new names by users. Setting Method: Press Menu and turn on the transmitter to enter “SYS SETTING” Use up/down button to select “Model name”, OK key to enter editing. -
Page 25: Model Setting
WFT08X HELICOPTER INSTRUCTION 3. Model setting You can select the model type. There are two types: HELI, ACRO. Setting Method: Press Menu and turn on the transmitter to enter “SYS SETTING” Use up/down key to select “Model setting”, OK to enter editing. -
Page 26: Atl
WFT08X HELICOPTER INSTRUCTION 4. ATL The adjustable travel limit (ATL) makes throttle trim effective only at low throttle, disabling the trim at high throttle. This prevents pushrod jamming due to idling trim changes. This function is ON by defaults. If you are not using channel 3 for throttle, you may want trim operation the same as on all other channels. -
Page 27: Modulation Setting
WFT08X HELICOPTER INSTRUCTION 5.Modulation setting Because of the different receiver modulation, PPM/PCM/ PCMS 1024, the transmitter has to be set in accordance with the receiver modulation. Setting Method: Press Menu and turn on the transmitter to enter “SYS SETTING”. Use up/down key to select “Modulation setting”, OK to enter editing. -
Page 28: Swash Select
WFT08X HELICOPTER INSTRUCTION 6.Swash select There are 6 kinds of swash. You can select the swash you preferred. If you use a 120 degree CCPM helicopter, the servos will realize mix function automatically. Please select the swash according to your helicopter swash type. -
Page 29: Stick Setting
WFT08X HELICOPTER INSTRUCTION 7.Stick setting There are 4 kinds of model, you can use up/down direction key to select the model you prefer. 1-aileron 2-elevator 3-throttle 4-rudder Setting Method: Press Menu and turn on the transmitter to enter “SYS SETTING”... -
Page 30: Adjustment
WFT08X HELICOPTER INSTRUCTION 8.Adjustment This function is to set the center, high and low points of four sticks when users change the mode I or mode II by themselves. Setting Method: Press Menu and turn on the transmitter to enter “SYS SETTING”... -
Page 31: Reset Setting
WFT08X HELICOPTER INSTRUCTION 9.Rest setting This function resets your transmitter to default. Setting Method: Press Menu and turn on the transmitter to enter “SYS SETTING”. Use up/down keys to select “Rest setting”, OK to enter editing. Steps: 1. Use direction keys to select the editing part. -
Page 32: Send Data
WFT08X HELICOPTER INSTRUCTION 10. Send data Two transmitters (WFT08X) can copy data using the trainer/data transfer cable. This function and the next one “Receive data” can be used to copy data between transmitters. Setting Method: Press Menu and turn on the transmitter to enter “SYS SETTING”... -
Page 33: Receive Data
WFT08X HELICOPTER INSTRUCTION 11.Receive data Two transmitters (WFT08X) can copy data by a trainer/data transfer cable. This function and the next one “Send data” can be used to copy data between transmitters. Setting Method: Press Menu and turn on the transmitter to enter “SYS SETTING”. -
Page 34: Sound
WFT08X HELICOPTER INSTRUCTION 12.Sound This function is to select the sound ON and OFF. Setting Method: Press Menu and turn on the transmitter to enter “SYS SETTING” Use up/down button to select “SOUND”, OK button is to enter editing. Steps: 1. -
Page 35: Contrast Setting
Use up/down keys to select “CONTRAST SETTING”, OK to enter editing. Steps: 1. Use +/- keys to increase or decrease the value. 2. Long press OK to back default. 3. Press EXIT after setting. About This item shows the Version of WFLY radio. -
Page 36: Language
WFT08X HELICOPTER INSTRUCTION Language This function is to select the language. The selection is as shown in the picture if only English or Chinese menu the function is not exist... -
Page 37: Normal Setting
WFT08X HELICOPTER INSTRUCTION NORMAL SETTING(helicopter) 1. MONITOR Monitor shows the stick/switch/knob movements in real time. Monitor describes the 8 channels output and the channel mixing. 3ch and 6ch is mixing. Setting Method: Press menu button, enter system setting, the first function is... -
Page 38: Dual Rate & Exponential
WFT08X HELICOPTER INSTRUCTION 2. DUAL RATE & EXPONENTIAL SETTING (1). AIL Servo Switch Curve picture Dual rate (please refer to Page 23) Exponential Curve point (2). ELE (3). RUD Dual rate is to adjust aileron, elevator and rudder travel range. -
Page 39: Servo Reverse
WFT08X HELICOPTER INSTRUCTION 3. SERVO REVERSE Direction (Rev-reverse, Nor-normal) Channel This function changes the direction of the servos. Setting Method: Use up/down keys to select “Servo reverse”, OK to enter editing. Steps: 1. Use direction keys to select editing part. -
Page 40: End Point
WFT08X HELICOPTER INSTRUCTION 4. END POINT Channel Side Value It is to adjust the end of individual servo’s travel. The range is from 0% to 120%. Setting Method: Use up or down keys to select End point, OK to enter editing. -
Page 41: Sub Trim
WFT08X HELICOPTER INSTRUCTION 5. SUB TRIM Channel Value High/Low Sub trim makes small changes or corrections to the neutral position of each servo. Range is -120 to +120, default setting is 0. We recommend that you center the digital trims before making Sub trim changes, and that you try to keep all of the Sub trim values as small as possible. -
Page 42: Swash Param Setting
WFT08X HELICOPTER INSTRUCTION 6. SWASH PARAM SETTING Effection Value direction This function is to adjust the aileron, elevator and pitch travel range of swash plate mixing mode. Setting Method: Use up or down keys to select Swash param setting, OK to enter editing. -
Page 43: Auxiliary Channels Setting
WFT08X HELICOPTER INSTRUCTION 7. AUXILIARY CHANNELS SETTING Switch Direction Channel This function is for CH 5 to CH 8 function setting. Setting Method: Use up or down keys to select Swash param setting, OK to enter editing. Steps: 1. Use direction keys to select editing part. -
Page 44: Throttle Curve Setting
WFT08X HELICOPTER INSTRUCTION 8. THROTTLE CURVE SETTING Current flight mode Flight mode Curve picture Dual rate (Please refer to Page 23) Curve point Throttle curve, together with the throttle stick, can be adjusted properly to maximize engine performance at a particular pitch setting. - Page 45 WFT08X HELICOPTER INSTRUCTION Setting Method: Use up/down keys to select Throttle curve setting, OK to enter editing. Steps: 1. Flight(NORM IDLE1 IDLE2 IDLE3) Use direction keys to select editing part. Use +/- keys to select one curve. 2. Set Dual rate Use direction keys to select “D/R”...
-
Page 46: Pitch Curve Setting
WFT08X HELICOPTER INSTRUCTION 9. PITCH CURVE SETTING Flight mode Curve picture Dual rate (Please refer to Page 23) Curve point Pitch curve, together with the throttle stick, can be adjusted properly to maximize engine performance at a particular pitch setting. - Page 47 WFT08X HELICOPTER INSTRUCTION Setting Method: Use up/down keys to select PITCH CURVE SETTING, OK to enter editing. Steps: 1. Flight(NORM IDLE1 IDLE2 IDLE3) Use direction keys to select editing part. Use +/- keys to select one curve. 2. Set Dual rate Use direction keys to select “D/R”...
-
Page 48: Revolution Mixing
WFT08X HELICOPTER INSTRUCTION 10. REVOLUTION MIXING This curve mix adds opposite rudder input to counteract the changes in torque when the speed and collective pitch of the blades is changed. Setting Method: Use +/- keys to select Revolution mixing, OK to enter editing. -
Page 49: Trim Step Setting
WFT08X HELICOPTER INSTRUCTION 11. TRIM STEP SETTING This function is to change the rate at which the trim moves when the TRIM LEVER is activated. The range is from 0 to 250. Generally larger trim steps are for models with larger control throws or for first flights to ensure sufficient trim to properly correct the model. -
Page 50: Throttle Cut Setting
WFT08X HELICOPTER INSTRUCTION 12. THROTTLE CUT SETTING This function is to shut off the engine at the end of a flight. The engine can be stopped with one touch of any switch, eliminating the need to move the trim to kill the engine and then readjust prior to each flight. -
Page 51: Fly Model Switch
WFT08X HELICOPTER INSTRUCTION 13. FLY MODEL SWITCH Switch Fly mode statue Fly mode This function is to select the flight mode. Setting Method: Use up/down keys to select Fly model switch, OK to enter editing. Steps: 1. Use direction keys to select editing part. -
Page 52: Throttle Holding Setting
WFT08X HELICOPTER INSTRUCTION 14. THROTTLE HOLDING SETTING This function can make the throttle servo operating at a low speed position at the end of a flight. The range is between -75% and +75%. User can set the mix function with rudder under the throttle holding state and the mix rate (offset). -
Page 53: Fail Safe
WFT08X HELICOPTER INSTRUCTION 15. FAIL SAFE This function is to set responses in case of loss of signal or low RX battery. Setting Method: Use up/down keys to select Fail safe, OK key to enter editing. Steps: 1. Use direction keys to select editing part. -
Page 54: Time
WFT08X HELICOPTER INSTRUCTION 16. TIMER The flight time of every helicopter is different according to the different tank of fuel, engine, ESC, etc. Timer function can alarm you to land before the fuel lacks. The transmitter can set 3 timers (A, B, C). The longest time can be set as MM99SS59. -
Page 55: Advanced
WFT08X HELICOPTER INSTRUCTION 17. ADVANCED To realize an idle fly, there are 17 advanced function in more setting. Setting Method: Use up/down keys to select ADVANCED, OK to enter editing. +/- keys can switch between pages. please read the following pages for more about advanced... -
Page 56: Gyro Sens Setting
WFT08X HELICOPTER INSTRUCTION ADVANCED FUNCTION INTRODUCTION (1). GYRO SENS SETTING User can adjust the gyro sensitivity by transmitter,AVCS gyro (GY) and normal gyro (STD). Gyro sensitivity switch plug should plug in the fifth channel of receiver. The auxiliary channel CH 5 won’t have any function now. -
Page 57: Throttle Hovering Setting
WFT08X HELICOPTER INSTRUCTION (2). THROTTLE HOVERING SETTING Throttle hovering setting is fine-tuning adjustments for the throttle, affecting performance only around the center point and only in the normal condition. This function can set knob VA/VB/VC to control, turn right the rotor speed becomes faster, turn left the rotor speed becomes slower. -
Page 58: Pitch Hovering Setting
WFT08X HELICOPTER INSTRUCTION (3). PITCH HOVERING SETTING Pitch hovering setting is fine-tuning adjustments for the pitch, affecting performance only around the center point and only in the normal condition. This function can set knob VA/VB/VC to control, turn right the rotor speed becomes faster, turn left the rotor speed becomes slower. -
Page 59: Hi/Lo Pit Setting
WFT08X HELICOPTER INSTRUCTION (4). HI/LO PIT SETTING This function is to set the high and low pitch position at different flying modes. This function can set knob VA/VB/VC to control or controlled by user ”CTRL MAN”. if “CTRL MAN”, the pitch is set by “Rate”, the range is between 60%-100%. -
Page 60: Trim Offset Setting
WFT08X HELICOPTER INSTRUCTION (5). TRIM OFFSET SETTING This function is to adjust the servo trim at hovering state. This function is used to automatically change the trim of a helicopter, for example, when transitioned from hover to flying at high speed. A clockwise-rotation rotor helicopter tends to drift to the right at high speed, so an aileron offset may be applied to offset the helicopter to the left. -
Page 61: Delay
WFT08X HELICOPTER INSTRUCTION (6). DELAY This function is to delay the aerobatics or throttle cut when the helicopter is in the air so that to avoid the big trim change. The Delay function provides a smooth transition between the trim positions whenever OFFSET, REVO. MIXING, or THROTTLE HOLD functions are turned on and off. -
Page 62: Governor Mixing
WFT08X HELICOPTER INSTRUCTION (7). GOVERNOR MIXING This function is to set the governor. The Governor mixing function is used to adjust the Governor speed settings from the transmitter. Setting Method: Use up/down keys to select Governor mixing, OK to enter editing. -
Page 63: Swash And Thr Mixing
WFT08X HELICOPTER INSTRUCTION (8). SWASH AND THR MIXING This function is to adjust throttle and pitch mix function. Setting Method: Use up/down keys to select Swash and THR mixing, OK to enter editing. Steps: 1. Use direction keys to select editing part. -
Page 64: Curve Setting
There are 2 kinds of setting, Normal and Advanced. 1. Setting introduction Curve setting is one of the functions of WFT08X. We will make detail description here. You can refer to this detail description for the other functions which relates to the curve setting. - Page 65 WFT08X HELICOPTER INSTRUCTION Advanced curve setting: User can add or delete the curve point. D/R curve has 7 points and every point can be set. Press +/- button for seconds can add/delete curve point. It can at most add to 7 points and delete to 2 points.
- Page 66 WFT08X HELICOPTER INSTRUCTION (2)Move curve point operations are as follows When you want to adjust the data of curve point, such as you have increased one curve point in the 0.0% position, if you want to make the increased point to move to +5.5% position, please select the 0.0% this curve point, that means in the throttle curve settings...
-
Page 67: Prog.nor.mix1-5
WFT08X HELICOPTER INSTRUCTION (10)-(14) PROG. NOR. MIX1-5 The mix program is to adjust the flying pose. There are 5 series programs with the same setting method. You can set one mix and one mix with another one mix. Setting Method Use up/down keys to select PROG. -
Page 68: Prog.cur.mix1-2
WFT08X HELICOPTER INSTRUCTION (15) (16). PROG. CUR. MIX1-2 There are 2 curve mix program, the curve is made up by 2 to 7 points. Setting Method: Use up/down keys to select PROG. CUR. MIX1-2, OK to enter editing. Steps: 1. Use direction keys to select editing part and +/- keys to select any channel. -
Page 69: Throttle Needle Mixing
WFT08X HELICOPTER INSTRUCTION (17). THROTTLE NEEDLE MIXING Use throttle needle to adjust proportion of mixing gas. The th rottle stick has 2- 7 points, and adjust NORM and IDLE1, 2, 3 seperately. Setting Method Use up/down keys to select Throttle needle mixing, OK to enter editing. -
Page 70: Airplane
WFT08X AIRPLANE INSTRUCTION AIRPLANE Press Menu and turn on the transmitter to enter SYS SETTING. Select MODEL SETTING, press OK button to select the model type Airplane. Restart the transmitter after setting. Introduction This is for Airplane function. Long press Menu key, then turn on the radio to enter SYS SETTING. - Page 71 WFT08X INSTRUCTION AIRPLANE Editing mode and function introduction 1. Opening Screen Turn on the power switch, the LCD displays as follows. Voltage Start time Timer A Modulation Model type Timer B Timer C Throttle trim Elevator trim display display Rudder trim display...
-
Page 72: Sys Setting
WFT08X INSTRUCTION AIRPLANE B. SYS SETTING Press Menu and turn on the power switch, the LCD displays the following: Setting method: 1. Use direction keys to select the editing part, use up/down keys to select function item. Left/right direction keys to switch pages. -
Page 73: Model Selecting
WFT08X INSTRUCTION AIRPLANE SYS SETTING 1.MODEL SELECTTING There are 8 airplane models. You can select any one to set. Setting Method: Press Menu and turn on the transmitter to enter “SYS SETTING” Use up/down keys to select “MODEL SELECTING”, OK to enter editing. -
Page 74: Model Name
WFT08X INSTRUCTION AIRPLANE 2. MODEL NAME This function is to make new names by users. Setting Method: Press Menu and turn on the transmitter to enter “SYS SETTING” Use up/down keys to select “MODEL NAME”, OK button to enter editing. -
Page 75: Model Setting
WFT08X INSTRUCTION AIRPLANE 3. MODEL SETTING You can select the model type. There are two types: HELI, ACRO. Setting Method: Press Menu and turn on the transmitter to enter “SYS SETTING” Use up/down keys to select “MODEL SETTING”, OK to enter editing. -
Page 76: Atl
WFT08X INSTRUCTION AIRPLANE 4. ATL Adjustable travel limit (ATL) makes throttle trim effective only at low throttle, disabling the trim at high throttle. This prevents pushrod jamming due to idling trim changes. This function defaults to ON. If you are not using channel 3 for throttle, you may want trim operation the same as on all other channels. -
Page 77: Ail-2
WFT08X INSTRUCTION AIRPLANE 5. AIL-2 AIL-2 is another channel for aileron. Setting Method: Press Menu and turn on the transmitter to enter “SYS SETTING” Use up/down keys to select “AIL-2”, OK to enter editing. Steps: 1. Use direction keys to select model. -
Page 78: Modulation Setting
WFT08X INSTRUCTION AIRPLANE 6. MODULATION SETTING Because of the different receiver modulation PPM/PCM/ PCMS 1024, the transmitter should be accordance with the receiver modulation. Setting Method: Press Menu and turn on the transmitter to enter “SYS SETTING” Use up/down keys to select “Modulation setting”, OK to enter editing. -
Page 79: Stick Setting
WFT08X INSTRUCTION AIRPLANE 7.STICK SETTING There are 4 kinds of mode, you can use up/down direction keys to select the mode you preferred. 1-aileron 2-elevator 3-throttle 4-rudder Setting Method: Press Menu and turn on the transmitter to enter “SYS SETTING”... -
Page 80: Adjustment
WFT08X ARIPLANE INSTRUCTION 8.Adjustment This function is to set the center, high and low point of four sticks when users change the mode I or II by themselves. Setting Method: Press Menu and turn on the transmitter to enter “SYS SETTING”... -
Page 81: Reset Setting
WFT08X INSTRUCTION AIRPLANE 9.RESET SETTING This function is to back default. Setting Method: Press Menu and turn on the transmitter to enter “SYS SETTING” Use up/down keys to select “REST SETTING”, OK to enter editing. Steps: 1. Use direction keys to select the editing part. -
Page 82: Send Data
WFT08X INSTRUCTION AIRPLANE 10. SEND DATA Two transmitters (WFT08X) can copy data by a trainer/data transfer cable. This function and the next function “Receive data” can be realized between transmitters. Setting Method: Press Menu and turn on the transmitter to enter “SYS SETTING”... -
Page 83: Receive Data
WFT08X INSTRUCTION AIRPLANE 11.RECEIVE DATA Two transmitters (WFT08X) can copy data by a trainer cable/data transfer cable. This function and the previous function “Send data” can be realized between transmitters. Setting Method: Press Menu and turn on the transmitter to enter “SYS SETTING”... -
Page 84: Sound
WFT08X AIRPLANE INSTRUCTION 12.Sound This function is to select the sound ON and OFF. Setting Method: Press Menu and turn on the transmitter to enter “SYS SETTING” Use up/down button to select “SOUND”, OK button is to enter editing. Steps: 1. -
Page 85: Contrast Setting
Use up/down keys to select “CONTRAST SETTING”, OK to enter editing. Steps: 1. Use +/- keys to increase or decrease the value. 2. Long press OK to go back to default. 3. Press EXIT after setting. About This item shows the Version of WFLY radio. -
Page 86: Language
WFT08X INSTRUCTION AIRPLANE 16.Language This function is to select the language. The selection is as shown in the picture if only English or Chinese menu the function is not exist... -
Page 87: Normal Setting
WFT08X INSTRUCTION AIRPLANE NORMAL SETTING(AIRPLANE) 1. MONITOR Monitor shows the stick/switch/knob movement. For PPM, this function is to describe the 8 channels output. Setting Method: Press menu key, enter system setting, the first function is the monitor. -
Page 88: Dual Rate & Exponential Setting
WFT08X INSTRUCTION AIRPLANE 2. DUAL RATE & EXPONENTIAL SETTING (1). AIL Servo Switch Curve picture Dual rate (please refer to Page 23) Exponential Curve point (3). RUD (2). ELE Dual rate is to adjust aileron, elevator and rudder travel range. -
Page 89: Servo Reverse
WFT08X INSTRUCTION AIRPLANE 3. SERVO REVERSE Direction (Rev-reverse, Nor-normal) Channel This function is to change the direction of the servos movement. Setting Method: Use up/down keys to select SERVO REVERSE, OK to enter editing. Steps: 1. Use direction keys to select editing part. -
Page 90: End Point
WFT08X INSTRUCTION AIRPLANE 4. END POINT Channel Side Value It is to adjust the end of individual servo’s travel. The range is from 0% to 120%. Setting Method: Use up or down keys to select END POINT, OK to enter editing. -
Page 91: Sub Trim
WFT08X INSTRUCTION AIRPLANE 5. SUB TRIM Channel Value High/Low Sub trim makes small changes or corrections to the neutral position of each servo. Range is -120 to +120, default setting is 0. We recommend that you center the digital trims before making Sub trim changes, and that you try to keep all of the Sub trim values as small as possible. -
Page 92: Auxiliary Channels Setting
WFT08X INSTRUCTION AIRPLANE 6. AUXILIARY CHANNELS SETTING Switch Direction Channel This function is for channel 5 to channel 8 function setting. Setting Method: Use up or down keys to select AUXILIARY CHANNELS SETTING, OK to enter editing. Steps: 1. Use direction keys to select editing part. -
Page 93: Throttle Curve Setting
WFT08X INSTRUCTION AIRPLANE 7. THROTTLE CURVE SETTING Current flight mode Flight mode Curve picture Dual rate (Please refer to Page 23) Curve point Throttle curve, together with the throttle stick, can be adjusted properly to maximize engine performance at a particular pitch setting. - Page 94 WFT08X INSTRUCTION AIRPLANE Setting Method: Use up/down button to select THROTTLE CURVE SETTING, OK button is to enter editing. Steps: 1. Set Dual rate Use direction keys to select “D/R” and edit (one or two values can be set separately or together). Press +/- keys can increase or delete the value.
-
Page 95: Trim Step Setting
WFT08X INSTRUCTION AIRPLANE 8. TRIM STEP SETTING This function is to change the rate at which the trim moves when the TRIM LEVER is activated. The range is from 0 to 250. Generally larger trim steps are for models with larger control throws or for first flights to ensure sufficient trim to properly correct the model. -
Page 96: Flaperon
WFT08X INSTRUCTION AIRPLANE 9. FLAPERON FLAPERON mixing function uses on servo on each of the two ailerons, and uses them for both aileron and flap function. Setting Method: Use up/down keys to select FLAPERON, OK to enter editing. Steps: 1. Use direction keys to select editing part, use+/- keys to select on/disable. -
Page 97: Flap Trim
WFT08X INSTRUCTION AIRPLANE 10. FLAP TRIM FLAP TRIM assigns the primary flaperon control to allow trimming in flight of the flap action of flaperons. Setting Method: Use up/down keys to select FLAP TRIM, OK to enter editing. Steps: 1. Use direction keys to select editing part, use+/- keys to select on/disable. -
Page 98: Ail-Diff
WFT08X INSTRUCTION AIRPLANE 11. AIL-DIFF Aileron differential(AIL-DIFF) is primarily used on 3-servo wings, with one servo operating inboard flap(s) on Ch6, and AIL-DIFF controlling proper aileron operation of 2 aileron servos, plugged into Ch1 and Ch7. Setting Method: Use up/down keys to select AIL-DIFF, OK to enter editing. -
Page 99: Elev-Flap
WFT08X INSTRUCTION AIRPLANE 12. ELEV-FLAP ELEV-FLAP mixing is the first pre-programmed mix we’ll cover. This mix makes the flaps drop or rise whenever the elevator stick is moved. It is most commonly used to make tighter pylon turns or squarer corners in maneuvers. In most cases, the flaps droop (are lowered) when up elevator is commanded. -
Page 100: Throttle Cut Setting
WFT08X INSTRUCTION AIRPLANE 13. THROTTLE CUT SETTING This function is to shut off the engine at the end of a flight. The engine can be stopped with one touch of any switch, eliminating the need to move the trim to kill the engine and then readjust prior to each flight. -
Page 101: Idle Down
WFT08X INSTRUCTION AIRPLANE 14. IDLE DOWN This function is to lower the engine idle for: sitting on the run- way prior to take off, stalls and spins, and landings. The normal idle setting is a little higher for easier starts and safe flights with less risk of dead sticks. -
Page 102: Fail Safe
WFT08X INSTRUCTION AIRPLANE 15. FAIL SAFE This function is to set responses in case of loss of signal or low RX battery. Setting Method: Use up/down keys to select FAIL SAFE, OK to enter editing. Steps: 1. Use direction keys to select editing part. -
Page 103: Timer
WFT08X INSTRUCTION AIRPLANE 16. TIMER The flight time of every airplane is different according to the different tank of fuel, engine, ESC, etc. Timer function can alarm you to land before the fuel lacks. The transmitter can set 3 timers (A, B, C). The longest time can be set as MM99SS59. -
Page 104: Advanced
WFT08X INSTRUCTION AIRPLANE 17. ADVANCED To realize an idle fly, there are 16 advanced functions in ADVANCED. Setting Method: Use up/down keys to select ADVANCED, OK to enter editing. +/- button can switch pages. About each advanced function please read the following pages. -
Page 105: Curve Setting
There are 2 kinds of setting, Normal and Advanced. 1. Setting introduction Curve setting is one of the functions of WFT08X. We will make detail description here. You can refer to this detail description for the other functions which relates to the curve setting. - Page 106 WFT08X INSTRUCTION AIRPLANE Advanced curve setting: User can add or delete the curve point. D/R curve has 7 points and every point can be set. Press +/- button for seconds can add/delete curve point. It can at most add to 10 points and delete to 2 points.
- Page 107 WFT08X INSTRUCTION AIRPLANE (2)Move curve point operations are as follows When you want to adjust the data of curve point, such as you have increased one curve point in the 0.0% position, if you want to make the increased point to move to +5.5% position, please select the 0.0% this curve point, that means in the throttle curve settings...
-
Page 108: 6.Prog.nor.mix1-5
WFT08X INSTRUCTION AIRPLANE 2- 6.PROG. NOR. MIX1-5 The mix program is to adjust the flying pose. There are 5 series programs with the same setting method. You can set one mix and one mix with another one mix. Setting Method Use up/down keys to select PROG. -
Page 109: 8.Prog.cur.mix1-2
WFT08X INSTRUCTION AIRPLANE 8.PROG. CUR. MIX1-2 There are 2 curve mix programs, the curve is made up by 2 to 7 points. Setting Method: Use up/down keys to select PROG. CUR. MIX, OK to enter editing. Steps: 1. Use direction keys to select editing part. Set any two channels mix(1-2). -
Page 110: Air Brake
WFT08X INSTRUCTION AIRPLANE 9. AIR BRAKE AIR BRAKE simultaneously moves the flaps, twin ailerons and elevators, and is usually used to make steep descents or to limit increases in airspeed in dives. Setting Method: Use up/down keys to select AIR BRAKE, OK to enter editing. -
Page 111: Elevon
WFT08X INSTRUCTION AIRPLANE 10. ELEVON This function used with delta wings, flying wings and other tailless aircraft that combine aileron and elevator functions, using two servos, one on each elevon. The aileron/elevator responses of each servo can be adjusted independently. -
Page 112: Ailvator
WFT08X INSTRUCTION AIRPLANE 11. AILVATOR AILEVATOR mixing function uses one servo on each of the two elevators, and combines the elevator function with the aileron function(unless aileron travel is set to 0). Setting Method: Use up/down keys to select AILVATOR, OK to enter editing. -
Page 113: V-Tail
WFT08X INSTRUCTION AIRPLANE 12. V-TAIL V-TAIL mixing is used with v-tail aircraft so that both elevator and rudder functions are combined for the two tail surfaces. Both elevator and rudder travel can be adjusted independently on each surface. Setting Method: Use up/down keys to select V-TAIL, OK to enter editing. -
Page 114: Snap-Roll
WFT08X INSTRUCTION AIRPLANE 13. SNAP-ROLL This function allows you to execute snap rolls by flipping a switch, providing the same input every time. It also removes the need to change dual rates on the 3 channels prior to performing a snap, as snap-roll always takes the servos to the same position, regardless of dual rates, inputs held during the snap, etc. -
Page 115: Delay
WFT08X INSTRUCTION AIRPLANE 14. DELAY DELAY function is used to slow the response of the throttle servo to simulate the slow response of a turbine engine. Setting Method: Use up/down keys to select DELAY, OK to enter editing. Steps: 1.Use +/- keys to select on/disable. -
Page 116: Throttle Needle Mixing
WFT08X INSTRUCTION AIRPLANE 15. THROTTLE NEEDLE MIXING Throttle needle is a pre-programmed mix that automatically moves an in-flight mixture servo in response to the Throttle Stick input for perfect engine tuning at all throttle settings. This function is particularly popular with contest pilots who fly... -
Page 117: Gyro Sens Setting
WFT08X INSTRUCTION AIRPLANE 16. GYRO SENS SETTING User can adjust the gyro sensitivity by transmitter, AVCS gyro (GY) and normal gyro (STD). Gyro sensitivity switch plug should plug in the fifth channel of receiver. The auxiliary channel CH 5 won’t have any function now. - Page 118 WFT08X INSTRUCTION TO THE PILOT Thank you for using WFT08X raido control system. Welcome your valuable advice and we will continue developing the radio. Welcome to contact us! E-mail: info@wflysz.com sales@wflysz.com Tel: 0086-755-26621859 Fax: 0086-755 -26585126 ® WFLY...
Need help?
Do you have a question about the WFT08X and is the answer not in the manual?
Questions and answers