Advertisement
Quick Links
SparkFun gator:particle Hookup Guide
Introduction
Do you have an experiment involving biometrics or particle detection?
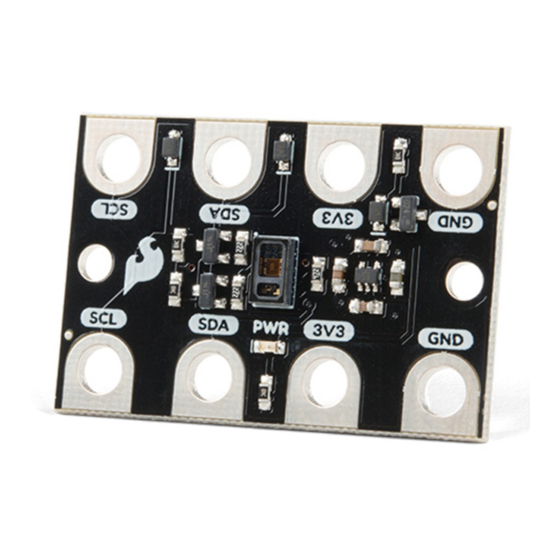
SparkFun gator:particle - micro:bit Accessory Board
SEN-15271
The gator:particle is an amazing tool that uses a high-sensitivity pulse oximeter and heart-rate sensor, the
MAX30102. Similar to the SparkFun Particle Sensor, with the MAX30105 high-sensitivity optical sensor, the
gator:particle can also be used for particle detection. The primary difference between these boards is that the
SparkFun Particle Sensor also uses a green LED that requires more power than the micro:bit can provide. This
tutorial will show you how to get started using the gator:particle sensor with the gator:bit (v2) in the micro:bit
development environment.
Product Showcase: gator:boards - micro:bit Accessory Boards
Product Showcase: gator:boards - micro:bit Accessory Boards
Advertisement

Subscribe to Our Youtube Channel
Related Manuals for sparkfun gator:particle


Summary of Contents for sparkfun gator:particle
- Page 1 The primary difference between these boards is that the SparkFun Particle Sensor also uses a green LED that requires more power than the micro:bit can provide. This tutorial will show you how to get started using the gator:particle sensor with the gator:bit (v2) in the micro:bit development environment.
- Page 2 Go Bundle KIT-14542 DEV-14336 micro:bit Board DEV-14208 To easily use the gator board ecosystem, one of the gator:bit boards will help breakout the necessary pins. You will also need alligator cables to connect the gator:bit to the gator:particle.
- Page 3 PRT-12978 SparkFun gator:bit DEV-14484 Suggested Reading There isn't much to learning how to use the gator:particle sensor. However, you may find the following concepts useful along the way. Light Logic Levels Light is a useful tool for the electrical engineer.
- Page 4 MAX30105 Particle and Pulse Ox Sensor Hookup Guide An introduction to I2C, one of the main embedded The SparkFun MAX30105 Particle Sensor is a flexible communications protocols in use today. and powerful sensor enabling sensing of distance, heart rate, particle detection, even the blinking of an eye.
-
Page 5: Hardware Overview
It also has as built-in addressable LEDs and a built-in buzzer. Hardware Overview The gator:particle consists of 4 pads for power and data. Contacts Direction Description Ground: Reference voltage and ground loop. - Page 6 The specified operating voltage for the MAX30102 is between 1.7V - 2V. For use with the gator:bit (v2) and micro:bit, you should provide 3.3V through the 3V3 and GND pads to keep the logic levels consistent; the 3.3V input is then regulated to 1.8V for the MAX30102. Power connection pads and power indication LED.
- Page 7 LED Wavelength: 870 to 900 nm (avg. 880 nm) Forward Voltage: 1.4V IR LED Radiant Power: 6.5 mW LED Driver Current: 0 to 50 mA (programmable) LED Wavelength: 650 to 670 nm (avg. 660 nm) Forward Voltage: 2.1V Red LED Radiant Power: 9.8 mW LED Driver Current: 0 to 50 mA (programmable) Spectral Range of Sensitivity: 600 to 900 nm...
-
Page 8: Hardware Assembly
(you can't have devices with the same address). I C connection pads. Hardware Assembly Connecting your gator:particle to the gator:bit (v2) is simple. The board can also be daisy-chained with other I C boards. This can easily be done with alligator cables. -
Page 9: Installing Extensions
If this is your first time using the gato:bit (v2), please review our SparkFun gator:bit v2 Hookup Guide. The easiest way to get started using the gator:particle is to use Microsoft MakeCode, a web-based block editor. This tutorial assumes you are familiar with the with MakeCode, the gato:bit (v2), and the micro:bit development board. - Page 10 Click on the the Extensions block to open the extensions page. Click on image to enlarge. There are two methods for finding the gator:particle extension: Search for the name used on the extension . Use the link to the GitHub repository for the pxt-package as the search term.
- Page 11 Search for Extension. Then, click on the box to add it to the block library. Click on image to enlarge. Then, click on the box for the extension to add it to the block library. The gator:particle extension should now appear in the block library.
- Page 12 Now that you have added the gator:particle extension to the Editor, lets start with some example code. Plug the micro:bit into your computer using an USB micro-B cable after you have assembled your hardware with the instructions from the previous section. The micro:bit should appear on your computer as a removable storage device.
- Page 13 Learn more use. Simulator Blocks JavaScript Edit on start initialize gator:Particle sensor serial redirect to USB forever Program Error: Cannot read property 'begin' of unde ned " " " serial write line join Particle = value...
-
Page 14: Troubleshooting Tips
Eagle Files (ZIP) MAX30102 Datasheet (PDF) AN6410: Signal to Noise Ratio (PDF) AN6433: Depth Penetration for Biosensors (PDF) gator:particle PXT Package GitHub Product Repo micro:bit Landing Page SFE Product Showcase Interested in the micro:bit? Check out some of these other micro:bit products:... - Page 15 SparkFun Inventor's Kit for micro:bit Lab Pack SparkFun gator:bit v2.0 - micro:bit Carrier Board LAB-15229 DEV-15162 micro:bit Educator Lab Pack SparkFun Inventor's Kit for micro:bit LAB-15230 KIT-14542 Need some inspiration for your next project? Check out some of these other micro:bit product tutorials:...
- Page 16 SparkFun gator:soil Hookup Guide Buttons and switches and inputs oh my! Start adding The gator:soil is analog soil moisture sensor. This more control to your gator:bit with the SparkFun tutorial will get you started using the gator:soil with the gator:control.
Need help?
Do you have a question about the gator:particle and is the answer not in the manual?
Questions and answers