Advertisement
Pi Servo Hat Hookup Guide
Introduction
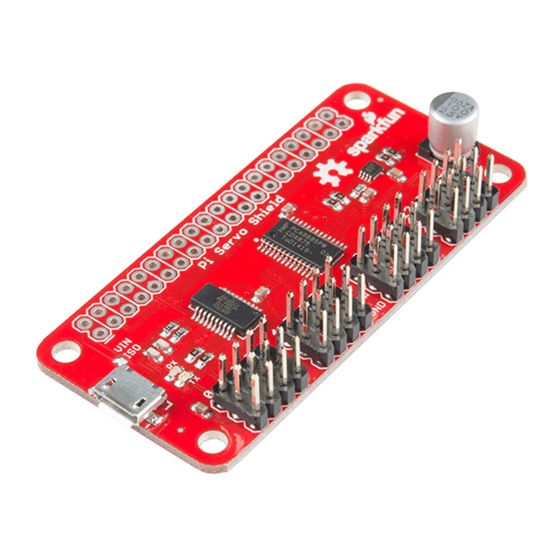
The SparkFun Pi Servo Hat allows your Raspberry Pi to control up to 16
servo motors via I2C connection. This saves GPIO and lets you use the
onboard GPIO for other purposes. Furthermore, the Pi Servo Shield adds a
serial terminal connection which will allow you to bring up a Raspberry Pi
without having to hook it up to a monitor and keyboard.
SparkFun Pi Servo HAT
DEV-1432 8
Required Materials
Here's what you need to follow along with this tutorial. We suggest
purchasing a blank microSD card rather than a NOOBS ready card, since
the NOOBS ready cards may not have a new enough OS to support the Pi
Zero W.
microSD Card with Adapter -
16GB (Class 10)
COM- 13833
Break Away Headers -
Straight
PRT-00 116
Page 1 of 10
Advertisement
Table of Contents

Subscribe to Our Youtube Channel
Related Manuals for sparkfun Pi Servo Hat


Summary of Contents for sparkfun Pi Servo Hat
- Page 1 Pi Servo Hat Hookup Guide Introduction The SparkFun Pi Servo Hat allows your Raspberry Pi to control up to 16 servo motors via I2C connection. This saves GPIO and lets you use the onboard GPIO for other purposes. Furthermore, the Pi Servo Shield adds a serial terminal connection which will allow you to bring up a Raspberry Pi without having to hook it up to a monitor and keyboard.
-
Page 2: Required Tools
Page 2 of 10 SparkFun Pi Servo HAT Wall Adapter Power Supply - 5.1V DC 2.5A (USB Micro-B) DE V- 14328 TOL- 13831 Raspberry Pi GPIO Tall Raspberry Pi Zero W Header - 2x20 DEV- 14277 PRT- 14017 In addition, you’ll want some kind of servo motor to test the setup. -
Page 3: Suggested Reading
Page 3 of 10 Soldering Iron - 30W (US, Solder Lead Free - 15-gram 110V) Tube TOL- 09507 TOL- 09163 Suggested Reading You may want to review these tutorials before undertaking this one. How to Solder: Through- Raspberry Pi SPI and I2C Hole Soldering Tutorial This tutorial covers everything you... -
Page 4: Hardware Assembly
Page 4 of 10 Power supply isolation jumper - This jumper can be cleared (it is closed by default) to isolate the servo power rail from the Pi 5V power rail. Why would you want to do that? If there are several servos, or large servos with a heavy load on them, the noise created on the power supply rail by the servo motors can cause undesired operation in the Pi, up to a complete reset or shutdown. - Page 5 “PWR IN” port on the Pi Zero W. Software - Python We’ll go over in some detail here how to access and use the pi servo hat in Python. Full example code is available in the product GitHub repository.
- Page 6 Page 6 of 10 We have to tell the program the part’s address. By default, it is 0x20, so set a variable to that for later use. addr = 0x20 Next, we want to enable the PWM chip and tell it to automatically increment addresses after a write (that lets us do single-operation multi-byte writes).
- Page 7 Software - C++ We’ll go over in some detail here how to access and use the pi servo hat in C++. Note that it’s much harder than it is in Python, so maybe now’s the time to learn Python? Full example code is available in the product GitHub repository.
- Page 8 Page 8 of 10 int addr = 0x40; // PCA9685 address ioctl(file_i2c, I2C_SLAVE, addr); // Set the I2C address for u pcoming // transactions is a general purpose function not specifically limited to working ioctl() with I2C. Configure the PCA9685 Chip for Proper Operation The default setup of the PCA9685 chip is not quite right for our purposes. We need to write to a couple of registers on the chip to make things right.
- Page 9 Resources and Going Further Now that you’ve successfully got your SparkFun Pi Servo Hat up and running, it’s time to incorporate it into your own project! For more information, check out the resources below: •...
- Page 10 Page 10 of 10 • Setting Up the Pi Zero Wireless Pan-Tilt Camera Tutorial - A kit that uses the Pi Servo Hat in a pan/tilt camera setup. For additional software example using the PCA9685, you can refer to the hookup guide for the Edison PWM Block, which uses the same hardware and is conceptually very similar.
Need help?
Do you have a question about the Pi Servo Hat and is the answer not in the manual?
Questions and answers