Advertisement
Quick Links
SparkFun gator:bit v2 Hookup Guide
Introduction
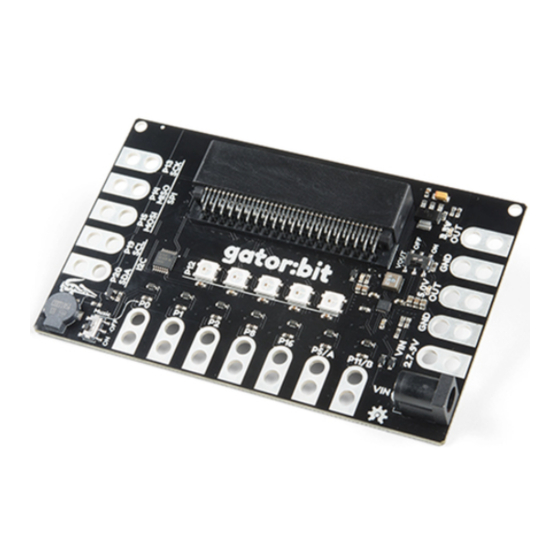
The SparkFun gator:bit v2 is a development board for the BBC micro:bit. Almost every pad of the micro:bit is
broken out to alligator clippable pads, on the gator:bit, so you can get the most out of it. The gator:bit comes
equipped with five addressable LEDs, a built-in buzzer (speaker), as well as a power management system that
gives you access to 3.3V and 5V. The gator:bit can be powered from 2.7V - 9V giving you quite a range of
powering options.
SparkFun gator:bit v2.0 - micro:bit Carrier Board
DEV-15162
Product Showcase: SparkFun gator:bit v2.0
Product Showcase: SparkFun gator:bit v2.0
Product Showcase: SparkFun gator:bit v2.0
Advertisement

Related Manuals for sparkfun gator:bit v2


Summary of Contents for sparkfun gator:bit v2
- Page 1 Introduction The SparkFun gator:bit v2 is a development board for the BBC micro:bit. Almost every pad of the micro:bit is broken out to alligator clippable pads, on the gator:bit, so you can get the most out of it. The gator:bit comes equipped with five addressable LEDs, a built-in buzzer (speaker), as well as a power management system that gives you access to 3.3V and 5V.
-
Page 2: Required Materials
Required Materials Here are some products that will help you get started with the gator:bit: gator:bit v2 Hookup Guide Wishlist SparkFun Wish List SparkFun gator:bit v2.0 - micro:bit Carrier Board DEV-15162 micro:bit Board DEV-14208 The BBC micro:bit is a pocket-sized computer that lets you get creative with digital technology. Each order contains…... -
Page 3: Suggested Reading
SparkFun gator:control ProtoSnap Alligator Test Leads - Multicolored (10 Pack) COM-14968 PRT-12978 CLICK TO SEE MORE COMPONENTS! Suggested Reading If you aren’t familiar with the following concepts, we recommend checking out these tutorials before continuing. What is a Circuit? Voltage, Current, Resistance, and Ohm's Law Every electrical project starts with a circuit. - Page 4 Powering Your gator:bit There are 3 ways of powering your gator:bit v2, either from the barrel jack, the alligator clippable pads labeled VIN, or through the micro:bit itself. On the gator:bit, any input voltage between 2.7V and 9V will be regulated to 3.3V to power the micro:bit, the speaker, and for use by any of the alligator clippable pins.
- Page 5 The gator:bit also provides access to pins 13, 14, 15, 19 & 20. These are digital pins that can be used to read and write digital signals. Pins 13, 14, & 15 are also SPI communication pins giving you the ability to use SparkFun’s SPI sensors with the gator:bit.
- Page 6 On the right side of the board there are two “OUT” pins. One for 5V and one for 3.3V. You will know when the output voltage is available because two red LEDs will turn on right above the pad. You can use either of the two ground pads since all ground is connected.
- Page 7 LEDs! Programming Environments There are several programming environments to use your micro:bit and gator:bit with. MakeCode Makecode is a web application based on block programming. The blocks then directly convert to Javascript; you can switch back and forth for ease of inspection. To upload your program to the micro:bit you download the project and drag and drop it on the micro:bit.
-
Page 8: Hardware Assembly
Click the image to get a closer look. Since the blocks are based on Javascript and you can switch between looking at a program in blocks and Javascript, Makecode is a great way to start programming fast and learn another language as you go. Click the image to get a closer look. - Page 9 Simply, insert the micro:bit into the slot on the gator:bit v2 as shown below. A micro:bit inserted into the gator:bit v2. Programming To program the micro:bit for the following examples, simply connect it to your computer with a USB micro-B cable.
- Page 10 The gator:bit v2 powered through barrel jack with 4xAA battery pack. Example Project: LED Animations Installing the NeoPixel Extension for Microsoft MakeCode Heads up! The following examples use MakeCode, which is a third party software and is therefore, subject to changes we may be unaware of. For most cases, you should be able to search the internet for information regarding the changes and how to work around them.
- Page 11 LEDs with a random color rather than turning off. The brightness is turned down to 75 to save your eyes and your battery life! SparkFun gator:bit v2.0: Project- LED Animation SparkFun gator:bit v2.0: Project- LED Animation SparkFun gator:bit v2.0: Project- LED Animation...
- Page 12 __ pressed button drum machine or synthesizer! This function can be found in the “input” extension in makecode. SparkFun gator:bit v2.0: Project- Button Melody Player SparkFun gator:bit v2.0: Project- Button Melody Player SparkFun gator:bit v2.0: Project- Button Melody Player...
- Page 13 BBC micro:bit - Kitronik University - More micro:bit tutorials. SparkFun micro:bit Landing Page SparkFun micro:bit Series - Video tutorials to get started using the micro:bit or using it with MicroPython. For additional SparkFun tutorials, check out some of these related micro:bit tutorials:...
- Page 14 How to Load MicroPython on a Microcontroller Wireless Remote Control with micro:bit Board In this tutorial, we will utilize the MakeCode radio This tutorial will show you how to load the MicroPython blocks to have the one micro:bit transmit a signal to a interpreter onto a variety of development boards.
Need help?
Do you have a question about the gator:bit v2 and is the answer not in the manual?
Questions and answers