Table of Contents
Advertisement
Quick Links
Advertisement
Table of Contents

Subscribe to Our Youtube Channel
Related Manuals for BAS-IP SP-03


Summary of Contents for BAS-IP SP-03
- Page 1 SP-03 SP-03 Exported on 02/10/2020...
-
Page 2: Table Of Contents
Table of Contents Device description....................4 Technical parameters................... 5 Main features ...........................5 FUNCTIONAL CAPABILITIES....................5 Configuration through WEB interface............6 Login ..............................6 Dashboard ............................6 Device information ................................6 Do not disturb mode ..............................7 Intercom ............................7 Address Settings................................7 DTMF ....................................9 Advanced intercom settings ........................... - Page 3 • Device description (see page 4) • Technical parameters (see page 5) • Configuration through WEB interface (see page 6) • Installation and connection (see page 15) – 3...
-
Page 4: Device Description
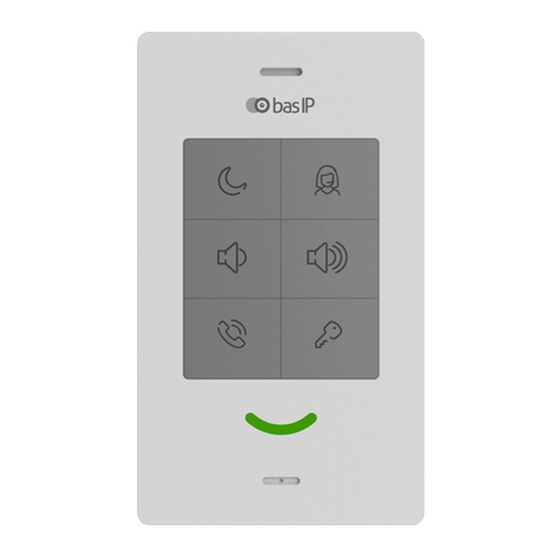
Device description Subscriber IP audio device with support for SIP, P2P and internal BAS-IP protocol. Functional 6 buttons, from left to right, from bottom to top: • Answer an incoming call/end a call; • The opening of the lock. Automatically receive settings from Link software;... -
Page 5: Technical Parameters
Display of various device statuses using the indicator light • 6 volume levels • Link software support • Support for receiving automatic settings from Link • Backup and restore settings • Possibility of receiving software updates from the BAS-IP server and user update server Technical parameters – 5... -
Page 6: Configuration Through Web Interface
Configuration through WEB interface • Login (see page 6) • Dashboard (see page 6) • Intercom (see page 7) • Network (see page 11) • System (see page 13) Login To search for a device on the network, you can use the software for searching and firmware upgrade. -
Page 7: Do Not Disturb Mode
Framework: Version of Framework. Web Server: Version of Web server. Firmware version: Version of the firmware. Device type: Device type. Device name: Name of the device. Device serial number: Device serial number. MAC address: MAC address of the device. Do not disturb mode Enable/Disable: Enable/disable the do not disturb mode. ... - Page 8 Building: Building number. Unit: Unit number. Floor: Floor number. Apartment: Apartment number. Device number: Sequence number of the device. If the device is one, it is necessary to set "0" in this line. If there are several devices, then the numbering should begin with "0" and end with "8". SIP settings Enable/Disable: Enable/disable SIP registration.
-
Page 9: Dtmf
Before the proxy address, you must specify "sip:". Realm: SIP server address. It can be specified as an IP address or a domain name. STUN IP: Server STUN address. stun.l.google.com. STUN port: STUN server port. Port 19302 is used for the STUN server of Google. User: SIP number. -
Page 10: Advanced Intercom Settings
Total count: The number of active redirects (up to four redirects). URL: Direction for parallel call forwarding when an incoming call is made to the internal monitor. Example sip:1155@sip.bas-ip.com Forwarding to the specified directions is activated when making calls to the handsfree using an internal protocol. -
Page 11: Network
Enable/disable the function to call the specified SIP number by SOS/Concierge button: pressing the button to call the concierge on the device. If this feature is disabled, the concierge will be called using an internal protocol. URL: SIP number input field, which will be called when pressing the concierge button. Network Network configuration DHCP: Enable/disable the auto retrieve network settings feature. -
Page 12: Management System
Custom NTP: Enable/disable the use of a custom NTP server. Current device date/time: The current time and date of the device. NTP URL: Custom time server input field. Time Zone: Select the time zone to use. Management system Link Server: The address of the PC or server where the Link monitoring and control system for the intercom system is installed. -
Page 13: System
System Language Selection device language. Settings Choose file: Select a monitor configuration file from the PC file system. Backup settings: Save and export monitor configuration files. Reset to default settings: Reset all internal monitor settings to factory settings. Firmware upgrade Configuration through WEB interface – ... -
Page 14: Reboot
URL: The input field for the IP address or domain of the custom update server. Choose file: Select a software update file from the PC file system. Check for updates: Check for software updates on the BAS-IP server or user server. Update firmware: Start firmware update. -
Page 15: Installation And Connection
Installation and connection This page describes how to install and connect the device. • Completness check of the product (see page 15) • Electrical connection (see page 15) • Mechanical mounting (see page 16) • Connection of additional modules (see page 18) Completness check of the product Before installing the monitor, be sure to check its completeness and the presence of all components. -
Page 16: Mechanical Mounting
Mechanical mounting Before installing the monitor, you must provide a hole or recess in the wall with a diameter of 68 mm for a standard mounting box for a 65 * 45 mm outlet. This is necessary for switching wires and mounting the monitor. - Page 17 Before installing the monitor with the SP-AU handset, it is necessary to fasten the bracket for the tube on the backside as shown in the diagram below: Installation and connection – 17...
-
Page 18: Connection Of Additional Modules
Connection of additional modules • Optional handset SP-AU • External siren (siren is activated when one of the alarm sensors is triggered) • Call button on one of the alarm loops Installation and connection – 18...
Need help?
Do you have a question about the SP-03 and is the answer not in the manual?
Questions and answers