Table of Contents
Advertisement
Quick Links
Advertisement
Table of Contents

Related Manuals for BAS-IP AA-12 Series


Summary of Contents for BAS-IP AA-12 Series
- Page 1 AA-12 AA-12 Exported on 07/11/2019...
-
Page 2: Table Of Contents
Table of Contents Device description....................6 Apperance ............................6 Technical parameters...................7 Main features ..........................7 Functionality ...........................7 Configuration through graphical interface ..........8 Main screen ............................ 8 Device settings ..........................9 Network settings.......................... 11 Access settings..........................12 Additional settings ........................13 About system ..........................14 Configuration trough web interface............. - Page 3 Device usage ......................47 UKEY mobile access .........................47 Description ................................... 47 Working principle ..............................47 Mobile access with UKEY applicationhttps://wiki.bas-ip.com/basipidapp ........47 Triple-clicking setup in UKEY Cfg application ....................48 Ways to get the mobile ID and access card ....................48 – 3...
- Page 4 Recieving the RTSP stream from the panel's camera ..........51 – 4...
- Page 5 • Device description (see page 6) • Technical parameters (see page 7) • Configuration through graphical interface (see page 8) • Configuration trough web interface (see page 15) • Installation and connection (see page 41) • Device usage (see page 47) – ...
-
Page 6: Device Description
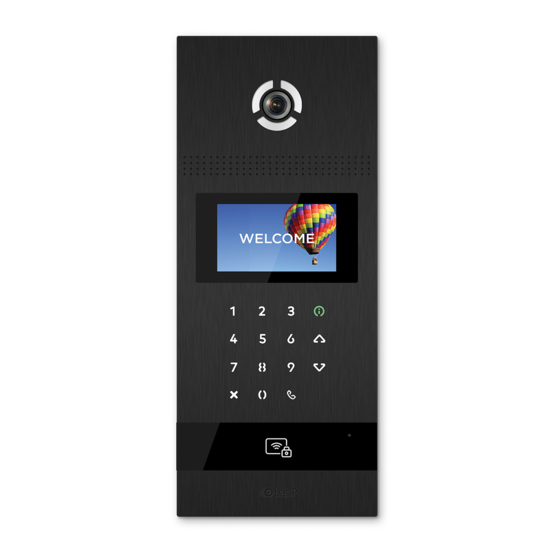
Modern design and well-thought out functionality of this panel makes it an ideal solution for business and elite buildings. AA-12B is available in gold, silver, and black, and also it supports BAS-IP UKEY mobile access. There is a separate button to call concierge or emergency services. -
Page 7: Technical Parameters
Installation Type: Flush Keypad: Backlight piezo buttons Functionality Interface: Russian/English, WEB interface Opening the lock: From the monitor, by code, by card, from the BAS-IP Intercom application, UKEY Access control integration: WIEGAND-26 output Shortcut buttons: Concierge button Number of call melodies: 4 polyphonic melodies, ability to customize melodies for different actions Authentication: Separate password for settings, WEB –... -
Page 8: Configuration Through Graphical Interface
Address book: A list of contacts to search for and call residents if the exact logical address of the monitor is unknown. Address book is available if the option is enabled in the settings of the web interface in the "Apartments " section. https://wiki.bas-ip.com/aa07v4/en/apartments-14058107.html Configuration through graphical interface – 8... -
Page 9: Device Settings
To enter the system settings, press the " " button twice: Next you need to enter 6 digits of the password to enter the call panel settings (default password: 123456) and press " ". https://wiki.bas-ip.com/aa07v4/en/advanced-8552667.html Configuration through graphical interface – 9... - Page 10 The "2" button moves the cursor up, the "8" button moves the cursor down. To confirm the values, press the " " button and the " " button to go back. Mode: select operation mode of the panel. Configuration through graphical interface – 10...
-
Page 11: Network Settings
Information about operation modes If you select the "Wall" mode, you must enter 4 digits of the building number, 2 digits of the unit number, 2 digits of the floor number, and 2 digits of the apartment number to call the desired monitor. If you select the "Unit"... -
Page 12: Access Settings
DHCP: Enable/disable mode to get network settings automatically. IP: IP address of outdoor panel. By default the outdoor panel can have a static IP address 192.168.68.90 or 192.168.1.90. Mask: Subnet mask. Gateway: Default gateway. DNS: Address of the DNS server. Server: IP address of your PC or server, where Management Software or Link software is installed. -
Page 13: Additional Settings
Timeout: Time when contacts of the panel relay will be closed or open. Delay: Time after which contacts of the panel relay will be closed or open (delay before unlocking). Elev Refer: Floor number where the panel is installed (using elevator control module EVRC-IP, optional). -
Page 14: About System
RoomNum: Apartment number to which access card must be linked. Adding cards through graphical interface: Enter the desired apartment number and wave the card in front of the area of the reader. A signal will sound from the panel, confirming that the card is registered, and a card number will be displayed in the Card field. -
Page 15: Configuration Trough Web Interface
Configuration trough web interface • Login (see page 15) • Dashboard (see page 16) • Network (see page 17) • Panel (see page 18) • Apartments (see page 21) • Access management (see page 23) • Identifiers (see page 26) •... -
Page 16: Dashboard
Dashboard After successful authorization, the following interface will be displayed: Framework: Firmware version. Launcher: Launcher version. Hybrid Mode: The current connection mode of the hybrid adapter. Hybrid Version: Hybrid adapter version. Serial number: Serial number of the device. Device name: Name of the device. Configuration trough web interface – ... -
Page 17: Network Information
Network information DHCP: The current state of the DHCP connection. IP Address: The current IP address of the panel. Subnet Mask: Subnet Mask. Gateway Address: The address of the main gateway. DNS server: DNS server address. MAC address: MAC address of the panel. Network Network settings DHCP: Enable/disable mode to get network settings automatically. ... -
Page 18: Custom Ntp
DNS: DNS server address. Custom NTP NTP: Enable/disable the use of a custom NTP server. URL: The input field for the user NTP server address. Time Zone: Select the time zone. Management system Mode: Selects the operation mode of the panel control system. URL: Management server address. -
Page 19: Sip Settings
Information about operation modes If you select the "Wall" mode, you must enter 4 digits of the building number, 2 digits of the unit number, 2 digits of the floor number, and 2 digits of the apartment number to call the desired monitor. If you select the "Unit"... -
Page 20: Call Settings
Example: stun.l.google.com. STUN port: The port of the STUN server. Example: For google STUN server 19302 port is used. Password: Password of SIP number. Call settings Concierge: Enable / disable the function to call the specified number in the "Number" line when pressing the concierge button. -
Page 21: Apartments
This menu displays a list of apartments. An apartment is a logical entity intended to bind identifiers, access codes and redirection rules. Use the address book: Enable/disable usage of address book to search and call the apartments from the main screen . https://wiki.bas-ip.com/aa07v4/en/main-screen-2754641.html Configuration trough web interface – 21... -
Page 22: New Apartment
New apartment After clicking on the "New apartment" button, the following interface will be displayed: Building: Building number 0001-9999 Unit: Unit number: 00-99 Floor: Floor number: 00-99 Apartment: Apartment number: 01-99 Apartment name: Apartment name. For example, "Smith's" Number of inhabitants: The conditional number of inhabitants who live in this apartment. After clicking on the "Confirm"... -
Page 23: Access Management
The table contains the following columns: Apartment name: Apartment name. Number of inhabitants: The conditional number of inhabitants in this apartment. Number of identifiers: The number of identifiers that are issued for this apartment. Identifiers can be created in the "Access management" menu, tab "Identifiers". Number of access codes: The number of access codes issued for this apartment. -
Page 24: Common Settings
Common settings Master card: Master card number. Use master code: Enable/disable using master code to open the lock. Master code: The code entered on the keypad for opening the lock. When using the control module with two locks SH-42, when entering the master code on the panel, both locks will open. -
Page 25: Open Lock
Lock #1, Lock #2 Lock open time (s): Time for which the panel relay contacts are closed or open. Delay before opening: Time after which the contacts of the panel's relay will close or open. Open lock Lock #1, Lock #2 Open lock: The function of opening the selected lock from the panel WEB interface. -
Page 26: Server Manage Access
Server manage access Enabled: Turning on/off the panel operation mode, in which access cards and identifiers are not stored in the panel's memory and when placed to the reader, the panel will send a request to the server and wait for the answer - to give access or not. Use a custom server: Enable/disable the use of custom server to control the panel. -
Page 27: Access Restrictions
Apartment number: Select an apartment from the existing list of apartments. Name of the owner: Information about the owner of the identifier. Owner Type: Select the type of owner ID. The Owner and Guest types are available. Identifier Type: Select identifier Type. There are 3 types of identifiers available: Card - EM-Marin or Mifare card. -
Page 28: New Restriction
New restriction After clicking on the "New restriction" button, the following interface will appear: Name: The name of the rule. All day: Enable/disable the time restriction interval per day. Configuration trough web interface – 28... - Page 29 If function is disabled, user can set time interval of this restriction. Start at - End at: Select the interval of action for this restriction. Repeat: Specify the duration of repetitions of this restriction. Configuration trough web interface – 29...
-
Page 30: Forward
Duration of repetitions: Select the number of repetitions of this restriction. If you select the "Infinitely" option, rule will always act. If you select the "Until" option, you can set the end date for the action of this restriction. Forward This section is used to substitute numbers by panel when making calls to internal monitors when there is no monitor or it is turned off, or to any given SIP number. -
Page 31: New Forward Queue
Mode: Mode of the forwarding. All at once - the call is made to all numbers simultaneously. One by one - the call is made to the numbers in turn with a delay of 20 seconds. New forward queue After clicking on the "New Forward" button, the following interface will be displayed: Apartment number: Number dialed on the panel's keypad. -
Page 32: Advanced
Input format for SIP calls sip:5588@sip.bas-ip.com, where 5588 is the SIP number of the device being called, sip.bas-ip.com is the address of the SIP server, which can be specified either by the IP address or by the domain name. Advanced This section is used to substitute the advanced settings of the panel. -
Page 33: Custom Notifications
During a call, it is possible to switch between streams by pressing keys from 1 to 5 in the monitor menu. The key "1" corresponds to the stream of the outdoor panel, the keys from "2" to "5" - to additionally added streams (transmission is carried out by DTMF RFC2833). - Page 34 Required audio file options • Format: wav • Channels: mono • Bit rates: 16 • Sample Rate: 8000 Hz Key pressing: Sound when you press the panel keys. Message text: The text displayed on the main panel screen. In this field you can enter, for example, the number of the concierge for communication or the name of the residential complex.
- Page 35 Ring back: Sound and text message "Calling" when panel make an outgoing call. Door unlock: Sound and the text message "Welcome" when panel receive a signal to open the lock. Error: Sound and text message "Error" when entering an unregistered subscriber number, the lock opening code and the presentation of an unregistered identifier. Configuration trough web interface – ...
-
Page 36: Logs
Emergency: Sound and text alert "Alarm!" when switching the panel to emergency mode. Switching occurs programmatically through BAS-IP Link or through third-party software using API. In emergency mode, locks connected to the panel are also opened. If any of the functions is turned off, the standard sound and the standard text message will be used. -
Page 37: System
Administrator - has full access to all panel settings. Manager - has access to the panel settings, but he has limited access to the access control menu. Typically, access to this account is provided to installers to install and configure the system. -
Page 38: Settings
Settings Choose file: Selecting the panel configuration file from the PC file system. Set default settings: Reset all panel settings to factory defaults. Backup all settings: Save and export configuration files. Export/Import data Configuration trough web interface – 38... -
Page 39: Device Language
Choose file: Choosing the path to the backup file in te PC's filesystem. When importing data into the panel, all data in the Apartments, Forward, Identifiers and Access restricitons tables will be deleted and replaced with new data without the possibility of restoring old data. -
Page 40: Reboot
Select file: Select software update file from PC file system. After selecting the file, you must click on the "Update Software" button. Check for update: Check for software update on BAS-IP server or user server. Update software: Start software update. -
Page 41: Installation And Connection
Installation and connection This page describes the process of installation and connection of the outdoor panel. • Completeness check of the product (see page 41) • Electrical connection (see page 41) • Mechanical mounting (see page 45) • Connection of additional modules (see page 46) Completeness check of the product Before installation of the outdoor panel, it is necessary to check that it is complete and all... - Page 42 1. Connection scheme of electromagnetic lock using uninterruptible power supply UPS-DP-S. 2. Connection scheme of electromagnetic lock using third-party power supply for the lock. Installation and connection – 42...
- Page 43 3. Connection scheme of electromechanical lock using uninterruptible power supply UPS-DP-S. Installation and connection – 43...
- Page 44 3. Connection scheme of electromechanical lock using third party power supply for the lock. Installation and connection – 44...
-
Page 45: Mechanical Mounting
Mechanical mounting Before installation of the outdoor panel it is necessary to provide a hole or a recess into a wall with dimensions 141×359×58 mm (for flush mount) dimensions of the bracket (mounting box) = 140×358×57 mm. It is also necessary to provide supply of a power cable, additional modules and the local network. ... -
Page 46: Connection Of Additional Modules
Installation height recommendations: The outdoor panel should be installed at a convenient height for you. Approximate height of installation is 160-165 cm of the camera level. Connection of additional modules The following modules can be connected to all multi-apartment panels: •... -
Page 47: Device Usage
UKEY mobile access Description Ukey Mobile Access from BAS-IP is a universal technology for gaining access to the premises or to the territory of an object with the possibility to use in one reader simultaneously: EM-Marin cards and MIFARE/encrypted cards MIFARE Plus/MIFARE Classic, cell phone (Bluetooth and NFC). -
Page 48: Triple-Clicking Setup In Ukey Cfg Application
For users' ease of operation with BAS-IP outdoor panels equipped with multi-format readers, the company BAS-IP has released a new mobile Ukey application which, after receiving the mobile ID, is used to open the doors/gates/parking gate arms. For each outdoor panel equipped with a reader module with support for UKEY Mobile access, a different range of the mobile ID can be configured, in the range of 2 centimeters to 10 meters. - Page 49 You cannot copy or duplicate an identifier. Using BAS-IP TR-03B reader In order for the administrator of the management company to be able to use TR-03B to issue mobile identifiers or to record access cards, it is necessary to specify the master-card, ...
- Page 50 5. Bring a cell phone to the reader (make sure Bluetooth is on) and enter UKEY App, then press Obtain button or select Obtain BAS-IP TR-03 key. 6. The reader will transmit a mobile ID to your cell phone, thus "Your key is ready" will appear in the app.
- Page 51 Recieving the RTSP stream from the panel's camera To get the RTSP stream from the camera of the call panel to the video surveillance system, you need to put in the add line of the camera rtsp://admin:123456@192.168.1.16:8554/ch01, where admin is the login, 123456 is the password to access the WEB interface, 192.168.1.16 is the IP address of the panel, 8554 is the port of access to the camera, ch01 is the channel number.
Need help?
Do you have a question about the AA-12 Series and is the answer not in the manual?
Questions and answers