Table of Contents
Advertisement
Advertisement
Table of Contents

Related Manuals for ARIBEX NOMAD DENTAL


Summary of Contents for ARIBEX NOMAD DENTAL
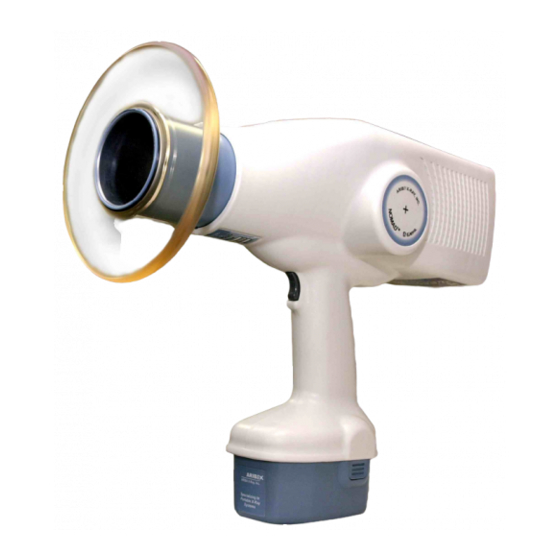
- Page 1 Portable X-ray System for Intraoral Radiographic Imaging USER MANUAL...
- Page 2 Aribex and NOMAD are registered trademarks within the United States and other countries. NOMAD Dental, and the ARIBEX and NOMAD logos are trademarks of Aribex, Inc. worldwide. United States and international patents pending. All other brand and product names are trademarks or registered trademarks of their respective companies.
-
Page 3: Table Of Contents
USER MANUAL NOMAD ® Dental Table of Contents Getting Started ..........................1 Intended Use ........................1 Unpack, Check, and Register NOMAD ................1 Charging the Battery ......................2 Safety Precautions ........................... 3 Radiation Safety ........................ 3 Usage ..........................5 Cleaning ..........................6 Security, Storage, and Transportation ................ - Page 4 Thank you for choosing the Aribex NOMAD as your x-ray solution! At Aribex we value your business and we would like to hear from you, because your feedback or suggestions are important to us. If you have comments, please email us: NOMAD@aribex.com...
-
Page 5: Getting Started
ANUAL 1.0 Getting Started 1.1 Intended Use The NOMAD Dental X-ray System is designed to be used for both adult and pediatric patients by trained dentists and dental technicians for producing diagnostic x-ray images. 1.2 Unpack, Check, and Register NOMAD Unwrap individual components from the protective plastic and check for any noticeable signs of damage. -
Page 6: Charging The Battery
NOMAD Complete the product Warranty/Registration card and mail it with proper postage to Aribex today. Completing the card fulfills a condition of warranty coverage (see the inside back cover of this manual) and enables you to receive valuable product news and updates. -
Page 7: Safety Precautions
ANUAL 2.0 Safety Precautions 2.1 Radiation Safety This x-ray unit may be dangerous to operator and bystander unless safe exposure factors and operating instructions are observed. Operators must follow all guidelines dictated by applicable regulations and in-house radiation protection program in regard to patients and operators who are pregnant or expect to become pregnant. - Page 8 NOMAD An exposure can be terminated for any reason by abruptly releasing the depressed trigger (for more information see section 4.0, Operation). As shown in graphic representations, maximum protection (green area) from backscatter radiation (red area) exists when the NOMAD is positioned near the patient, is perpendicular to the operator (with the patient’s head tilted if needed), and the backscatter shield is...
-
Page 9: Usage
ANUAL Comparative Data for Hand and Extremity Exposure (Annual) 500mGy Recommended Occupational Limit 50mGy Occupational Limit Requiring Dosimetry 0.18mGy Average Exposure Using NOMAD with D-Speed Film 0.07mGy Average Exposure Using NOMAD with F-Speed Film or Digital Sensor 1) Standards for Protection against Radiation, 10 CFR 20 (US Federal Standards), 1994 X-RAY SOURCE BACKSCATTER... -
Page 10: Cleaning
NOMAD There are no user serviceable parts inside the NOMAD. • Do not open the device housing. Doing so will void the warranty. • NOMAD should not be used in environments where flammable cleaning agents are • present. Locate the battery charger away from the normal patient environment (see section 5.0, •... -
Page 11: Setup And Check
ANUAL Do not store the NOMAD, battery charger, or batteries in extreme conditions: below –20° C / –4° F or above +40° C / +105° F, or beyond 95% relative humidity (non-condensing). This storage location should be cool, dry, and away from direct sunlight. 3.0 Setup and Check 3.1 The Backscatter Shield In addition to the lead-lined cone, the backscatter shield provides additional protection to you, the... -
Page 12: Attaching A Charged Battery
NOMAD 3.2 Attaching a Charged Battery Properly orient and carefully insert the newly charged battery into the base of the NOMAD handle, (a properly oriented battery should click into place without force, forcing the battery into position may damage the battery and/or the NOMAD). -
Page 13: Optional Checks
ANUAL Once a battery is depleted, indicated by the LOW BATTERY alert, it must be recharged before use. For continued use, insert the secondary, replacement battery (which should be charged in advance). See section 5.0, Battery Replacement, for more information. NOTE: 3.4 Optional Checks The NOMAD is factory calibrated and tested prior to release (see your Certificate of Conformance),... -
Page 14: Operation
NOMAD 4.0 Operation 4.1 Powering Up Press and release POWER button to turn NOMAD on (after approximately 2.5 half minutes of inactivity, NOMAD shuts off automatically). When the power is turned on a single, long audible signal and an example illuminated numeric (LED) display indicate the unit has power. -
Page 15: Situating The Patient And Enabling The Device
ANUAL 4.4 Situating the Patient and Enabling the Device Properly position the patient and yourself before enabling NOMAD (to prevent accidental exposure). Press and release ENABLE to ready the device; be sure to re-enable NOMAD if any subsequent changes are made to the time setting prior to exposure. -
Page 16: Exposure Techniques
NOMAD 4.7 Exposure Techniques NOMAD provides a high degree of flexibility, making it possible for exposures to be produced while the patient is reclined, lying on their back, or sitting upright. When taking images, hold the NOMAD using two hands; one on the handle and the other under the battery for increased stability and patient safety. - Page 17 ANUAL Technique Factor Chart 2.3mA 60kV Recommended exposure settings (X 1/100 second) with cone perpendicular to film/sensor. Adult Maxilla (upper) Sensor #1 & #2 Mandible (lower) Schick Sensor Child Maxilla (upper) Sensor #1 Mandible (lower) Adult Maxilla (upper) Sensor #1 & #2 Mandible (lower) Techniques Accent...
-
Page 18: Battery Replacement
Do not attempt to charge damaged batteries. An authorized distributor, Aribex, and your local recycling center will accept spent or damaged batteries. Order new 14.4V batteries from Aribex or your authorized distributor, do not use batteries from other sources, which invalidates the warranty. -
Page 19: Keeping Nomad Up And Running
ANUAL 6.0 Keeping NOMAD Up and Running 6.1 Alarms and Alerts The visual/audible alarm signals a programmed action designed to prevent harm to operator, patients, and/or NOMAD. The visual/audible alerts confirm normal conditions or draw the operator’s attention to a required action. ☼... - Page 20 NOMAD ☼ Condition Visual Indicator Audible Signal Function / Resolution Activates when ENABLE is System Green ENABLED indicator pressed/released; ends Readiness flashes Slow series of automatically after 30 seconds or short, double beeps when an exposure starts (trigger is depressed or START is Alert pressed) Invalid Input...
-
Page 21: Troubleshooting
ANUAL 6.2 Troubleshooting If you encounter results and/or errors in the operation of NOMAD that are not explained in the previous sections, check the following table on user troubleshooting to determine the need for authorized service. Device Symptom Potential Problem Corrective Action Increase the exposure time setting;... - Page 22 NOMAD will require authorized were emitted and shutdown service; see section 6.3, Repair occurred, a different problem and Maintenance. exists (see section 6.1, Alarms and Alerts). If you have additional questions or need additional help contact: support@aribex.com...
-
Page 23: Repair And Maintenance
Be sure to include the RMA number on the package you are returning. Products without a RMA number cannot be serviced or given credit consideration. Aribex will not assume responsibility for shipping damages; however, it will help you file a claim with the freight carrier. Please see warranty information at the end of this manual. -
Page 24: Technical Description
(1) year from the date of purchase. The liability of Aribex, Inc. is limited to repair or replacement of any parts that Aribex or its authorized resellers determine to be defective. Contact Aribex for a Return Material Authorization (RMA) number and shipping instructions. -
Page 25: Wiring Diagram
0366 ISO 13485 / ISO 9001 ERTIFIED OMPANY © Aribex, Inc. 2005, 2008 All Rights Reserved English is the original draft language for this manual. Aribex, Inc. Phone: +1 801-226-5522 744 South 400 East Fax: +1 801-434-7233 Orem, Utah 84097 Email: NOMAD@aribex.com...
Need help?
Do you have a question about the NOMAD DENTAL and is the answer not in the manual?
Questions and answers