Advertisement
Quick Links
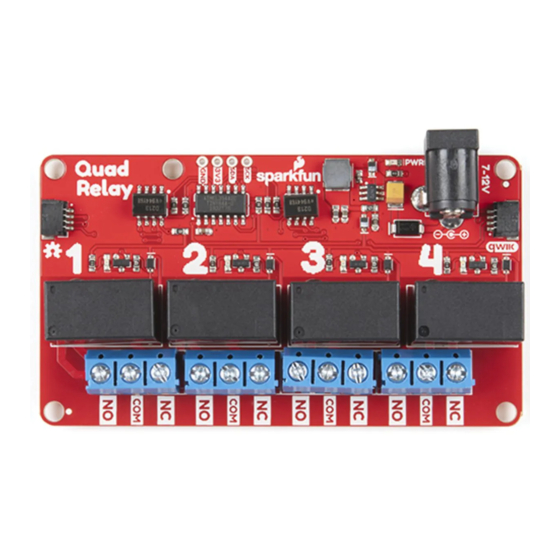
Qwiic Quad Relay Hookup Guide
Introduction
SparkFun's Qwiic Quad Relay is a product designed for switching not one but four high powered devices from
your Arduino or other low powered microcontroller using I C. It has four relays rated up to 5 Amps per channel at
250VAC or 30VDC that are controlled by an ATtiny84A. Each channel has its own blue stat LED, silk for easy
identification, and screw terminals for easy connection. The product is Qwiic enabled allowing you to easily
integrate the Quad Relay with other products in the Qwiic environment, which means no solder neccessary!
SparkFun Qwiic Quad Relay
COM-15102
Product Showcase: SparkFun Qwiic Single and Quad Relay Boar... ... ...
Product Showcase: SparkFun Qwiic Single and Quad Relay Boar
Product Showcase: SparkFun Qwiic Single and Quad Relay Boar
2
Advertisement

Related Manuals for sparkfun Qwiic Quad Relay


Summary of Contents for sparkfun Qwiic Quad Relay
- Page 1 Introduction SparkFun’s Qwiic Quad Relay is a product designed for switching not one but four high powered devices from your Arduino or other low powered microcontroller using I C. It has four relays rated up to 5 Amps per channel at 250VAC or 30VDC that are controlled by an ATtiny84A.
- Page 2 ⚡ Before we begin! There are a number of safety precautions included in the product, but that can not account for human inexperience and error. This product and the example below interacts with HIGH AC voltage and so is intended for people experienced around, and knowledgeable about HIGH AC voltage. If that's not quite your jam, then take a look at our IoT Power Relay! It's not I C but the IoT Power Relay contains shielding to prevent accidental shock.
- Page 3 SparkFun BlackBoard Qwiic Cable - 100mm SPX-14669 PRT-14427 Breadboard - Mini Modular (Red) PRT-12044 Additional Options You could also use our 9 volt wall adapter if that suits your fancy and we have a number of Qwiic cable sizes to fit your needs.
- Page 4 Qwiic Cable - 500mm Qwiic Cable - 200mm PRT-14429 PRT-14428 Qwiic Cable - 50mm PRT-14426 Tools You will need a flush cutter and wire stripper to remove the sheath and insulation from a cable. A Phillips head screwdriver will be required to connect the load's to a screw terminal.
-
Page 5: Hardware Overview
SparkFun Mini Screwdriver TOL-09146 Suggested Reading If you aren’t familiar with the Qwiic system, we recommend reading here for an overview. Qwiic Connect System We would also recommend taking a look at the following tutorials if you aren’t familiar with them. - Page 6 Relays There are four single pole, double throw JZC-11F relays on the Qwiic Quad Relay. Each relay is capable of 5 Amps at 250VAC or 30VDC. These relays have an associated blue screw pin terminals that are aligned in order from left to right.
- Page 7 Jumpers There are two jumpers on the underside of the Qwiic Quad Relay. The first is the address jumper that changes the default I C address from 0x6D to 0x6C. The second is the jumper labeled 5V Wall Adapter Jumper. If you intend to use a wall adapter or other power source that is below 7-15V than you can close this jumper to side step the on board voltage regulator, and provide 5V directly to the 5V power system.
-
Page 8: Hardware Assembly
Hardware Assembly Introduction to Relays Let’s walk through how to setup the relay to switch on a lamp or other device, but let’s begin with a short introduction into relays. A relay is a switch. However, unlike most switches, within the relay’s housing there is also a switching mechanism that is isolated from the switch. - Page 9 On the tail end is a Qwiic connector leading to the Quad Relay. ⚡ Warning! Make sure the lamp is not plugged into the wall as you cut into the wire in the following section. Let’s take a quick look at the lamp wire, before we look at the Quad Relay. Our goal here is to sever one of the two lamp wires, and plug the two ends of the cut wire into the relay which will reconnect the wire when we activate the switching mechanism.
-
Page 10: Example Code
Arduino, please review our tutorial on installing the Arduino IDE. Let’s take a look at some example code fort the Qwiic Quad Relay. You can download all example codes from the GitHub repo by clicking the link below. - Page 11 The rest of the defines list all of the possible I C commands possible. You can toggle each individual relay, toggle them all, turn them all on, or turn them all off. There is also a list of commands to check the state of each relay; whether the relay is on or off represented numerically by zero and 15 respectively.
- Page 12 void setup() Wire.begin(); Serial.begin(115200); //Use internal resitors to keep them in a known high state. pinMode(yellow_btn, INPUT_PULLUP); pinMode(blue_btn, INPUT_PULLUP); pinMode(red_btn, INPUT_PULLUP); pinMode(green_btn, INPUT_PULLUP); get_relays_status(); void loop() // Since we'll only ever want the relay to be on or off, // the logic is handled by the product. Here we're just pressing buttons and // putting a small 400 ms debounce.
- Page 13 delay(400); The get_relays_status function is of particular interest. Getting the status of the relays works like an I C buffer. Depending on the number of bytes requested, you will get the status of that many relays. For example, if you request the status of relay one and four bytes, then you’ll get the status of relay one plus the other three.
- Page 14 (i.e. Example2_Relay_Using_Interrupts) if you need your Arduino to stop whatever it is processing to toggle the relays. Or if you need to control more than one Qwiic quad relay on the same bus? Check out the third example (i.e. Example3_ChangeI2CAddress) to adjust an I C address.
- Page 15 Photon Remote Water Level Sensor Blynk Board Project Guide Learn how to build a remote water level sensor for a A series of Blynk projects you can set up on the Blynk water storage tank and how to automate a pump based Board without ever re-programming it.
- Page 16 Using the ESP32 to make a web-configured timed Get started switching those higher power loads around relay. with the Qwiic Single Relay.
Need help?
Do you have a question about the Qwiic Quad Relay and is the answer not in the manual?
Questions and answers