King gates STARG8 24 Installation Instructions Manual
Control unit for 24v sliding and swing gates motors
Hide thumbs
Also See for STARG8 24:
- Installation and use instructions and warnings (24 pages) ,
- Programming (16 pages) ,
- Quick manual (2 pages)
Table of Contents
Advertisement
STARG8 24
Control unit for 24V sliding and swing gates motors
Installation instructions
S
A T
S
A T
D ip
- S
1
2
O n
O n
O n
O n
Made in Italy
STARG8 24 BOX
Control unit for Jet 24, Jet 24 XL,
Couper, Linear 24V or Intro 24-400
R
G
8
R
4 2
G
8
4 2
L X
w it
c h
3
4
5
6
7
8
J e
t /
L in
e a
C o
u p
r
e r
/ In
o
tr
D y
n a
m o
s
M in
im
o d
P h
u s
o t o
S t o
p
R a
E r
d io
r o r
S t a
r t
Control unit for Minimodus
Control unit for
Modus280, Modus420
or Modus XL
Control unit for Dynamos 24
Advertisement
Chapters
Table of Contents

Subscribe to Our Youtube Channel
Related Manuals for King gates STARG8 24


Summary of Contents for King gates STARG8 24
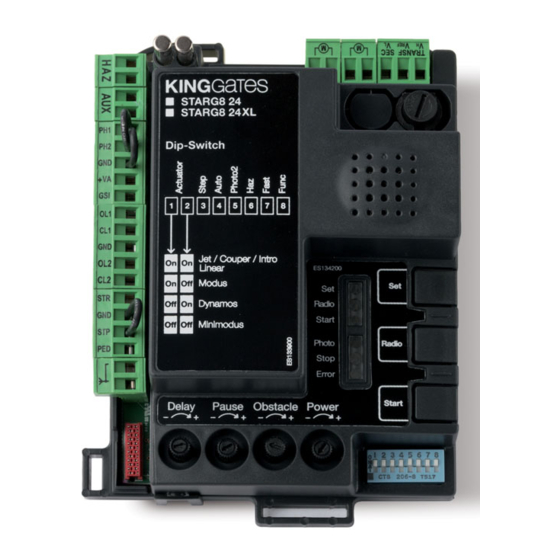
- Page 1 STARG8 24 Control unit for 24V sliding and swing gates motors Installation instructions STARG8 24 BOX Control unit for Jet 24, Jet 24 XL, Couper, Linear 24V or Intro 24-400 D ip w it L in / In M in...
-
Page 2: Table Of Contents
2. Wiring 2.1 - STARG8 24 power connection 2.2 - STARG8 24 XL power connection 2.3 - STARG8 24 Accessories wiring connection of a typical system 4 2.4 - StarG8 24 Accessories wiring connection 3. Control unit settings 3.1 - Dip-switch adjustment 3.2 - Knob adjustment... -
Page 3: Wiring
Product description 1.1 - Commissioning 1.2 - Main Features - Automated access command for 1 or 2 24V motors. To start-up the system, the following steps must be carried out: C C C o o o n n n g g g i i i f f f r r r u u u t t a a a o o o i i i t... -
Page 4: Starg8 24 Xl Power Connection
1 - SAFETY NOTICE - This Instructions Manual (Instructions) contains important information regarding safety - Read the entire document before you install any of the equipment - Installation must be carried out by qualified installers - Installation must be in accordance with all state and federal laws and regulations relating to Electrical Safety in your area - Make sure that all cabling and wiring are in accordance with Wiring Rules AS 3000:2007 - Do not modify the equipment unless directed to by the Instructions. -
Page 5: Starg8 24 Accessories Wiring Connection Of A Typical System
2.3 - StarG8 24 Accessories wiring connection of a typical system Line fuses (already Transformer* 230V 50Hz MAINS series connected) (already series 230V POWER SUPPLY connected) CABLE: 3X1,5mm² (max. distance 30m) WARNING LIGHT Idea 24 Plus (12V) LAMP CABLE: 2X0.5 mm (max. -
Page 6: Starg8 24 Accessories Wiring Connection
2.4 - StarG8 24 Accessories wiring connection MOT2 MOT1 Warning light 24Vdc max.15W warning light (Paragraph 9.3) Default: electric lock 12Vdc max. 15W AUX contact / electric lock (for courtesy light enable, see par. 13) For safety devices connected to (Paragraph 9.4) -
Page 7: Control Unit Settings
Control unit setting 3.1 - Dip-switch adjustment DIP SWITCHES (Paragraph 3.1) DIP-SWITCH status Description of operation DIP 1-2 1 ON 2 ON Connected gearmotors: swing series “Jet 24V”, “JetXL 24V”, “Linear 24V”, “Intro 24-400” or “Couper24” MOTOR 1 ON 2 OFF Connected gearmotors: “Modus”... -
Page 8: Knob Adjustment
DIP6 “HAZ”: DIP8 “FUNC”: If the dip-switch is put to ON, the warning light is powered (terminals SWING GATE (DIP1/2= ON ON / ON OFF/ OFF OFF) 1, 2) in the intermittent mode. If the “HAZ” dip switch is set to OFF, “FUNC”... -
Page 9: Transmitter (Remote Control Unit) Programming
Set button Radio button The transmitters to be programmed must be of the “Stylo4K” or “Stylo2K” series by King Gates. See adjacent pictures. , it means that the programming pro- tections have been activated – see Paragraph 16.1. Therefore radio transmitters learning is not possible. -
Page 10: Deleting All Memorised Transmitters
4.3 - Deleting all memorised transmitters This operation deletes all memorised transmitters from the memory. 1. PRESS THE RADIO BUTTON FOR 2. PRESS THE RADIO 3. MEMORY DELETION COMPLETED 4 SECONDS AND RELEASE WHEN BUTTON AGAIN RADIO LED FLASHES FOR 1 SECOND The red “radio”... -
Page 11: Programming The Gate Travel
Programming the gate travel path Knob Power Start button Set button Radio button Initial basic setup of the gate travel must be done prior to using the gate tion has been activated – see Paragraph 16.1. To interrupt the following programming sequences at any time, press the SET and RADIO buttons simultaneously or wait 10 seconds. -
Page 12: Programming The Pedestrian (Partial) Opening Width
If the operator does not recognise the mechanical stops (end of the travel for swing gates) even with the OBS knob set to its minimum, you can select the open and closed points during programming by pressing the “SET” button (or a programmed transmitter’s button) at the end of points 5, 6 and 7. -
Page 13: Advanced Programming Of The Gate Travel
5.3 - Advanced programming of the gate travel path With this procedure, you will set the slow down points or remove them completely 2. PRESS THE SET BUTTON 3. PRESS THE RADIO BUTTON 1. PUT THE GATE LEAF/LEAVES FOR 2 SECONDS FOR 1 SECOND TO TO ABOUT HALF WAY PO- The yellow “set”... -
Page 14: Testing And Commissioning
With double hinged gate, the control unit will open and close one leaf at a time. After any “POWER” knob adjustment, the gate travel learning must be reprogrammed. If the operator does not recognise the mechanical stops (end of the travel for swing gates) even with the OBS knob set to its minimum, you can select the open and closed points during programming by pressing the “SET”... -
Page 15: Leds Indication
LED indication When the control unit switched on (and with no protection activated), the yellow “Set the green “Photo” and “Stop” LEDs turn on indicating that the two safety contacts are closed circuits. 7.1 - Input status indication LEDs The following signals refer to the standby mode (after 12seconds after power up and inactivity). GREEN PHOTO LED: - OFF if at least one of the PHO1 or PHO2 contacts (terminals 5-6-7) is opened GREEN STOP LED:... -
Page 16: Reset Procedure
RESET procedure Reset procedure deletes gate travel parameters (par. 5) and all advanced functions (par. 10). It can be performed in case of programming mistakes and it brings the STARG8 control board to factory settings. This reset doesn’t affect memorised radio transmitters (see par. 4 for radio transmitters management). 1. -
Page 17: Devices Connectable To The Control Unit
- with the opened gate they lock closing commands. “HAZ” dip-switch 6 (see Paragraph 3.1), select constant (DIP 6 ON) Figures 11a, 11b and 11c show examples of King Gates “Viky30” photocell connections. When multiple devices are connected on this contact, they must be series connected (see Fig. - Page 18 - with the gate closed they lock the opening commands. - with the gate open they have no effect. Figures 11a, 11b and 11c show examples of King Gates “Viky30” photocell connections. When multiple devices are connected on this contact, they 9.11...
-
Page 19: 24Vdc Accessories' Power Supply
9.6 - 24VDC accessories’ power supply PEDESTRIAN CONTACT (terminals 16-18) (terminals 16-18) The pedestrian “PED” input is a partial opening TERMINALS: 7-8 (see Paragraph 2.4). gate command (for pedestrian access) by wire. Nominal voltage 24VDC, max. 250mA, output for powering external With double swing gate only MOTOR1 is opened by it. -
Page 20: Memo 2000
MEMO 2000 - backup and restore (optional) MEMO 2000 Memo 2000 is an accessory memory module with two functions: • alternative radio memory with a storable capacity of 1500 radio transmitters. It can be permanently installed in STARG8 control unit and then all memorized remote controls saved by the procedure of paragraph 4 are stored into this module. - Page 21 F.A.Q. Problem Symptoms / Causes Solution 9a The control unit LEDs No power to the control unit. Check for mains power – see Paragraph 2.2 / 2.3. are turned off For solar/ battery power check 24VDC power to the board. The fuses blown.
-
Page 22: Advanced / Professional Programming - Index
Professional (Advanced) programming The following programming sequences are not necessary for standard installations. 12. Backjump adjustment 13. AUX output programming 13.1 - Programming of the button linked to the “AUX” output 13.2 - Selection of device connected to “AUX” output 13.3 - Selection of “AUX”... -
Page 23: Backjump Adjustment
Backjump adjustment This procedure allows for adjusting or eliminating the backjump function. Backjump is inverting the gate movement at the end of the travel to facilitate easy unlocking and manual release as well as to safeguard the mechanical system. On certain motors backjump is unnecessary, therefore the value is set to 1 by default. -
Page 24: Aux Output Programming
AUX output programming These programming sequences are not essential to the system’s operation, though they allow for setting the type (lock or courtesy light), work mode and output voltage of the devices connected to the AUX output. To interrupt the following programming sequences at any time, press the SET and RADIO buttons simultaneously or wait 10 seconds. -
Page 25: Selection Of Device Connected To "Aux" Output
13.2 - Selection of device connected to “AUX” output Default = electric lock 12V This procedure allows for setting the “AUX” output for the operation as: ELECTRIC LOCK: the control unit closes the AUX contact (terminals 3-4) whenever a command is received. By default the contact is closed for 2 seconds (electric lock mode ). -
Page 26: Selection Of "Aux" Output Voltage
To control the AUX contact set as courtesy light, a radio command must be registered through the procedure indicated in Paragraph 13.1 and connect a suitable relay (see paragraph 13). 13.4 - Selection of “AUX” output voltage (only for STARG8 24) STARG8 AC (FIXED VOLTAGE OF 12V AC) STARG8 24: Default=12VDC The output voltage of the AUX contact can be set to 12VDC or 24VDC, depending on the connected lock or the available relay. -
Page 27: Safety Device Advanced Programming Sequences
Safety device advanced programming sequences These programming sequences are not essential to the system’s operation, but they allow for controlling the safety devices by activating the photo-test—when photocells are installed—or controlling the resistance when 8.2kOhm resistive edges are mounted. To interrupt the following programming sequences at any time, press the SET and RADIO buttons simultaneously or wait 10 seconds. -
Page 28: Selection Of The Outputs Linked To The Photo-Test
14.2 - Selection of the outputs linked to the photo-test Default = PHO1 and PHO2 contacts (terminals 5-6) With this procedure, it is possible to decide on which safety devices to carry out the photo-test. 1. PRESS THE START BUTTON FOR 3 SECONDS 3 LEDs turn on and then all LEDs turn off (if not, consult Paragraph 16.1) 2. -
Page 29: Setting The Wired Commands
Setting the wired commands These programming sequences allow: 1) for locking wired commands, ONLY transmitters working 2) changing the wired commands start and pedestrian inputs to OPEN and CLOSE protection has been activated – see Paragraph 16.1. To interrupt the following programming sequences at any time, press the SET and RADIO buttons simultaneously or wait 10 seconds. -
Page 30: Activating/Deactivating Start And Pedestrian Lock
15.2 - Activating/deactivating start and pedestrian security mode Default = wired start input and start button of the control unit are activated . This programming sequence allows for better security by disabling the operation of the “start” / “ped” wired input and the start button on the control unit. -
Page 31: Resetting The Control Unit's Default Parameters
16.3 - Energy saving mode (only for STARG8 24) This feature cuts the power supply to the photocells when the control unit is on standby, therefore it decreases the power consumption. It is useful in case of battery power supply conditions. - Page 32 Installer details Company Stamp Address Province Tel. Contact person Manufacturer's details King Gates S.r.l. Phone +39.0434.737082 Fax +39.0434.786031 info@king-gates.com www.king-gates.com...
Need help?
Do you have a question about the STARG8 24 and is the answer not in the manual?
Questions and answers