Advertisement
Quick Links
Installation Instructions
Rear Anti-Sway Bar Kit
for Sprinter Van 3500
part #1209-118
1-3/8" diameter
INTRODUCTION
Thank you for purchasing this anti-sway bar kit. This kit is designed to improve the handling characteristics of your Sprinter 3500
by reducing the body roll and balancing the weight transfer during cornering. The anti-sway bar kit is engineered for long life
and trouble-free performance. For maximum suspension control, use this kit along with our front anti-sway bar kit.
All the hardware needed for installation is included in this kit. Refer to the PARTS LIST in these instructions to identify the parts.
SUGGESTED TOOLS
The following tools are suggested to complete the installation procedures:
• General hand tools
WARNING
• If raising the vehicle to install the anti-sway bar, always support
the vehicle with jack stands at both frame rails or at the rear axle
before working underneath. Ensure that the jack stands are securely
positioned, and are rated at or above the weight of the vehicle.
•The installer must read the instructions and use all bolts and parts
supplied. Use only the parts supplied by ROADMASTER to install
this kit.
• Minor modifications are sometimes necessary due to slight vehicle
variations, even for the same year, make and model.
• Regardless of year, make and model, a wide range of options for
specific applications may or may not interfere with the installation.
It is the installer's responsibility to make certain that equipment is
not damaged once the suspension solution travels through the full
range of motion. Failure to ensure adequate clearance could result
in non-warranty property damage, personal injury or even death.
ROADMASTER, Inc. • 6110 NE 127th Ave. • Vancouver, WA 98682 • 800-669-9690 • www.roadmasterinc.com
• Die grinder
Failure to follow these instructions
can result in property damage, per-
sonal injury or even death.
Thank you for purchasing this anti-
sway bar kit. Please read through
these instructions before installation.
• If running changes were made by the manufacturer after this kit
was designed, there may be weldments, braces, gussets, or other
structural items which interfere with the installation. It is the in-
staller's responsibility to allow for these running changes without
sacrificing the structural integrity of the anti-sway bar. Failure to
securely fasten the anti-sway bar could result in property damage,
personal injury or even death.
•ROADMASTER will not be responsible for any damage or injury
resulting from any modification or alteration.
• Check ALL the fasteners for tightness before and after road testing
the vehicle.
• Do not use this document for custom fabrication, as it may not
show all parts or structural components.
• Do not use an air impact wrench when re-installing bolts, as stripped
threads may result.
• This anti-sway bar is only warranteed for the original installation.
Installing a used anti-sway bar on another vehicle is not recom-
mended and will void the warranty.
85-3774 rev. 04 02-19
Advertisement

Subscribe to Our Youtube Channel
Related Manuals for Roadmaster 1209-118


Summary of Contents for Roadmaster 1209-118
- Page 1 Failure to ensure adequate clearance could result mended and will void the warranty. in non-warranty property damage, personal injury or even death. ROADMASTER, Inc. • 6110 NE 127th Ave. • Vancouver, WA 98682 • 800-669-9690 • www.roadmasterinc.com...
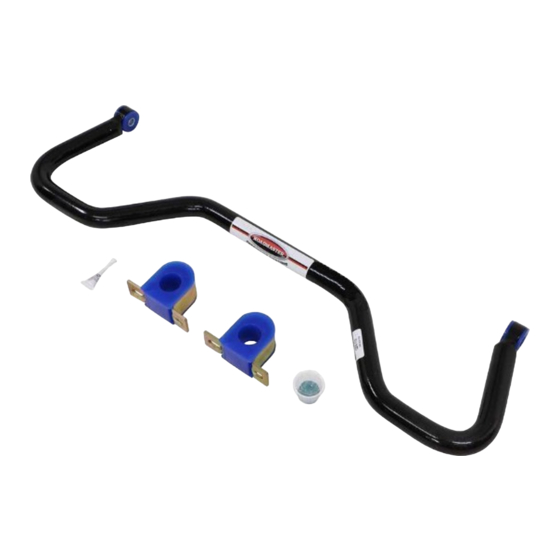
- Page 2 PARTS LIST Part #1209-118 Part # Description 1 B140 Bracket 2 205219-10 Bushing 3 205227-00 Bushing 4 205507-00 Sleeve 5 400011-30 Grease Aqualube 6 580037-00 Anti-sway bar 7* 200544-00 Loc Tite *not pictured 2 • Sprinter Van 3500 Rear Anti-Sway Bar Kit...
- Page 3 INSTALLATION The following instructions must be followed in the order listed to ensure a proper installation and to preserve the ROADMASTER warranty. Figure 1 1. Remove the factory anti-sway bar from the axle. Do not disconnect the endlinks from the frame (Figure 1). Retain all hardware, you will be using it later.
- Page 4 INSTALLATION The following instructions must be followed in the order listed to ensure a proper installation and to preserve the ROADMASTER warranty. Figure 4 Note: when reinstalling the brake line locators, they may need to be trimmed (Figure 4). 4. Once the bolts are started on both sides, tighten them to the factory torque specifications.
Need help?
Do you have a question about the 1209-118 and is the answer not in the manual?
Questions and answers