Table of Contents
Advertisement
LOGITECH RALLY AND RALLY PLUS
IMPLEMENTATION GUIDE
Rally greatly simplifies installation by combining camera signal,
two display signals, audio and USB over a single CAT6 cable.
TABLE OF CONTENTS
SYSTEM
1a. What's Included: Rally
1b. What's Included: Rally Plus
2. Parts Description
9. Using Rally
12. For More Information
Pre-configuration and Knowledge Before Customer Visit
PAGE
CLICK
02
CLICK
03
CLICK
04
CLICK
10
CLICK
11
CLICK
14
17
CLICK
CLICK
18
18
CLICK
19
CLICK
22
CLICK
22
CLICK
23
CLICK
23
CLICK
23
CLICK
Advertisement
Table of Contents

Related Manuals for Logitech Rally


Summary of Contents for Logitech Rally
- Page 1 LOGITECH RALLY AND RALLY PLUS IMPLEMENTATION GUIDE Rally greatly simplifies installation by combining camera signal, two display signals, audio and USB over a single CAT6 cable. TABLE OF CONTENTS SYSTEM PAGE CLICK 1a. What's Included: Rally CLICK 1b. What's Included: Rally Plus CLICK 2.
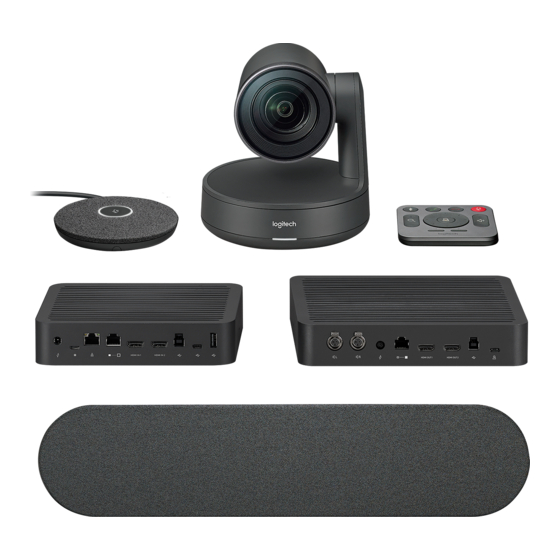
- Page 2 11. Remote 6. HDMI Cable RALLY COMPONENTS CAMERA REMOTE SPEAKER MIC POD TABLE HUB DISPLAY HUB CABLING (Up to 7) *Rally includes one (1) speaker and one (1) mic pod. Rally Plus includes two (2) speakers and two (2) mic pods.
- Page 3 RALLY PLUS COMPONENTS CAMERA REMOTE SPEAKER x2 MIC POD x2 TABLE HUB DISPLAY HUB CABLING (x2) (Up to 7) *Rally includes one (1) speaker and one (1) mic pod. Rally Plus includes two (2) speakers and two (2) mic pods.
- Page 4 LOGITECH RALLY AND RALLY PLUS IMPLEMENTATION GUIDE 2. PART DESCRIPTIONS a. CAMERA: Fully motorized pan/tilt/zoom camera that supports up to 4K resolution. The camera can be mounted upside down; an internal sensor will automatically invert the image and remote control function.
- Page 5 LOGITECH RALLY AND RALLY PLUS IMPLEMENTATION GUIDE b. TABLE HUB: The Table and Display Hubs work together to convert HDMI, camera, and audio to a signal that can be passed over one CAT6a cable. The Table Hub is the connection point for the microphones and the meeting room computer at the table.
- Page 6 LOGITECH RALLY AND RALLY PLUS IMPLEMENTATION GUIDE c. DISPLAY HUB: Connection point for the speakers, HDMI to the displays (when the meeting computer is connected to the Table Hub) and the meeting room computer when located at the display. Note, the HDMI signals are a straight pass through between the hubs.
- Page 7 MIC PODS: Each Mic Pod has an approximate pickup diameter of 15’/ 4.6m. The microphones can be daisy chained or connected in a trunk/branch configuration using the optional Mic Pod Hub described below. Rally supports up to seven (7) Mic Pods. 1. Mic cable 2.
- Page 8 LOGITECH RALLY AND RALLY PLUS IMPLEMENTATION GUIDE e. SPEAKERS: The Rally speakers are ultra-low distortion designed specifically for speech and enhanced echo canceling. When the system is uses in an application that enables a microphone (such as video conferencing and recording applications) the speaker output is binaural/double mono.
- Page 9 (10) seconds. Again, the LED on the camera will flash when the preset is saved. At the start of a meeting, the camera will move to the home preset position. Camera presets are stored in Rally, not the meeting room computer.
- Page 10 Mic Pod Hub: Used in microphone routing configurations where most of the cabling is below the table. The Mic Pod Hub has three jacks that can be connected to a combination of Mic Pods or other Mic Pod Hubs. Rally supports up to seven (7) Mic Pod Hubs.
- Page 11 Connect the USB type A/type B cable between the Table Hub and meeting computer. Connect the HDMI cable(s) between the Table Hub and computer. Note that Rally can pass through two HDMI signals from the computer to drive two displays. If using just...
- Page 12 LOGITECH RALLY AND RALLY PLUS IMPLEMENTATION GUIDE iii. Connect the Mic Pod(s) to the Table Hub. iv. Connect the CAT6a cable to the Table Hub. Connect the power supply to the Table Hub. b. CONNECTING THE DISPLAY HUB Connect the speakers to the Display Hub.
- Page 13 LOGITECH RALLY AND RALLY PLUS IMPLEMENTATION GUIDE Connect the USB C cable between the camera and Display Hub. The camera draws more power than normally available from an USB port and so must be connected to the Display Hub. Note, the camera can optionally be mounted upside down and an internal sensor will automatically invert the image and remote control function.
- Page 14 LOGITECH RALLY AND RALLY PLUS IMPLEMENTATION GUIDE vi. NOTE REGARDING HDMI SIGNALS: Up to one 4K 60fps (YCbCr 4:2:0) on HDMI 1 or two 1080p signals (one at 1080p 60fps and one at 1080p 30fps, which is then upscaled to 60fps) can be carried between the Table Hub and Display Hub.
- Page 15 Connect the CAT6a cable to the Table Hub. iii. Connect the power supply to the Table Hub. b. CONNECTING THE DISPLAY HUB Connect the HDMI cable(s) directly to the display(s). Please note that Rally can’t turn on the display(s) via CEC with this configuration.
- Page 16 LOGITECH RALLY AND RALLY PLUS IMPLEMENTATION GUIDE Connect the speakers to the Display Hub. iii. Connect the USB C cable between the camera and Display Hub. The camera draws more power than normally available from an USB port and so must be connected to the Display Hub.
- Page 17 With the meeting room computer connected to the Display Hub, it’s possible to share content from a second computer using the Logitech Screen Share as shown below: b. Using Logitech Tap with Rally, the recommended connections are as follows:...
- Page 18 No LED indicates either no power or a problem. 8. GETTING 4K OUT OF THE CAMERA a. Rally Camera is capable of outputting 4K video. If the meeting room computer is connected to the Display Hub, the computer can receive a 4K signal from the camera.
- Page 19 The camera is listed as “Logi Rally Camera.” The microphones and speakers are listed as “Logi Rally Audio.” b. STARTING A VIDEO CALL: After installing Rally and ensuring it is the default device in your video conferencing application, simply start the application in the normal manner and enjoy the benefits of improved audio and video.
- Page 20 17. CEC (Vizio) vii. This feature is not supported on all TVs. d. PAIRING RALLY TO A BLUETOOTH DEVICE: You can pair a Bluetooth device to Rally for audio-only calls. Rally supports the Hands Free Profile (HFP). To pair your Bluetooth...
- Page 21 RECEIVING A CALL (IN SUPPORTED APPLICATIONS) When a call is being received, the white LED will blink and the application ringer is heard on the Rally speaker. Press the call answer button on the remote control button or from the application to start the call.
- Page 22 Remote are replaced, the remote must be re-paired with the system. Further, you can pair up to 5 remote controls to Rally or Rally Plus to make it easier to control the system in larger rooms. To pair a remote, do the following: a.
- Page 23 3. If the meeting room computer is connected to the Table Hub and the second display is blank. Rally is able to transmit from the Table Hub to the Display Hub either one 4K signal or two 1080p streams. So, if a computer outputting a 4K signal is connected to the Table Hub, the second signal will not be transmitted—the 2nd screen will be black.
- Page 24 • Check computer device manager if Rally audio device is shown properly • Check Sound properties in Windows and check that Rally is selected as default audio playback device • In Windows Sound Properties, run the speaker test 6. Mics not working •...
Need help?
Do you have a question about the Rally and is the answer not in the manual?
Questions and answers
How do I add a second camera to the system?