Table of Contents
Advertisement
Advertisement
Table of Contents

Related Manuals for Vitronics Soltec myReflow


Summary of Contents for Vitronics Soltec myReflow
- Page 1 Installation Guide myReflow Version 38.2.0.001 VITRONICS SOLTEC BV Visit address Innovatiepark 12 - 4906 AA Oosterhout - the Netherlands Mail address P.O. Box 143 - 4900 AC Oosterhout - the Netherlands Telephone +31-162-483000 +31-162-483269...
- Page 2 Vitronics Soltec BV. This publication remains the property of Vitronics Soltec BV and may not be passed, loaned or given to any third party. Vitronics Soltec BV reserves the right to make changes in design and specifications without notice.
- Page 3 For corrections or clarifications please contact: 1. By mail: VITRONICS SOLTEC BV HEAD OFFICE TECHNICAL PUBLICATIONS P.O. BOX 143 4900 AC OOSTERHOUT THE NETHERLANDS TEL NR. (31) - 162483000 FAX.NR. (31) - 162483285 2. By e-mail: hoosterhout@vsww.com Installation Guide myReflow...
-
Page 5: Table Of Contents
2.1 General . 2.2 Transport 2.2.1 Symbols used . 2.3 Unpacking . 2.3.1 Packet in crate . 2.3.2 Packed on wooden pallet 2.3.3 Lifting with forklift 2.4 Connections 2.4.1 General . 2.4.2 Electrical connection . 2.4.3 Nitrogen connection . Installation Guide myReflow... - Page 6 2.4.4 Exhaust system. . 2-4 2.4.5 Personal computer . 2-5 2.5 Opening cover for leveling . . 2-6 2.6 Leveling . . 2-7 2.7 Installation Sheets and Requirements . . 2-8 Index...
- Page 7 SAFETY RULES GENERAL INFORMATION ICON DESCRIPTION ICON DESCRIPTION Only Qualified personnel is allowed to work on the High voltages are present on various parts of the sys- equipment. tem. Never eat, drink or smoke while working on the machine. Before working on the electrical circuit, turn main Wash thoroughly before eating, drinking or smoking.
-
Page 9: Safety Features
VERSION 2009 June Safety features ENERAL The myReflow Soldering System is designed and build only for soldering and handling printed cir- cuit boards. Safety features provides safe operating / working conditions for both the operator / maintenance- man and the machine. -
Page 10: Symbols
We have made a kit including the required materials to work safe with your soldering equipment. 1.3.1 O RDERING DETAILS This kit UG0200 can be ordered through your Vitronics Soltec office or local representative. The kit includes: ART NUMBER UANTITY... -
Page 11: Hazards
When burned, immerse in cold water immediately. When the burn is severe consult a physi- cian as soon as possible. • Most of the components in the soldering system don’t look hot. Always assume that all parts are hot. Installation Guide myReflow HAPTER... -
Page 12: Mechanical Hazard
AFETY FEATURES 1.4.3 H IGH VOLTAGES The 3 x 400 Volt supply present an electrical hazard. High voltages are present on various parts of the system. Hazard warning labels are places on the outside and inside of the enclosures. • To avoid exposure to high voltages, ensure that the protective panels remain closed during operation. -
Page 13: Nitrogen
1.4.8 E XHAUST SYSTEM Standard for testing purposes at Vitronics Soltec a bridge is made for “exhaust on”. This bridge must be removed at Vitronics Soltec. Check if bridge is removed. A Normally Open contact should be connected on this terminal connectors. When the exhaust is switched on, the signal must be active after a short time (delay). -
Page 14: Precautions
AFETY FEATURES RECAUTIONS • Always keep the working area clean. • No smoking or open fire in the working area. • NO-SMOKING signs should be posted in the work area (visible for everyone). • Always wear protective clothing & glasses when working on the machine. •... -
Page 15: Safety
Machine not at setpoint, machine stop ABLE ELLOW LIGHT SIGNAL FUNCTION Steady Overload (outfeed full). Machine will block Flashing slow Alarm. Flashing fast Critical alarm. Machine will block. ABLE ED LIGHT SIGNAL FUNCTION Continuous E-stop active Installation Guide myReflow HAPTER... - Page 16 AFETY FEATURES 1.6.2 P RECAUTIONS 1.6.2.1 MERGENCY The standard machine is fitted with safety emergency switches. The emergency stop has a red button (mushroom type) and a yellow shield. The E-stop is a low voltage (24VDC) powered loop, that provides automatic shut-down of any powered mechanism.
-
Page 17: Installation
VERSION 2009 November Installation ENERAL Installing only by trained Vitronics Soltec / Agent personnel. At the end of this chapter an installation sheet is located. RANSPORT 2.2.1 S YMBOLS USED Position pallet/box for transport Breakable Keep dry Lift here (labels are placed on... -
Page 18: Unpacking
NSTALLATION NPACKING The Vitronics Soltec myReflow is packed on a wooden pallet. When necessary, the machine is packed in crates (e.g. when shipped). If packed in crates the following procedure (paragraph 2.3.1 and 2.3.2) should be followed. When the machine is packed on a wooden pallet follow instructions in paragraph 2.3.2. -
Page 19: Lifting With Forklift
When the transporting straps are removed, the myReflow can be placed on the place the cus- tomer has provided. * = DISTANCE BETWEEN FORKS minimum 1200mm IGURE ORKLIFT UNDER MACHINE To lift and transport the myReflow use the positions as shown in the installation sheet at the end of this document. Installation manual myReflow HAPTER... -
Page 20: Connections
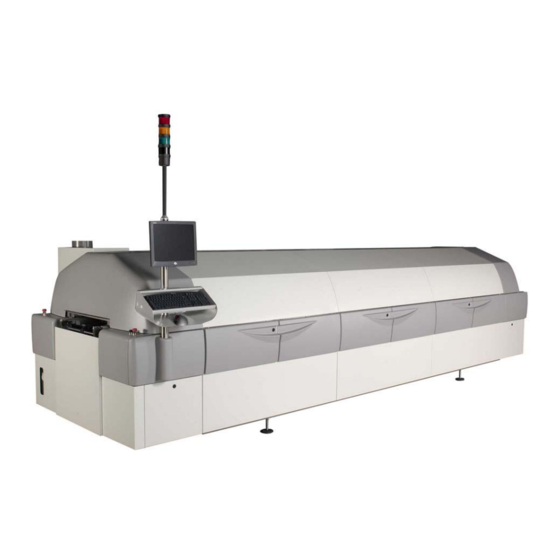
XHAUST SYSTEM One exhaust gauge of 165 mm (6.5”) is provided. This should be connected with the customer’s exhaust system (not supplied by Vitronics Soltec). • Inflammable and/or explosive gas might develop in the machine because of the evaporation of the solvent in the flux. - Page 21 ❷ ❼ ❻ ❺ IGURE NSTALLING Unpack all boxes. Unpack PC arm. Slide signal column in position. Install keyboard holder. Install keyboard and mouse. Install the monitor on PC arm. Connect all cables to the PC. Installation manual myReflow HAPTER...
- Page 22 Before the machine can be leveled the power on the machine must be on. Switching on is only allowed by qualified personnel. Switch on the mainpower and PC. Select the myReflow icon on your desktop to start the PC program. Select from the Status Menu Reset. Enter your username and password.
- Page 23 A spirit level should be placed on the frame for checking the X direction. For the Y- direction the spirit level should be placed on both conveyorbars. When machine is leveled, tighten the nuts (A). See Figure 2.8) After this procedure the machine is mechanically correct installed. Installation manual myReflow HAPTER...
- Page 24 NSTALLATION NSTALLATION HEETS AND EQUIREMENTS see next pages HAPTER...
- Page 25 VERSION November 2009 Installation sheets myReflow 7038 10 Positions MR820A Front View...
- Page 26 VERSION November 2009 Installation sheets myReflow 7038 10 Positions MR820A Top View...
- Page 27 VERSION November 2009 Installation sheets myReflow 7038 12 Positions MR820N MR930A MR1020A Front View...
- Page 28 VERSION November 2009 Installation sheets myReflow 7038 12 Positions MR820N MR930A MR1020A Top View...
- Page 29 VERSION November 2009 Installation sheets myReflow 7038 14 Positions MR930N MR1040A MR1130A MR1020N Front View...
- Page 30 VERSION November 2009 Installation sheets myReflow 7038 14 Positions MR930N MR1040A MR1130A MR1020N Top View...
- Page 31 VERSION November 2009 Installation sheets myReflow 7038 16 Positions MR1040N MR1130N Front View...
- Page 32 VERSION November 2009 Installation sheets myReflow 7038 16 Positions MR1040N MR1130N Top View...
- Page 33 VERSION November 2009 Installation sheets myReflow 7038 Side View...
- Page 34 VERSION November 2009 Installation sheets myReflow 7038 MR 820 MR 930 MR 1020 MR 1040 MR1130 ESCRIPTION NITS IR OR ITROGEN Input Voltage 3 x 400 (Supply tolerance +10%, -10%) Frequency 50/60 Start-Up power Slow Start-Up power Power required at setpoint (depending on...
- Page 35 Safety . . 1-1, 1-7 Green light . 1-7 Symbols . . 1-2, 2-1 Hazards . 1-3 Transport . 2-1 High voltages . . 1-4 Hot surfaces . . 1-3 Unpacking . 2-2 Installation Sheet . 2-8 Installation Guide myReflow...
Need help?
Do you have a question about the myReflow and is the answer not in the manual?
Questions and answers