Advertisement
Advertisement

Related Manuals for Make Noise Rene


Summary of Contents for Make Noise Rene
-
Page 2: Table Of Contents
Table of Contents Limited Warranty Installation Overview Getting Started with René Panel Controls and Inputs/Outputs Clocking René CV and Page Programming Grids Program Pages Latch Page State Pages Tips and Tricks The Select Bus Calibration... -
Page 3: Fcc
This equipment generates, uses, and can radiate radio frequency energy and, if not installed and used in accordance with the instruction manual, may cause harmful interference to radio communications. makenoisemusic.com Make Noise Co., 414 Haywood Road, Asheville, NC 28806... -
Page 4: Limited Warranty
Make Noise to be the fault of the user are not covered by this warranty, and normal service rates will apply. During the warranty period, any defective products will be repaired or replaced, at the option of Make Noise, on a return-to-Make Noise basis with the customer paying the transit cost to Make Noise. -
Page 5: Installation
Eurorack style bus board, minding the polarity so that the RED stripe on the cable is oriented to the NEGATIVE 12 Volt line on both the module and the bus board. On the Make Noise 6U or 3U Busboard, the NEGATIVE 12 Volt line is indicated by the white stripe. - Page 6 , which we have extensively tested in-house and out in the world with power supplies from Make Noise, Doepfer, 4ms, Intellijel, Tip Top Audio, Pittsburgh Modular, Arturia, Mecatronics and others. ? What if with latest firmware version...
- Page 8 https://youtu.be/xVT2Unnn7Gg ) The diagram below shows all button colors, though in reality one will be ON at a time. GATE...
- Page 9 LIDE the shape of any associated envelope, as well as the clock rate and distance between notes, will have a big effect on the sound of the Gliding, . NAKE...
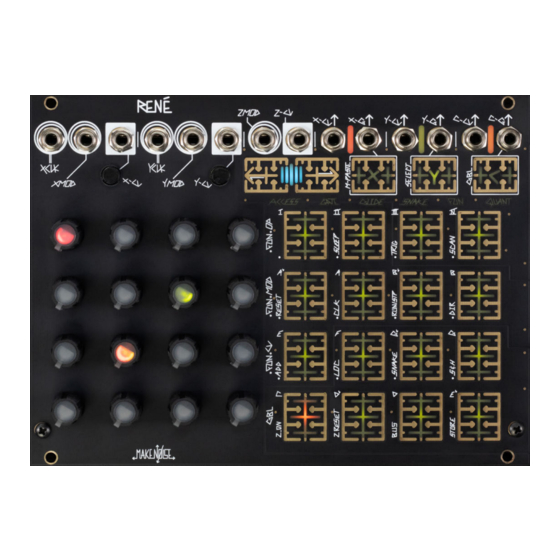
- Page 10 Panel Controls Panel Controls Channel Channel a Channel Channel Channel input (width greater than 2.5ms and amplitude greater than 2.5V) Range 0-5V.
- Page 11 Panel Controls Panel Controls 0-4 octaves. 0V or 8V. 0-4 octaves. 0V or 8V. octaves. 0V or 8V.
- Page 12 Panel Controls Panel Controls TATE...
- Page 13 ATE FUN Snake Pattern Distribution on the SNAKE Program Page...
- Page 14 change...
- Page 15 NAKE Note: that -MOD/Z-CV /exit TATE...
- Page 16 go to that Location will go to that Location. The LATCH page allows the user to override ACCESS page programming. On the LATCH Page the touch-selected locations always play and generate CV and GATE outputs. When nothing is selected on the LATCH page, it reverts to the current ACCESS and GATE settings.
- Page 17 ction C/Orange channel's FUN page consists of only the top row. For the other settings, the C/Orange channel inherits its X-axis properties from the X.FUN page, and its Y-axis properties from the Y.FUN page. ené...
- Page 18 tune all Channels to the same set of notes, that is closet to Location 1 (bottom left) . (Press again to turn it off.) Note: FUN.MOD.RUNSTP and FUN.MOD.DIR are mutually exclusive (only one of the two may be enabled at a time per channel). Note: FUN.MOD.RUNSTP and FUN.MOD.DIR are mutually exclusive (only one of the two may be enabled at a time per channel).
- Page 19 (may sound like fast sample & hold when CVing with continuous sources) C/Orange is not affected by FUN.CV.ADD. Note: FUN.CV.ADD and FUN.CV.S&H are mutually exclusive (only one of the two may be enabled at a time per channel). . A signal that results in a s sixteen locations on the Channel will thus result in a sweep of only four locations on the respective axis of the...
- Page 20 , which can be programmed on the channel's QUANT page quir The saved knob values will be redistributed onto new output ranges automatically when you change this setting. In other words this does not shift the sequence into a different octave, but expands it or contracts it across differing numbers of octaves.
-
Page 21: Latch Page
Latch Page From PGM Pages, PRESS currently select Channel Navigation Button again to enter or exit the channel's Latch Page. All PGM Page indicators are ON to indicate this page. Button for Channel selected to be programmed is also ON. If any locations are Latched, the Channel's Button will flash to indicate Latch is taking place (this flashing will continue in the Channel's Program Pages as well, as a reminder that you have locations Latched and thus the Access and Gate pages are being ignored). - Page 22 TATES Breathing of the currently selected Channel Button M-Paste Select State Global When on a Bank or Global Page, the current Page's button will Breathe at a faster rate. At any time, press a different Channel Button to go to that button's Page, or press the Left+Right navigation buttons at once to return to the Program Pages.
- Page 23 é CCESS LIDE NAKE UN UANT the Z-Axis, display (the button will now breathe faster).
- Page 24 display (the button will Breathe faster when in Bank view) on State 16 (or any State) State 16 is currently selected; States 1-4 are M-Paste Enabled display...
- Page 25 display Note: paste applied above the latest version of the firmware...
- Page 26 LEAD active means that René transmits messages on the Select Bus so that other compliant modules (such as the Make Noise TEMPI with latest version installed), if they are set to FOLLOW, can do any of the following actions simultaneously with the René:...
- Page 27 2 2 7 (cont.) GBL.STORE: Breathes Red. Pressing it initiates STORE, where all States, as well as current GLOBAL settings, are Stored to memory. M- Paste and Latch settings are not Stored. The State that was active when the Store procedure took place will also be loaded upon powerup.
-
Page 28: Tips And Tricks
Tips and Tricks - To set up an "Init" patch or "Clean Slate", go to the Global Page and press Button 13 (upper Left) to set the current State to default. If you like, use the M-Paste Page to paste this default State to any number of other States. If TEMPI is Following, all the same States on TEMPI will be Defaulted as well. -
Page 29: The Select Bus
See the section in this manual on GBL.BUS for information on how to set it with René specifically. Modules currently known to communicate with René on the Select Bus Make Noise TEMPI (René Leads) Expert Sleepers Disting mk4 (René Leads) Expert Sleepers General CV (René Leads) Malekko Vari-Gate (René... - Page 30 The Select Bus (cont.) Technical Specifications of the Select Bus // ************ SELECT BUS MESSAGES: ********************************* 0xC0 followed by a single State # 0 thru 63. This is "State Select" message. 0xF4 followed by a single State # 0 thru 63. This is "State Save" message. 0xF4 - 0x40 This is "Save All"...
-
Page 31: Calibration
Calibration René’s three CV Outputs are factory-calibrated to output 1 volt per octave as per the Eurorack standard for driving Voltage Controlled Oscillators. If you find that your VCO is mistuned, it is possible to calibrate each output to better drive a misbehaving VCO. Keep in mind that a René... - Page 32 Calibration (cont.) Ready to calibrate Y-CV Ready to calibrate C-CV...
- Page 33 Calibration (cont.) Patch your VCO’s square or sawtooth output (if it does not have these waveforms, use the simplest waveform output) to René's X-CLK input, regardless of which channel you are calibrating. Patch the René channel’s CV output to the 1v/oct input of your VCO. Adjust the VCO until the second row of buttons from the bottom is lit as in the diagram above.