
Subscribe to Our Youtube Channel
Related Manuals for MSA FIREHAWK M7 ULTRA ELITE 10084690


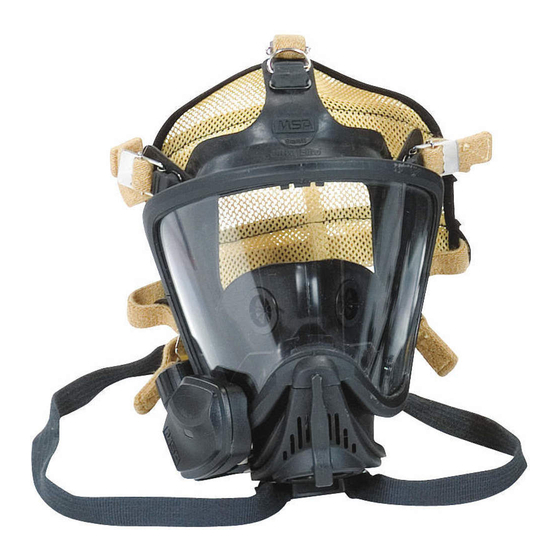
Summary of Contents for MSA FIREHAWK M7 ULTRA ELITE 10084690
- Page 1 FireHawk ® Ultra Elite ® Facepiece MAINTENANCE AND REPAIR TAL 903 (L) Rev. 1 © MSA 2009 Prnt. Spec. 10000005389(I) Mat. 10093089 Doc. 10093089...
- Page 2 FIREHAWK M7 ULTRA ELITE FACEPIECE Parts List Medium Large TAL 903 (L) Rev. 1 - 10093089 - DRAFT 6-25-09...
- Page 3 FIREHAWK M7 ULTRA ELITE FACEPIECE Exploded View TAL 903 (L) Rev. 1 - 10093089 - DRAFT 6-25-09...
-
Page 4: Table Of Contents
FIREHAWK M7 ULTRA ELITE FACEPIECE Table of Contents Disassembly SpeeD-ON ® Head Harness..........4 Speaking Diaphragm ............7 M7 HUD Mounting Bracket ..........4 Component Housing ............7 Lens Ring and Lens............5 Exhalation Valve, Spring, and Spring Retainer ....8 Nosecup .................5 Component Housing Cover..........9 Component Housing Cover..........5 Nosecup .................9 Spring, Spring Retainer and Exhalation Valve ....5... -
Page 5: Nosecup
FIREHAWK M7 ULTRA ELITE FACEPIECE Removing the Nosecup 4. Slide the bracket off of the facepiece. 1. Remove the nosecup. Removing the Lens and Lens Ring Note: Remove the adapter assembly and component Removing the Component Housing Cover housing cover. 1. -
Page 6: Adapter Assembly
FIREHAWK M7 ULTRA ELITE FACEPIECE Removing the Spring, Spring Retainer, and Exhalation Disassembling the Component Housing Valve 1. Remove and discard the spring retainer. Removing the Adapter Assembly 1. Remove the inlet adapter. Note: Use a large a. Slide one end of the adjustable wrench to retainer out of the unscrew the inlet adapter. - Page 7 FIREHAWK M7 ULTRA ELITE FACEPIECE Installing the Inlet Gasket and Disc Valve Note: You can use a piece 1” PVC pipe wrapped with a few winds of electrical tape to prevent the inlet 1. Gently stretch the valve adapter from deforming disc over the stem.
- Page 8 FIREHAWK M7 ULTRA ELITE FACEPIECE Note: Ensure that the housing is captured completely by the groove and that the centerline marks are aligned. 7. Use a Phillips screwdriver to tighten the component housing 2. Insert the narrow end ring screw. of the housing ring between the lower lens ring and facepiece...
- Page 9 FIREHAWK M7 ULTRA ELITE FACEPIECE 2. Insert the tab on the 3. Insert a new spring cover into the slot in retainer. the lens ring. 4. Ensure spring retainer is secure. 3. Press the cover until it locks. a. Make sure the retainer is fully engaged in the slots. b.
- Page 10 FIREHAWK M7 ULTRA ELITE FACEPIECE 4. Insert the top of the 2. Stretch the nose cup over the retaining ring. lens into the groove. Note: Ensure that the nosecup fully engages the retaining ring. Installing the Lens and Lens Ring 5.
- Page 11 FIREHAWK M7 ULTRA ELITE FACEPIECE Installing the M7 HUD Mounting Bracket M7 HUD Mounting Bracket P/N 10083133 Note: Remove the component housing cover before installing the M7 HUD Mounting Bracket (See Removing the Component Housing for instructions). If necessary, 7. Lubricate the lens ring with Snoop remove the lens ring screws (See Removing the Lens (P/N 600920).
-
Page 12: Component Housing
FIREHAWK M7 ULTRA ELITE FACEPIECE 4. Reinstall the component housing cover. (See Installing the Component Housing Cover for instructions.) 5. Check alignment and tighten screws. 1. Use a Phillips screwdriver to remove Installing the SpeeD-ON Head Harness SpeeD-ON Head Harness P/N 10031102 the lens ring screw. -
Page 13: Clearcommand Communication System
FIREHAWK M7 ULTRA ELITE FACEPIECE 7. Unscrew and remove 3. Install the retaining ring the speaking (P/N 10023505) and diaphragm retaining firmly hand tighten. ring. 4. Reinstall the nosecup (See Installing the Nosecup for instructions). 8. Remove the 5. Route the microphone ClearCommand cable over the microphone. - Page 14 ANSI standards suggest user training in cleaning a. Insert a screw. Use a procedures. Phillips screwdriver to tighten the lens Use MSA Confidence Plus ® Cleaning Solution (P/N ring screw. 10009971). It cleans and disinfects in one operation, retains germicidal effectiveness in hard water to inhibit bacteria growth, and will not deteriorate rubber, plastic, glass, or metal parts.
Need help?
Do you have a question about the FIREHAWK M7 ULTRA ELITE 10084690 and is the answer not in the manual?
Questions and answers