Saeco SE-50 Operation And Maintenance
Hide thumbs
Also See for SE-50:
- Instruction manual (20 pages) ,
- Operation and maintenance manual (68 pages)

Related Manuals for Saeco SE-50


Summary of Contents for Saeco SE-50
- Page 1 Espresso Coffee Machine WARNING: Read these instructions carefully before using the machine.
-
Page 2: Main Parts
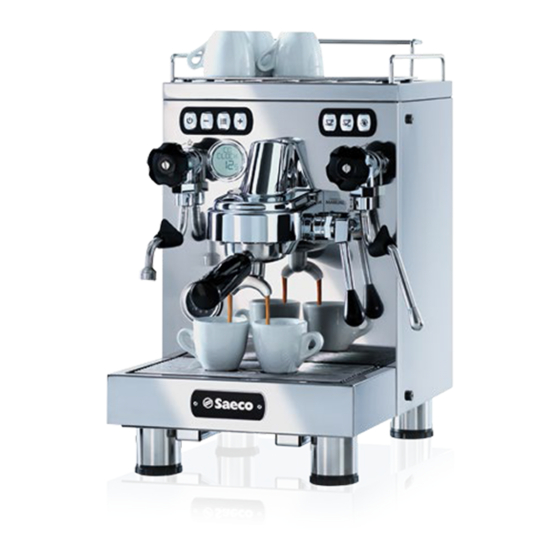
English MAIN PARTS Water tank filter holder Cup warming surface Control panel LCD Display Steam dispensing knob Hot water dispensing knob Steam wand Hot water wand Manual dispensing lever Brew group Drip tray Pressure regulator Adjustable feet... - Page 3 English SAFETY INSTRUCTIONS Always place the appliance The steam wand and the on a flat surface. hot water dispensing wand become extremely when frothing milk Do not use the appliance if when dispensing hot water. there is no water in the In case of contact it can tank.
- Page 4 English Do not use the machine The machine may be used with an extension cord, by children older than 8 and unless the extension cord upwards or by persons with has been checked and reduced physical, mental or approved by a technician. sensory abilities or lacking sufficient experience and/or Always use the appliance...
- Page 5 English Make sure that the power ensure higher cord do not come into protection, contact with the hot parts recommended to use a of the machine, such as the residual current device cup-warming surface, the (RCD) with a current not steam wand and the water greater than 30 mA in the dispensing spout.
-
Page 6: Table Of Contents
English CONTENTS 12.2 INACTIVITY AND STORAGE MAIN PARTS 1 INTRODUCTION TO THE MANUAL 13 INSTRUCTIONS FOR END OF 1.1 PREAMBLE OPERATIONAL LIFE DISPOSAL 1.2 ICONS USED 2 INFORMATION ABOUT THE MACHINE 2.1 INFORMATION FOR THE MAINTENANCE TECHNICIAN 2.2 DESCRIPTION AND INTENDED USE 2.3 APPLIANCE IDENTIFICATION 2.4 TECHNICAL SPECIFICATIONS 3 SAFETY... -
Page 7: Introduction To The Manual
This product has been manufactured by SaGa Coffee S.p.A. Preamble and sold under its own responsibility. SaGa Coffee S.p.A. is the guarantor of the product. Saeco is a registered trademark of Koninklijke Philips N.V. and its use is licensed This publication by Koninklijke Philips N.V. -
Page 8: Icons Used
English Icons Used Various kinds of warnings are contained in this manual to highlight the different hazard or competence levels. Each icon is followed by a message suggesting operating and behaviour procedures and providing useful information for the correct operation of the machine. Warning It is used to highlight danger situations for the persons in charge of using, refilling and servicing the machine. -
Page 9: Information About The Machine
English INFORMATION ABOUT THE MACHINE Information for the Description and Intended Use Maintenance Technician This machine brews: The appliance must be • coffee and espresso using ground coffee; installed well-lit, • hot water to prepare beverages; sheltered and dry place The elegant machine housing has been designed for use in small offices, businesses and institutions. -
Page 10: Appliance Identification
English Appliance Identification The appliance is identified by the model name and serial number shown on the special plate. The plate contains the following data: • name of the Manufacturer; • marks of conformity; • model; • serial number; • year and month of manufacture; •... -
Page 11: Technical Specifications
English Technical Specifications Size (w x h x d) 280 x 477 x 425 mm Weight 20 kg Machine housing material stainless steel Power Rating See the data plate Supply Voltage See the data plate Power cord length approx. 1,200 mm Capacity Water tank 2. -
Page 12: Safety
• use original spare parts; regulations, SaGa Coffee has prepared a technical file • carefully read the instructions contained in this manual and relating to the SE-50 appliance at its premises, in the attached documents; acknowledging the following standards in the design stage: •... -
Page 13: Operator Requirements
English case failure Maintenance technician malfunctioning, please refer The maintenance technician is the only person authorised to service the machine, start the programming procedures and only qualified perform the adjustment, set up and maintenance operations. personnel of the technical Access to the internal area service. -
Page 14: Handling And Storage
English HANDLING AND STORAGE Storage operations described in this chapter The machine is packed in cardboard and expanded polystyrene packaging. must performed If the appliance is not immediately installed, it shall be kept exclusively by the service in a sheltered place according to the following instructions: provider or a specialised •... -
Page 15: Installation
English INSTALLATION operations should neither described in this chapter installed in places where must performed water jets are used for exclusively by the service cleaning operations provider or a specialised where there is a risk of fire technician, shall or explosion. organise all the operating Make sure that the installation place is compatible with the following specifications, before unpacking the appliance:... -
Page 16: Unpacking And Positioning
English The following illustration shows the required access distances: Unpacking and Positioning • to the keypad on the front of the appliance; • to the service units in the event of malfunction. On receipt of the appliance, make sure that it has not suffered any damage during transport or that the packaging has not been unduly opened with consequent stealing of the components contained in it. -
Page 17: Connection To The Electric Network
English filter holder Connection to the Electric Network This operation must only be performed by specialised technical personnel or by the service provider. 600-ml jug The Maintenance Technician, who is in charge of the appliance's installation, shall make sure that: •... -
Page 18: Description Of Controls
English DESCRIPTION OF CONTROLS “Cleaning” button Display Enter the machine cleaning menu by pressing this button. The display shows the messages during normal operation and during the programming and maintenance phase. Keypad “On/Off” button “-” button (programming only) “Programming” button “+”... -
Page 19: Supply And Start Up
English SUPPLY AND START UP Rinse and fill it with fresh water; do not exceed the level Filling the Water Tank (MAX) indicated on the tank. Before using the machine for the first time, wash the water tank carefully. Fill the water tank with... -
Page 20: Measuring And Adjusting Water Hardness
English Press the “Programming” button to access the machine programming mode. Press the “Programming” button until the message “Cleaning alarm” is displayed. Measuring and Adjusting Water Hardness Press the “+” button to increase the value or the “-” button to decrease the value. Press the “Programming” Measuring water hardness is very important in order to button to save. -
Page 21: First Use - Use After A Long Period Of Inactivity
English First Use - Use after a Long 7.4.1 After a Period of Inactivity Period of Inactivity Upon first use of the machine, perform the following steps: Empty the water tank, wash and rinse it and fill it with fresh water (see section "Filling the Water Tank"). •... - Page 22 English After the machine has not been used for a certain time, it is recommended to read section “First Use - Use after a Long Period of Inactivity” again, before using the module again. The beverage selection modes are indicated in chapter "Operation and Use".
-
Page 23: Programming Menu
English PROGRAMMING MENU Description of Programming This chapter contains Buttons instructions on how to set Use the buttons described below to scroll the appliance menus. change programming parameters of the appliance. Therefore it is necessary to carefully read it and to understand exact sequence... -
Page 24: Service Provider Programming
English Service Provider 8.2.2 Structure of the Programming Programming Menu The structure of the programming menu is indicated in This menu allows you to manage certain machine section "Structure of the Programming Menu". operation parameters. The main items of the programming menu are: The section "Description of Messages in the Programming Menu"... - Page 25 English 8.2.3 Description of Messages in the Programming Menu DISPLAY MENU ITEM Description Coffee temperature This function allows you to adjust the coffee brewing temperature. (range: 86-98) Press the “-” or “+” button to change the settings and press the "Programming"...
-
Page 26: Operation And Use
English OPERATION AND USE Turning on the Machine The use by children older Connection to the power than 8 years or by persons supply should be carried with reduced physical, exclusively mental or sensory abilities service provider! or with lack of experience skills allowed, Before turning on the machine, ensure that the plug is... -
Page 27: Warm-Up
English Warm-up Brewing Coffee Upon start-up, the machine activates the warm-up phase. Wait until it is completed. Make sure there is enough water in the tank. The machine must be set at the right pressure and temperature. Insert the single-dose filter into the filter holder supplied to brew a coffee (or the double-dose filter to brew two backlight cups of coffee). -
Page 28: Hot Water Dispensing
English Danger of burning! Do not remove the filter holder before brewing is Insert and close the filter holder in its position in the completed. machine. When the desired amount of coffee has been brewed, press again the previously pressed button or reposition the lever to the initial position to stop brewing. -
Page 29: Steam Dispensing - Frothing Milk For Cappuccino
English When the desired amount of hot water has been reached, Fill half a jug with milk (the jug must be high enough). stop dispensing by rotating the knob clockwise. Insert the steam wand into the milk and gradually rotate the steam dispensing knob counter-clockwise. -
Page 30: Adjusting Brewed Products
English Once the desired froth level has been reached and the Afterwards, clean the wand with a sponge or with a cloth. temperature is sufficiently hot, stop steam dispensing by turning the steam dispensing knob clockwise. Adjusting Brewed Products The steam wand must The machine allows you to adjust the product length never be removed from according to your needs and to the type of cup used. -
Page 31: Interface Operation
English Interface Operation “On/Off” button “-” button (programming only) “Programming” button “+” button (programming only) “Coffee” button “Double coffee” button “Cleaning” button Mode / Button On/Off PROGRAMMING Warm-up Flashing Machine Ready Brewing Coffee Double coffee brewing Coffee brewing with manual lever Steam dispensing Hot Water Dispensing Adjusting the Coffee Length... -
Page 32: Cleaning And Maintenance
English CLEANING AND MAINTENANCE Before performing Never use direct jets of maintenance and/or water onto the appliance cleaning operation, unplug and/or its components. the power cord. The coffee brewing process also entails the extraction of oil from the ground coffee. Deposits of these oils build up over time and worsen the taste of coffee and machine operation. -
Page 33: Cleaning And Scheduled Maintenance
English 10.2 Cleaning and Scheduled 10.2.1 Maintenance Schedule Maintenance Operation to be carried out All parts requiring cleaning Emptying and cleaning the drip tray are easily accessible, so no Water tank cleaning Cleaning the brew unit, the filter holder tools are needed. and the filters Brew unit gasket DESCALING... - Page 34 English 10.2.2 Cleaning the Hot Water Never wash the wand with Wand abrasive pads as it could The hot water wand must be cleaned externally with a damp cloth after each use and, in any case, once a week. get damaged. Before performing this...
- Page 35 English Empty the drip tray and wash it. Reinsert the drip tray. 10.2.7 Cleaning the Brew Unit, the Filter Holder and the Filters Rinse the filters and the filter holder with hot water after each use and then carefully dry them. To remove any coffee residue from the brew unit, let water circulate and clean the unit and around the edge using a damp cloth.
- Page 36 This operation needs to be carried out before the appliance stops working properly, as in this case repair is not covered by warranty. After completing Use the Saeco descaling product only. Its formula has been descaling procedures refill specifically designed ensure...
- Page 37 English Remove the water tank, pour 500 ml of Saeco descaling 10.2.9.1 Steam circuit descaling solution in it and fill with fresh water up to the level indicated by MAX. Press the “Clean” button to enter the “CLEAN” menu. Navigate through the “CLEAN” menu using the "Clean"...
- Page 38 English Press the “Programming” button to confirm. 10.2.9.2 Coffee circuit descaling Remove the filter holder - if placed in the machine - and place a container with suitable dimensions underneath the engaging point of the filter holder. The machine automatically performs the complete descaling process of the coffee circuit.
- Page 39 English Navigate through the “CLEAN” menu using the “Clean” button and select “HW CLEAN”. Press the “Programming” button to confirm. Rotate the hot water knob counter-clockwise. The machine automatically performs the complete descaling process of the hot water circuit. If there is not enough water to complete the procedure, refill the tank up to the level indicated by MAX.
-
Page 40: Troubleshooting
English TROUBLESHOOTING 11.1 Warning signals This chapter describes all the warning messages that the machine may display to the user and the actions that can and/or must be performed by the user. Warning Signals Meaning Preheating mode: the display shows the wording “PREHEATING” (the On/Off button flashes). Machine ready mode: the display shows the wording “READY”. -
Page 41: Problems - Causes - Solutions
English 11.2 Problems - Causes - Solutions The following table indicates the possible error or alarm cause which may lead to a partial or total shutdown of the appliance. Problems Causes Solutions - There is no water in the tank. - Add water. -
Page 42: Inactivity And Storage
English STORAGE - DISPOSAL 12.1 Location Change Should the machine be placed in a different location, it is necessary to: • disconnect the appliance from the supply network; • carry out the general cleaning of the appliance as indicated in chapter "Cleaning and Maintenance"; •... -
Page 43: Instructions For End Of
English INSTRUCTIONS FOR END OF OPERATIONAL LIFE DISPOSAL INFORMATION FOR THE USER in compliance with art. 13 of the Italian Legislative Decree dated 25 July 2005, no. 151 "Implementation of the directives 2002/95/EC, 2002/96/EC and 2003/108/EC on the restriction of the use of certain hazardous substances in electrical and electronic equipment, as well as waste disposal".
Need help?
Do you have a question about the SE-50 and is the answer not in the manual?
Questions and answers