Table of Contents
Advertisement
Quick Links
CULLINAN V Series
Thank you for purchasing a Rosewill Computer Case.
Please read the instruction manual before use and retain for future reference.
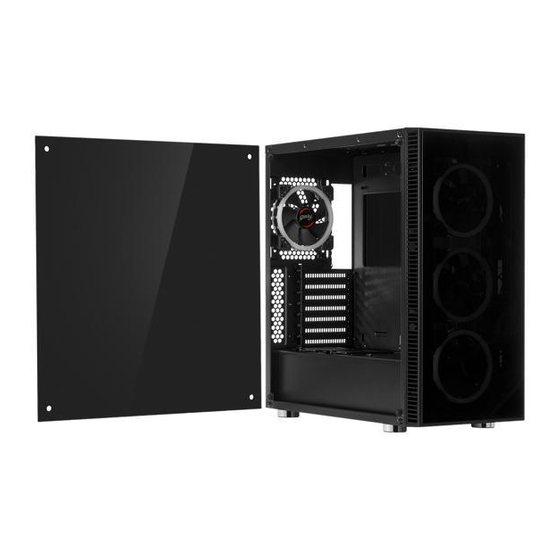
Product Overview
Disassembly Chart (components vary by country)
Right Side Panel
Dust Filter
Cooling Fan
Dust Filter
Dust Filter
Cooling Fan
Left Side Panel
Front Panel
(CULLINAN V-Silent)
Dimensions (W x H x D): 223 x 490 x 474 (mm)
Front View
Right Side View
223
474
1
Advertisement
Table of Contents

Related Manuals for Rosewill CULLINAN V Series


Summary of Contents for Rosewill CULLINAN V Series
- Page 1 CULLINAN V Series Thank you for purchasing a Rosewill Computer Case. Please read the instruction manual before use and retain for future reference. Product Overview Disassembly Chart (components vary by country) Right Side Panel Dust Filter Cooling Fan Dust Filter...
-
Page 2: Accessory Box
Top I/O Cable Pinout USB 3.0 CONNECTOR HD AUDIO CONNECTOR Top I/O Speaker Reset USB 3.0 Mic. Power USB 3.0 Fan Control Accessory Box Image Part Name Function / Component Screw-A (6-32 x 6 mm) Motherboard Screw-B (M3 x 5 mm) 2.5”... -
Page 3: Open The Unit
Installation Guide 1. Open the Unit 1-1. Loosen the thumbscrews and take off Panel R and L (Figure 1). 2. Install Power Supply 2-1. Seat the power supply unit (PSU) at the bottom-rear of the case and secure with Screw-A (Figure 2). -
Page 4: Install Add-On Card
4. Install Add-on Card 4-1. Loosen the screws to open the cover panel (Figure 4a). 4-2. Unscrew to release the slot cover (Figure 4b). 4-3. Install the add-on card and secure with screws (Figure 4c). 4-4. Put the cover panel back on and secure with screw (Figure 4d). - Page 5 5. Install 3.5” HDD 5-1. Take out the 3.5” HDD tray from the cage. 5-2. Install the 3.5” drive onto the tool-less tray and secure with Screw-B if so desired (Figure 5a). A 2.5” SSD can also be installed on the tray with Screw-C (Figure 5b). 5-3.
- Page 6 6-3. Secure the trays back onto chassis with screw (Figure 6b/6c). 7. Care To prevent damage, keep all panels closed and secured. 7-1. Put the side panels back in place and secure with thumbscrews (Figure 7a). 7-2. Clean the dust filters on top/bottom regularly to ensure adequate airflow (Figure 7b).
- Page 7 Specifications Table for options. 8-2. Liquid Cooling Radiator Installation The CULLINAN V Series supports optional max. 280 mm radiator installation on top or a 360 mm radiator in the front to more effectively cool high-performance systems. Front Water Cooling Radiator Installation Instructions: a.
-
Page 8: Specifications Table
Supports up to 280 mm long Liquid Cooling Radiator on Top Supports up to max. 250 mm long PSU Technical Support Information techsupport@rosewill.com 1-800-575-9885 CULLINAN V Series_A Please register your product at www.rosewill.com for complete warranty information and support for your product.
Need help?
Do you have a question about the CULLINAN V Series and is the answer not in the manual?
Questions and answers