
Subscribe to Our Youtube Channel
Related Manuals for Paradyne 7610 SNMP DSU

Summary of Contents for Paradyne 7610 SNMP DSU
- Page 1 AREA CODE CHANGE Please note that the area code for Paradyne Corporation in Largo, Florida has changed from 813 to 727. For any Paradyne telephone number that appears in this manual with an 813 area code, dial 727 instead.
-
Page 2: Package Checklist
Verify that your package contains the following: A Model 7610 Single Port SNMP DSU Startup Instructions and the Model 7610 SNMP DSU User’s Guide , Document No. 7610-A2-GB20. The user’s guide is on diskette, and requires a PC with Microsoft Windows to view or print it. - Page 3 Cables and Equipment You May Need to Order If connecting . . . Order a . . . A VT100-compatible terminal Standard straight-through EIA-232 cable with DB25 to the Terminal port plug connectors on both ends. An ASCII terminal or printer or Standard straight-through EIA-232 cable with DB25 UNIX Workstation to the plug connectors on both ends.
-
Page 4: Site Preparation
Site Preparation Make sure you have: A dedicated, grounded ac outlet that is protected by a circuit breaker within 6 feet of the access unit. A clean, well-lit, and ventilated site that is free from environmental extremes. One to two feet of clearance for cable connections. An operable network connection. -
Page 5: Installing The Power Cord
Installing the Power Cord CAUTION: Use no power supply except the one provided with the DSU. Using the wrong power supply can destroy the DSU. Procedure 1. Insert the power plug into the POWER jack. 2. Plug the power transformer into an ac outlet. Power Jack NETWORK... -
Page 6: Connecting To The Management Port
NOTE: Factory defaults for communications parameters on the Terminal port are 9.6 kbps, 8 bits per character, one stop bit, and no parity. Connecting to the Management Port Procedure 1. Insert the 25-pin end of the EIA-232 cable into the MANAGEMENT port. 2. -
Page 7: Connecting To A Dte
Connecting to a DTE Procedure 1. Insert one end of the 34-pin V.35 cable into the DTE port. 2. Insert the other end of the V.35 cable into the DTE connector. NETWORK TERMINAL MANAGEMENT POWER DTE Port 496-15111 Connecting to the Network Procedure 1. -
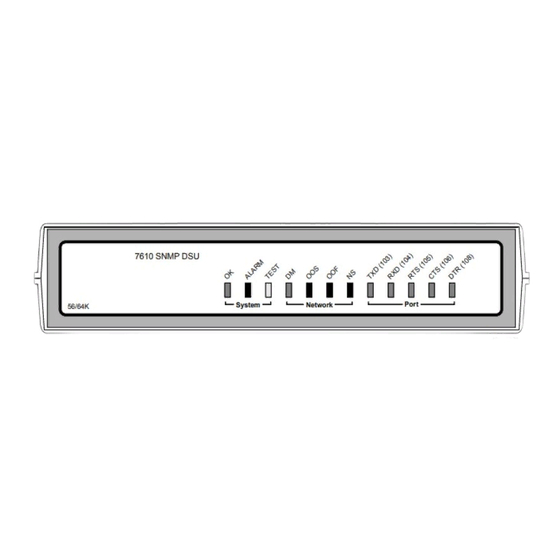
Page 8: Hardware Verification
— The ALARM LED will remain lit if the network connection has not been made. To connect to the network, refer to Connecting to the Network . If the network is connected, refer to Troubleshooting in Chapter 8 in the User’s Guide. 7610 SNMP DSU System Network Port 56/64K 496-15073 Did the Main Menu appear on the asynchronous terminal screen? If not, see Messages and Troubleshooting , Chapter 8, in the User’s Guide. -
Page 9: Technical Specifications
Technical Specifications Table 1. Model 7610 DSU Technical Specifications (1 of 2) Item Specifications Housing Height (including feet) 2.13 inches (54.1 mm) Height (without feet) 1.99 inches (50.6 mm) Width 9.10 inches (231.2 mm) Depth (case) 6.20 inches (157.5 mm) Depth (case and connectors) 6.51 inches (165.3 mm) Weight... - Page 10 Table 1. Model 7610 DSU Technical Specifications (2 of 2) Item Specifications Network Compatibility ANSI T1.410–1992 and 56 and 64 kbps meeting desired loop loss AT&T Technical Reference 62310–1993 IP Connectivity Up to 20 routes NMS Compatibility SNMP Network Manager MIB II Object Groups ICMP group Supported...
-
Page 11: Start-Up Checklist
Table 3. Model 7610 DSU LADS (Local Area Data Set) Connection Distances Wire Diameter (AWG) 19 Gauge 22 Gauge 24 Gauge 26 Gauge (.0359 or (.0253 or (.0201 or (.0159 or Data Rate .9122 mm) .643 mm) .511 mm) .404 mm) (kbps) 10.84 mi 6.4 mi... -
Page 12: Important Safety Instructions
Important Safety Instructions 1. Read and follow all warning notices and instructions marked on the product or included in the manual. 2. Slots and openings in the cabinet are provided for ventilation. To ensure reliable operation of the product and to protect it from overheating, these slots and openings must not be blocked or covered. -
Page 13: Government Requirements
The authority to operate this equipment is conditioned by the requirements that no modifications will be made to the equipment unless the changes or modifications are expressly approved by Paradyne Corporation. WARNING: To Users of Digital Apparatus in Canada: This Class A digital apparatus meets all requirements of the Canadian interference-causing equipment regulations. - Page 14 No repairs may be performed by the user. Should you experience difficulty with Warranty, Sales, and Service Information this equipment, refer to For Digital Data Service (DDS) installations, inform the local telephone company of the appropriate facility interface code for the service you desire. DDS Facility Interface Code Data Rate (kbps) 04DU5-56...
- Page 15 Contact your sales or service representative directly for any help needed. For additional information concerning warranty, service, repair, installation, documentation, or training, use one of the following methods: Via the Internet: Visit the Paradyne World Wide Web site at http://www.paradyne.com Via Telephone: Call the automated call system to receive current information via fax or to speak with a company representative.
Need help?
Do you have a question about the 7610 SNMP DSU and is the answer not in the manual?
Questions and answers