Table of Contents
Advertisement
Quick Links
INSTALLATION
RT7
WIRED 7 DAY PROGRAMMABLE
ROOM THERMOSTAT
Pack contains ....................................................................................1
Installation .........................................................................................1
Installing batteries ...............................................................................................1
Mounting of wall mounting plate .....................................................................1
Wiring ...................................................................................................................2
Mounting Of The Thermostat ..............................................................................2
Installer Settings .................................................................................2
Advanced Installer Setting ................................................................................2
Troubleshooting .................................................................................4
Technical Specifications ...................................................................4
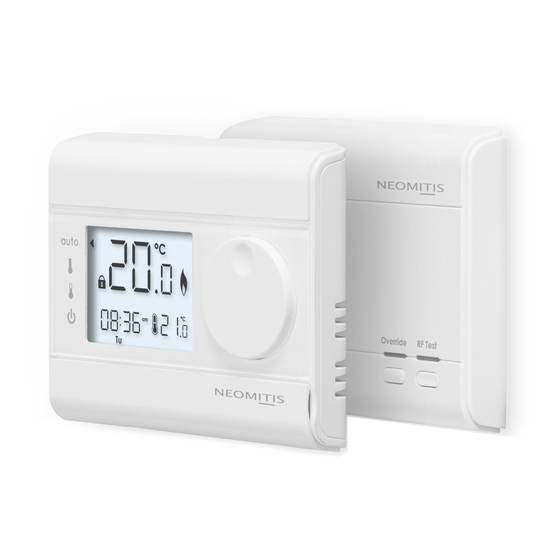
PACK CONTAINS
x1
Thermostat
x2
Screw Anchor
RTE7REA NEO ENG FP V02 22 04 2015
INSTRUCTIONS
x2
AA Batteries (LR6)
x2
Screws
INSTALLATION
INSTALLING BATTERIES
1- Remove the batteries cover
which is placed on the front of
thermostat.
2- Insert the 2 batteries AA sup-
plied. Note the correct polarity
according to the engraving on
the thermostat when inserting
the batteries.
3- Replace the batteries cover.
MOUNTING OF WALL MOUTING PLATE
The digital room thermostat is fixed on the wall with the wall plate which
is supplied with the product.
1- Unscrew the 2 screws under the
thermostat.
2- Remove the wall plate from the
thermostat.
3- Secure the wall plate with the
two screws provided using the
horizontal and vertical holes.
x2
1
Advertisement
Table of Contents

Subscribe to Our Youtube Channel
Related Manuals for Neomitis RT7


Summary of Contents for Neomitis RT7
- Page 1 INSTALLATION INSTALLING BATTERIES INSTALLATION INSTRUCTIONS 1- Remove the batteries cover which is placed on the front of thermostat. WIRED 7 DAY PROGRAMMABLE ROOM THERMOSTAT 2- Insert the 2 batteries AA sup- plied. Note the correct polarity according to the engraving on the thermostat when inserting the batteries.
- Page 2 Recommended locations for your thermostat. WIRING To ensure that your thermostat provides accurate readings and controls effectively, it must be installed approximately 1.5 m above floor level on an inside wall, away from direct sunshine and any other sources of heat or cold such as radiators, cold draughts, etc.
- Page 3 • Set 12/24 hours clock 1- Rotate the dial to ON and locked. The pre-set value is 12 hours clock. 1- Rotate the dial to change to “24 hr”. 2- Then save by pressing move the Programming slider. 2- Then save by pressing move the Programming slider.
- Page 4 LIMITED - 4th Floor, Lincoln House, 300 High Holborn, London WC1V 7JH ® Registered in England and Wales No: 9543404 NEOMITIS is a registered trademark of CO INTECH - SIRET 42243514900048 RCS ANGERS ® www.neomitis.com Tel: +44 (0) 2071 250 236 - Fax: +44 (0) 2071 250 267 - E-mail: contact_uk@neomitis.com...
Need help?
Do you have a question about the RT7 and is the answer not in the manual?
Questions and answers