Table of Contents
Advertisement
Available languages
Available languages
Quick Links
Advertisement
Chapters
Table of Contents

Subscribe to Our Youtube Channel
Related Manuals for Foster 7330240


Summary of Contents for Foster 7330240
- Page 1 MANUALE D’ISTRUZIONE user’s manual notice d’utilisation Bedienungsanleitung...
-
Page 2: Table Of Contents
Gentile Cliente, Grazie per avere scelto un piano di cottura a induzione Foster. Per ottenere il meglio dal Suo piano cottura, La preghiamo di leggere con attenzione le presenti istruzioni, e di conservarle per un’eventuale consultazione futura. INDICE SICUREZZA ..........................3 .................. -
Page 3: Sicurezza
SICUREZZA Precauzioni prima del primo utilizzo Sballare eliminando tutti i materiali di imballo. L’installazione e connessione dell’apparecchio devono essere effettuate da personale specializzato. Il Fabbricante declina ogni responsabilità civile e penale per danni causati da installazione e/o connessione non realizzate a regola d’arte. ... -
Page 4: Precauzioni Onde Non Danneggiare L
Gli oggetti magnetici (carte di credito, floppy discs, calcolatrici) non devono essere piazzati vicino all’apparecchio quando questo è acceso. Non piazzare alcun oggetto metallico, tranne le pentole, sull’apparecchio. In caso di accensione involontaria, o di presenza di calore residuo dopo la cottura, questi potrebbero sciogliersi o anche incendiarsi. - Page 5 Pericolo di incendio! Non appoggiare alcun oggetto sul piano di cottura. Non piazzare mai un contenitore bollente sul pannello di controllo. Se sotto il piano cottura incassato c’è un cassetto, assicurarsi che lo spazio tra il contenuto dello stesso e la parte inferiore dell’apparecchio sia sufficiente (almeno 2 cm).
- Page 6 Altre precauzioni Assicurarsi che la pentola o padella sia sempre centrata sulla piastra di cottura. Il fondo dell’utensile deve coprire il più possibile la piastra di cottura. Per utilizzatori pace-makers: campo magnetico dell’apparecchio potrebbe influenzare il funzionamento del pace- maker.
-
Page 7: Descrizione Dell'apparecchio
DESCRIZIONE DELL’APPARECCHIO Dati tecnici Typo 7330240 7331240 7332240 7370240 Potenza totale 6700 W 6700 W 7400 W 7400 W Consumo di energia del piano cottura 173.6 Wh/kg 176.6 Wh/kg 174.2 Wh/kg 176.5 Wh/kg Posizione anteriore sinistra Ø 200 mm Ø 250 mm Ø... -
Page 8: Pannello Di Controllo
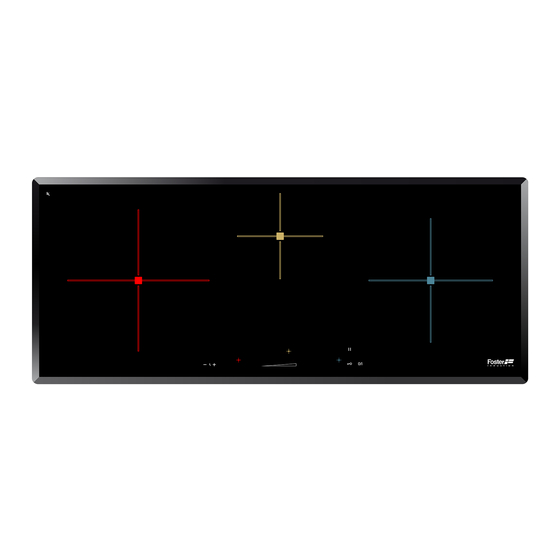
Pannello di controllo Spia timer Display Timer Display potenza Spia piastra Tasto mantieni caldo Spia Pausa/Ripeti Spia on/off Zona “SLIDER” di selezione Potenza e Tasto Tasto Tasto On/Off Booster Pausa/Ripeti impostazione timer USO DELL’APPARECCHIO Display Display Descrizione Funzione Zero La piastra è attivata. 1…9 Livello potenza Selezione del livello di potenza. -
Page 9: Prima Accensione E Utilizzo Dell'apparecchio
PRIMA ACCENSIONE E UTILIZZO DELL’APPARECCHIO Prima del primo utilizzo Pulire l’apparecchio con uno straccio umido, indi asciugarlo accuratamente. Non utilizzare detergenti che possano causare colorazioni anomale del vetro. Principio dell’induzione Sotto ogni piastra riscaldante si trova un magnete induttore. Quanto viene attivato, questo produce un campo elettromagnetico che genera una corrente induttiva nel fondo ferromagnetico della pentola. -
Page 10: Per Iniziare
Per iniziare Accensione/spegnimento dell’apparecchio : Azione Pannello di controllo Display Per accendere premere [ 0/I ] [ 0 ] lampeggiano Per arrestare premere [ 0/I ] niente o [ H ] Accensione/Spegnimento di una piastra riscaldante: Azione Pannello di controllo Display Selezione piastra premere il display [ 0 ] selezionato... -
Page 11: Timer
Gestione della potenza: L’apparecchio ha un sistema di limitazione della potenza massima. Quando la funzione Booster è attiva, al fine di non eccedere in potenza, il sistema elettronico riduce automaticamente la potenza di una delle altre piastre. Il display lampeggia su [ 9 ] per qualche secondo e poi indica la Potenza massima consentita: L’altra piastra: Piastra selezionata... -
Page 12: Cottura Automatica
Funzione timer al di fuori della cottura: Esempio: per 29 minutes : Azione Pannello di controllo Display Attivare l’apparecchio premere display [ 0/I ] spie piastra accese Selezionare « Timer » premere il display [ CL ] [ 00 ] scoirrere sullo “SLIDER“... -
Page 13: Funzione Richiamo
Funzione Richiamo Dopa ver spento l’apparecchio [ 0/I ], è possibile richiamare le ultime impostazioni. Regolazioni di cottura di tutte le piastre (Potenza) Minuti e secondi dei timer delle piastre Funzione riscaldamento La procedura di Richiamo è la seguente: ... -
Page 14: Suggerimenti Di Cottura
SUGGERIMENTI DI COTTURA Qualità delle pentole Materiali adatti: acciaio, acciaio smaltato, ghisa, acciaio con fondo magnetizzabile, alluminio con fondo magnetizzabile Materiali non adatti: alluminio e acciaio con fondo non magnetizzabile, rame, ottone, coccio, porcellana In via di massima, i fabbricanti indicano se i recipienti di cottura sono adatti per i piani ad induzione. Per verificare se i recipienti di cottura sono indicati per il piano ad induzione. -
Page 15: Dimensioni Delle Pentole
Dimensioni delle pentole Le piastre di cottura si adattano automaticamente, entro un certo limite, al diametro delle pentole. Tuttavia la pentola deve avere un diametro minimo, a seconda delle dimensioni della piastra. Per ottenere l’efficienza migliore dal vostro apprecchio, posizionate la piastra nel centro della piastra. -
Page 16: Cosa Fare In Caso Di Problemi
COSA FARE IN CASO DI PROBLEMI Appare il simbolo [ E 4 ] : L’apparecchio deve essere configurato secondo la procedura seguente: I) Attenzione : prima di iniziare ogni pentola o utensile deve essere rimossa dall’apparecchio. II) Scollegare l’apparecchio dalla rete elettrica rimuovendo il fusibile o staccando la spina. III) Collegare l’apparecchio nuovamente alla rete elettrica rimettendo il fusibile o collegando la spina. -
Page 17: Protezione Dell'ambiente
Compare il simbolo [ C ] o [ E ] Contattare l’assistenza tecnica. Una delle piastre viene disattivata È entrato in funzione il sistema di sicurezza. Si è dimenticato di disattivare la piastra per un certo periodo. ... -
Page 18: Istruzioni Di Installazione
(3). Inserimento – installazione Le misure di incasso sono : Articolo Foro incasso 7330240 760 x 350 mm 7331240 560 x 490 mm 7332240 650 x 490 mm 7370240 560 x 490 mm ... -
Page 19: Connessione Elettrica
CONNESSIONE ELETTRICA L'installazione di questo dispositivo e il suo collegamento alla rete elettrica devono essere eseguiti da un elettricista pienamente consapevole dei requisiti normativi. Assicurare la protezione dalle parti in tensione dopo l'installazione. I dati di connessione necessari si trovano sulla piastra di segnalazione e d'attacco sotto il dispositivo. - Page 20 Dear customer, Thank you for having chosen our induction ceramic hob. In order to make the best use of your appliance, we would advise you to read carefully the following notes and to keep them for a later consulting. SUMMARY SAFETY ............................
-
Page 21: Safety
SAFETY Precautions before using Unpack all the materials. The installation and connecting of the appliance have to be done by approved specialists. The manufacturer can not be responsible for damage caused by building-in or connecting errors. To be used, the appliance must be well-equipped and installed in a kitchen unit and an adapted and approved work surface. -
Page 22: Precautions Not To Damage The Appliance
In general do not place any metallic object except heating containers on the glass surface. In case of untimely engaging or residual heat, this one may heat, melt or even burn. Never cover the appliance with a cloth or a protection sheet. This is supposed to become very hot and catch fire. -
Page 23: Precautions In Case Of Appliance Failure
Precautions in case of appliance failure If a defect is noticed, switch on the appliance and turn off the electrical supplying. If the ceramic glass is cracked or fissured, you must unplug the appliance and contact the after sales service. ... -
Page 24: Description Of The Appliance
DESCRIPTION OF THE APPLIANCE Technical characteristics Type 7330240 7331240 7332240 7370240 Total power 6700 W 6700 W 7400 W 7400 W Energy consumption for the hob EC 173.6 Wh/kg 176.6 Wh/kg 174.2 Wh/kg 176.5 Wh/kg Front left heating zone Ø 200 mm Ø... -
Page 25: Control Panel
Control panel Control light timer Timer display Power display Control light cooking zone Keep warm key Control light Control light Pause/Recall on/off Power selection zone “SLIDER” and Booster Pause/Recall On/Off key timer setting zone USE OF THE APPLIANCE Display Display Designation Function Zero... -
Page 26: Starting-Up And Appliance Management
STARTING-UP AND APPLIANCE MANAGEMENT Before the first use Clean your hob with a damp cloth, and then dry the surface thoroughly. Do not use detergent which risks causing blue-tinted colour on the glass surface. Induction principle An induction coil is located under each heating zone. When it is engaged, it produces a variable electromagnetic field which produces inductive currents in the ferromagnetic bottom plate of the pan. -
Page 27: Starting-Up
Starting-up Start up / switch off the hob: Action Control panel Display To start press key [ 0/I ] [ 0 ] are blinking To stop press key [ 0/I ] nothing or [ H ] Start up / switch off a heating zone: Action Control panel Display... -
Page 28: Timer
Power management: The hole cooking hob is equipped by a maximum of power. When the booster function is activated, and not to exceed the maximum power, the electronic system orders to reduce automatically the power level of an other heating zone. The display is blinking on [ 9 ] during a few seconds and then shows the maximum of power allowed : Heating zone selected The other heating zone:... -
Page 29: Automatic Cooking
Automatic cooking All the cooking zones are equipped with an automatic “go and stop” cooking device. The cooking zone starts at full power during a certain time, then reduces automatically its power on the pre- selected level. Start-up : Action Control panel Display... -
Page 30: Control Panel Locking
[ B ] and [ 0 ] or [ H ] on displays [ L ] from the front right** zone display press on key [ B ] no light on the displays for the 7330240 use the rear right zone display... -
Page 31: Cooking Advices
COOKING ADVICES Pan quality Adapted materials : steel, enamelled steel, cast iron, ferromagnetic stainless-steel, aluminium with ferromagnetic bottom. Not adapted materials : aluminium and stainless-steel without ferromagnetic bottom, cupper, brass, glass, ceramic, porcelain. The manufacturers specify if their products are compatible induction. To check if pans are compatibles : ... -
Page 32: Pan Dimension
Pan dimension The cooking zones are, until a certain limit, automatically adapted to the diameter of the pan. However the bottom of this pan must have a minimum of diameter according to the corresponding cooking zone. To obtain the best efficiency of your hob, please place the pan well in the centre of the cooking zone. -
Page 33: What To Do In Case Of A Problem
WHAT TO DO IN CASE OF A PROBLEM When the symbol [ E 4 ] appears: The table must be reconfigured. Please implement the following steps : I) Important : before you start, make sure there is no more pot on the hob II) Disconnect the appliance from the grid by removing the fuse or turning the circuit breaker off III) Reconnect the table to the grid... -
Page 34: Environment Preservation
One or all cooking zone cut-off: The safety system functioned. You forgot to cut-off the cooking zone for a long time. One or more sensitive keys are covered. The pan is empty and its bottom overheated. ... -
Page 35: Installation Instructions
(3). Fitting - installing: The cut out sizes are: Reference Cut-size 7330240 760 x 350 mm 7331240 560 x 490 mm 7332240 650 x 490 mm 7370240 560 x 490 mm ... -
Page 36: Electrical Connection
ELECTRICAL CONNECTION The installation of this appliance and the connection to the electrical network should be entrusted only to an electrician perfectly to the fact of the normative regulations and which respects them scrupulously. Protection against the parts under tension must be ensured after the building-in. ... - Page 37 Chère cliente,cher client, Nous vous remercions de la confiance que vous nous avez accordée en choisissant notre table de cuisson vitrocéramique à induction. Afin de bien connaître cet appareil, nous vous recommandons de lire attentivement cette notice d’utilisation dans son intégralité et de la conserver pour une consultation ultérieure. SOMMAIRE SECURITE ...........................
-
Page 38: Securite
SECURITE Précautions avant utilisation en cuisson Retirez toutes les parties de l’emballage. L’installation et le branchement électrique de l’appareil sont à confier à des spécialistes agrées. Le fabricant ne saurait être tenu responsable des dommages résultant d’une erreur d’encastrement ou de raccordement. -
Page 39: Precautions Pour Ne Pas Deteriorer Lappareil
Assurez-vous qu’aucun câble électrique d’appareil fixe ou mobile ne vienne en contact avec la vitre ou la casserole chaude. Les objets magnétisables (cartes de crédits, disquettes informatiques, calculatrices) ne doivent pas se trouver à proximité immédiate de l’appareil en fonction. ... -
Page 40: Precautions En Cas De Defaillance De Lappareil
Eviter que le sucre, les matières synthétiques ou une feuille d’aluminium ne touchent les zones chaudes. Ces substances peuvent au refroidissement provoquer des cassures ou d’autres modifications de la surface vitrocéramique: Eteindre l’appareil et enlevez-les immédiatement de la zone de cuisson encore chaude (attention : risque de brûlures). -
Page 41: Autres Protections
Autres protections Assurez-vous que le récipient de cuisson soit toujours centré sur la zone de cuisson. Le fond de la casserole doit autant que possible couvrir la zone de cuisson. Pour les utilisateurs portant un régulateur de rythme cardiaque, le champ magnétique pourrait influencer son fonctionnement. -
Page 42: Description De L'appareil
DESCRIPTION DE L’APPAREIL Caractéristiques techniques Type 7330240 7331240 7332240 7370240 Puissance Totale 6700 W 6700 W 7400 W 7400 W Consommation d’énergie de la table de cuisson EC 173.6 Wh/kg 176.6 Wh/kg 174.2 Wh/kg 176.5 Wh/kg Foyer avant gauche Ø 200 mm Ø... -
Page 43: Bandeau De Commande
Bandeau de commande Voyants de sélection du Affichage de la foyer pour minuterie minuterie Affichage du niveau Voyant de sélection de puissance de foyer Touche maintien au chaud Voyant Voyant de mise Pause/Rappel en marche Touche Touche Zone de sélection de puissance Touche Pause/Rappel «... -
Page 44: Mise En Route Et Gestion De L'appareil
MISE EN ROUTE ET GESTION DE L’APPAREIL Avant la première utilisation Nettoyez votre appareil avec un chiffon humide, puis séchez-le. N’utilisez pas de détergent qui risquerait de provoquer une coloration bleutée sur les surfaces vitrées. Principe de l’induction Une bobine d’induction se trouve sous chaque foyer de cuisson. Lorsque celle-ci est enclenchée, elle produit un champ électromagnétique variable qui, à... -
Page 45: Mise En Route
Mise en route Enclencher / arrêter la table de cuisson : Action Bandeau de commande Afficheur Enclencher appuyer sur [ 0/I ] [ 0 ] clignotent Arrêter appuyer sur [ 0/I ] aucun ou [ H ] Réglage de la zone de chauffe : Action Bandeau de commande Afficheur... -
Page 46: Fonction Booster
Fonction booster La fonction booster [ B ] octroie un renforcement de puissance à la zone de cuisson sélectionnée. Si cette fonction est activée, ces zones de cuisson fonctionnent pendant 10 minutes avec une puissance nettement plus élevée. Le booster est conçu par exemple pour faire chauffer rapidement de grandes quantités d’eau, comme pour la cuisson des pâtes. -
Page 47: Programmation Dautomatisme De Cuisson
Arrêter la fonction minuterie cuisson : Exemple pour 13 minutes restantes à puissance 7 : Action Bandeau de commande Afficheur Sélectionner la zone appuyer sur [ 7 ] de la zone [ 7 ] et voyant de zone allumé Sélectionner «... -
Page 48: Fonction Pause
Fonction Pause Cette fonction permet d’interrompre ou de réactiver la cuisson avec les mêmes réglages de puissances. Enclencher, déclencher la fonction : Action Bandeau de commande Afficheur Activer la pause appuyer sur la touche [ II ] pendant 2s [ II ] sur les afficheurs appuyer sur la touche [ II ] pendant 2s le voyant “Pause/Rappel“... -
Page 49: Verrouillage Du Bandeau De Commande
[ B ] et [ 0 ] sur les afficheurs [ L ] de la zone avant droite** appuyer sur [ B ] les afficheurs sont éteints ** pour la référence 7330240 utiliser l’afficheur de la zone arrière droite... -
Page 50: Conseils De Cuisson
CONSEILS DE CUISSON Qualité des casseroles Matériaux adaptés : acier, acier émaillé, fonte, inox à fond ferromagnétique, aluminium à fond ferromagnétique. Matériaux non adaptés : aluminium et inox à fond non ferromagnétique, cuivre, laiton, verre, céramique, porcelaine. Pour vérifier si des casseroles sont compatibles : ... -
Page 51: Dimension Des Casseroles
Dimension des casseroles Les zones de cuisson s’adaptent automatiquement à la dimension du fond de la casserole jusqu’à une certaine limite. Le fond de cette casserole doit cependant avoir un diamètre minimum en fonction du diamètre de la zone de cuisson correspondante. Afin d’obtenir le rendement maximum de votre table de cuisson, veuillez placer la casserole bien au centre de la zone de cuisson. -
Page 52: Que Faire En Cas De Probleme
QUE FAIRE EN CAS DE PROBLEME Le symbole [ E 4 ] s’affiche : La table doit être reconfigurée suivant la procédure ci-dessous : I) Attention : au départ ne pas mettre de récipients sur la table à induction. II) Débrancher la table du réseau électrique : enlever le fusible ou couper le disjoncteur. -
Page 53: Protection De L'environnement
Le symbole [ U ] s’affiche : Il n’y a pas de casserole sur la zone de cuisson. Le récipient utilisé n’est pas compatible avec l’induction. Le diamètre du fond de casserole est trop petit par rapport à la zone de cuisson. Le symbole [ C ] ou [ E ] s’affiche : ... -
Page 54: Instructions D'installation
ôté la feuille de protection (3). Encastrement La découpe du plan de travail sera suivant le modèle de table de : Appareil Découpe 7330240 760 x 350 mm 7331240 560 x 490 mm 7332240 650 x 490 mm... -
Page 55: Connexion Electrique
CONNEXION ELECTRIQUE L’installation de cet appareil et son branchement au réseau électrique ne doit être confiés qu’à un électricien parfaitement au fait des prescriptions normatives. La protection contre les pièces sous tension doit être assurée après le montage. ... - Page 56 Sehr geehrte Kundin, sehr geehrter Kunde. Wir danken Ihnen für das Vertrauen, das Sie uns gewährt haben, indem Sie unser lnduktionskochfeld gewählt haben. Um dieses Gerät kennen zu lernen, empfehlen wir Ihnen, die Gebrauchsanweisung vollständig und aufmerksam zu lesen. Wir wünschen Ihnen viel Spaß mit diesem Gerät. INHALTSVERZEICHNIS SICHERHEIT ..........................
-
Page 57: Sicherheit
SICHERHEIT Vorsichtsmaßnahme vor der Inbetriebnahme Alle Teile der Verpackung abnehmen. Das Gerät darf nur von einem Elektrofachmann eingebaut und angeschlossen werden. Der Hersteller kann nicht verantwortlich gemacht werden für Schäden, die durch Fehler beim einbauen oder anschließen verursacht werden. Benutzen Sie das Gerät nur im eingebauten Zustand. -
Page 58: Allgemeine Sicherheits-Hinweise
Allgemeine Sicherheits-Hinweise Schalten Sie nach jedem Gebrauch die Kochzonen aus. Überhitzte Fette und Öle entzünden sich schnell. Wenn Sie Speisen in Fett oder Öl (z.B. Pommes Frites) zubereiten, sollten Sie den Kochvorgang beobachten. Wenn Sie kochen und braten, werden die Kochzonen heiß. Hüten Sie sich deshalb vor Verbrennungen während und nach der Benutzung des Geräts. - Page 59 Beachten Sie, daß auch Sandkörner Kratzer verursachen können. Glaskeramik ist unempfindlich gegen Temperaturschocks und sehr widerstandsfähig, jedoch nicht unzerbrechlich. Besonders spitze und harte Gegenstände, die auf die Kochfläche fallen, können sie beschädigen. Töpfe und Ränder nicht an der Scheibe anstoßen. ...
-
Page 60: Vorsichtsmaßnahmen Bei Geräteausfall
Vorsichtsmaßnahmen bei Geräteausfall Sollte Fehler festgestellt werden, muß Gerät ausgeschaltet und vom Netz getrennt werden. Wenn Brüche, Sprünge oder Risse auf dem Glas auftreten: schalten Sie das Kochfeld sofort aus, schrauben Sie die Sicherung für das Kochfeld ab bzw. nehmen Sie diese heraus, und wenden Sie sich an unseren Kundendienst oder an Ihren Fachhändler. -
Page 61: Gerätebeschreibung
GERÄTEBESCHREIBUNG Technische Beschreibung 7330240 7331240 7332240 7370240 Gesamt Leistung 6700 W 6700 W 7400 W 7400 W Energieverbrauch der Kochmulde EC 173.6 Wh/kg 176.6 Wh/kg 174.2 Wh/kg 176.5 Wh/kg Kochzone vorne links Ø 200 mm Ø 250 mm Ø 250 mm Ø... -
Page 62: Bedienfeld
Bedienfeld Zeitschaltuhr Leuchten Zeitschaltuhr Kochzonen Selektion Anzeige Leistungs-Anzeige Leuchten Kochzonen- Selektion Warmhalte Taste Pause/ Rückruf Ein/Aus Leuchte Leuchte Booster Pause / "SLIDER" Leistung und Zeitschaltuhr Ein/Aus Taste Rückruf Taste Auswahlzone Taste BEDIENUNG DES KOCHFELDES Anzeige Anzeige Benennung Funktion Null Die Kochzone ist aktiviert 1…9 Leistungsstufe Einstellung der Leistung... -
Page 63: Inbetriebnahme Des Kochfeldes
INBETRIEBNAHME DES KOCHFELDES Vor dem ersten Aufheizen Zuerst Ihr Gerät mit einem feuchten Lappen reinigen, dann trockenreiben. Benutzen Sie kein Reinigungsmittel, das eine bläuliche Färbung auf der verglasten Oberfläche verursachen könnte. Induktionsprinzip Unter jeder Kochzone befindet sich eine Induktionsspule. Wenn die Kochzone eingeschaltet wird, erzeugt diese Spule ein Magnetfeld. -
Page 64: Kochfeld Ein Und Ausschalten
Kochfeld ein und ausschalten Zuerst das Kochfeld und dann die Kochzone einschalten. Kochfeld: einschalten/ ausschalten: Betätigung Bedienfeld Anzeige Einschalten : Auf [ 0/I ] drücken [ 0 ] blinkt Ausschalten : Auf [ 0/I ] drücken Keine oder [ H ] ... -
Page 65: Zeitschaltuhr
Automatische Steuerung des “ Power“: Die Kochmulde ist mit einer Höchstleistung ausgestattet. Um diese Höchstleistung nicht zu überschreiten, reduziert die Elektronik automatisch das Kochniveau einer anderen Kochzone wenn die Power-Funktion aktiviert ist. Diese Kochzone wird dann blinkend die reduzierte Leistung [ 9 ] anzeigen. -
Page 66: Ankochautomatik
Ankochautomatik Alle Kochzonen sind mit einer Ankochautomatik bestückt. Bei aktivierter Ankochautomatik heizt die Kochzone automatisch mit höchster Leistung an und schaltet dann auf die von Ihnen gewählte Fortkochstufe zurück. Die Ankochzeit hängt von der gewählten Fortkochstufe ab. Aktivierung der Ankochautomatik: Betätigung Bedienfeld Anzeige... -
Page 67: Verriegelung Der Kochmulde
In den 5 Sekunden nach Einschalten der Mulde Verriegelung abschalten Gemeinsam auf [ P ] und [ 0 ] [ L ] vorne rechts drücken** Auf [ P ] drücken Keine Anzeige **Für 7330240 auf [ 0 ] oder [ L ] hinten rechts drücken... -
Page 68: Koch Empfehlungen
KOCH EMPFEHLUNGEN Kochgeschirr Geeignete Materialien: Stahl, emaillierter Stahl, Gusseisen, Stahl mit magnetisierbarem Boden, Aluminium mit magnetisierbarem Boden Nicht geeignete Materialien: Aluminium und Stahl mit nicht magnetisierbarem Boden, Kupfer, Messing, Steingut, Porzellan Im Allgemeinen geben die Hersteller an, ob ihrer Garbehälter sich zum Kochen auf Induktionskochfeldern eignen. -
Page 69: Geschirrgröße
Geschirrgröße Die Kochzonen passen sich automatisch an das Topfbodenmaß bis zu einer gewissen Grenze an. Das Kochgeschirr darf einen bestimmten Bodendurchmesser nicht unterschreiten, da sich die Induktion sonst nicht einschaltet. Zentrieren Sie immer den Topf in die Mitte der Kochzone, um den besten Wirkungsgrad zu erzielen. -
Page 70: Was Tun Wenn
WAS TUN WENN… [ E4 ] in der Anzeige erscheint: Das Kochfeld muss neu konfiguriert werden. Bitte folgen Sie nachstehende Hinweise : I) Wichtig : entfernen Sie alle Töpfe von Ihrem Kochfeld II) Das Kochfeld muss zuerst vom Stromnetz getrennt werden : nehmen Sie den Anschlusskabel weg oder schalten Sie die Sicherung am Schalttafel ab. -
Page 71: Umweltschutz
Der Auftrag Anzeige [ L ]: Finden Sie im Kapitel Verriegelung der Kochmulde. Eine Kochzone oder die gesamte Mulde schaltet ab: Die Sicherheits-Abschaltung hat es ausgelöst. Diese ist aktiviert, wenn Sie vergessen haben eine Kochzone abzuschalten. Diese Abschaltung ist aktiviert, wenn mehrere Tasten bedeckt sind. ... -
Page 72: Montagehinweise
Dichtung Einbau : Die Dichtung (2) nach Abnehmen der Schutzfolie (3) mit 2 mm Abstand der Außer kannte des Glases aufkleben. Einbau : Einbaumasse 7330240 760 x 350 mm 7331240 560 x 490 mm 7332240 650 x 490 mm 7370240 560 x 490 mm ... -
Page 73: Elektroanschluss
ELEKTROANSCHLUSS Zum Anschluß des Gerätes an das Elektronetz beauftragen Sie einen Elektrofachmann, der die landesüblichen Vorschriften der örtlichen Elektroversorgungsunternehmen genau kennt und sorgfältig beachtet. Der Berührungsschutz betriebsisolierter Teile muß nach der Montage sichergestellt sein. Ob die erforderlichen Anschlußdaten mit denen des Netzes übereinstimmen finden Sie auf dem Typenschild. - Page 76 Foster spa 42041 Brescello (RE) - Italy tel. +39.0522.687425 - tel. Servizio Assistenza +39.0522.684450 fax +39.0522.686019 - fax Servizio Ricambi +39.0522.962166 e-mail: service@fosterspa.com www.fosterspa.com 13849-4...
- Page 77 manual de instrucciones руководство по эксплуатации gebruikshandleiding...
- Page 78 Apreciada clienta, apreciado cliente, Le agradecemos la confianza que nos ha otorgado al elegir nuestra placa de cocción vitrocerámica a inducción. Con el fin de conocer bien este aparato, le recomendamos lea atentamente estas instrucciones de utilización en su totalidad y las conserve para consultas posteriores. RESUMEN SEGURIDAD ..........................
-
Page 79: Seguridad
SEGURIDAD Precauciones antes de utilizarla para cocinar Retire todos los elementos del embalaje. La instalación y el conexionado eléctrico del aparato deben encargarse a un especialista autorizado. El fabricante no será responsable de los daños resultantes de un error de empotramiento o de conexionado. -
Page 80: Precauciones Para No Deteriorar El Aparato
Asegúrese de que ningún cable eléctrico, fijo o móvil, del aparato toca el cristal o el recipiente caliente. Los objetos magnetizables (tarjetas de crédito, disquetes informáticos, calculadoras) no deben estar cerca del aparato en funcionamiento. Este aparato electrodoméstico puede ser usado por niños a partir de 8 años e igualmente por personas con capacidades físicas, sensoriales o mentales reducidas o que carezcan falta de experiencia y conocimiento del producto si se les ha dado... -
Page 81: Precauciones En Caso De Fallo Del Aparato
Si hay un cajón situado bajo el aparato empotrado, asegúrese que hay distancia suficiente (2 cm) entre el contenido de este cajón y la parte inferior del aparato con el fin de asegurar una buena ventilación. No deposite objetos inflamables (por ejemplo sprays) en el cajón situado bajo la placa de cocción. -
Page 82: Otras Precauciones
Otras precauciones Asegúrese siempre de que el recipiente de cocción esté centrado en la zona de cocción. El fondo de la cacerola debe cubrir, tanto como sea posible, la zona de cocción. Para usuarios que lleven un marcapasos, el campo magnético puede influir en su funcionamiento. -
Page 83: Descripción Del Aparato
DESCRIPCIÓN DEL APARATO Características técnicas Modelo 7330240 7331240 7332240 7370240 Potencia total 6700 W 6700 W 7400 W 7400 W Consumo energético para placas EC ** 173.6 Wh/kg 176.6 Wh/kg 174.2 Wh/kg 176.5 Wh/kg Fogón delantera izquierda Ø 200 mm Ø... -
Page 84: Zona De Mandos
Zona de mandos Pilotos de selección del fogón para el minutero Indicator de minutero Indicador de Visualización Selección del hogar de la potencia Tecla “Mantener caliente” Pilito de puesta Pilito Pausa en marcha Tecla „turbo‟ Zona de selección de potencia Tecla Tecla Pausa “SLIDER”... -
Page 85: Puesta En Marcha Y Gestión Del Aparato
PUESTA EN MARCHA Y GESTIÓN DEL APARATO Antes de la primera utilización Limpie el aparato con un trapo húmedo y séquelo. No utilice detergente ya que podría provocar una coloración azulada en las superficies vitrificadas. Principio de la inducción Debajo de cada placa de cocción hay una bobina de inducción. Cuando ésta está conectada, produce un campo electromagnético variable el cual produce a su vez corrientes inducidos en el fondo ferromagnético del recipiente. -
Page 86: Puesta En Marcha
Puesta en marcha Conectar / Apagar la placa de cocción: Acción Zona de mandos Indicador Conectar pulsar [ 0/I ] [ 0 ] parpadear Apagar pulsar [ 0/I ] ninguno o [ H ] Conectar / Apagar una zona de calentamiento: Acción Zona de mandos Indicador... -
Page 87: Unción Turbo
Función „turbo‟ La función „turbo‟ [ B ] proporciona un refuerzo de potencia en la zona de cocción seleccionada. Si se activa esta función, estas zonas de cocción funcionan durante 10 minutos con una potencia notablemente más alta. El „turbo‟ está destinado, por ejemplo, a calentar rápidamente grandes cantidades de agua, como para cocer pasta. -
Page 88: Programación De La Cocción Automática
Paro automático al final de la cocción: Cuando ha transcurrido el tiempo de cocción seleccionado, el minutero lo indica centelleando [ 00 ] y produciendo una señal sonora. Para parar el sonido y el parpadea, basta pulsar la tecla [ 00 ]. ... -
Page 89: Memorización De Funciones
[ B ] y [ L ] de la zona delantera derecha** [ L ] Pulsar de nuevo [ B ] Los indicadores se apagan ** para una placa de cocción 7330240 utilizar el [ 0 ] o [ L ] de la zona trasera derecha... -
Page 90: Consejos De Cocción
CONSEJOS DE COCCIÓN Calidad de las cacerolas Materiales adecuados: acero, acero esmaltado, fundición, inoxidable con fondo ferro-magnético, aluminio con fondo ferro-magnético Materiales no adecuados: aluminio e inoxidable con fondo no ferro-magnético, cobre, latón, vidrio, cerámica, porcelana Los fabricantes especifican si sus productos son compatibles con la inducción. Para verificar si las cacerolas son compatibles: ... -
Page 91: Dimensión De Las Cacerolas
Dimensión de las cacerolas Las zonas de cocción se adaptan automáticamente a la dimensión del fondo de la cacerola, hasta un cierto límite. Por ello, el fondo de esta cacerola debe tener un diámetro mínimo en función del diámetro de la zona de cocción correspondiente. Para obtener el máximo rendimiento de la placa de cocción, coloque la cacerola bien centrada en la zona de cocción. -
Page 92: Qué Hacer En Caso De Problema
QUÉ HACER EN CASO DE PROBLEMA EL sí m bolo [ E 4 ] aparece : La placa debe ser reconfigurada segun el procedimiento descrito a continuació n : I) Cuidado : al principio no colocar recipientes sobre la placa. II) Desconectar la placa de la corriente eléctrica : quitar el fusible o cortar el automático. -
Page 93: Protección Del Medio Ambiente
El símbolo [ U ] se enciende: No hay cacerola en la zona de cocción El recipiente utilizado no es compatible con la inducción El diámetro del fondo de la cacerola es demasiado pequeño respecto a la zona de cocción El símbolo [ E ] se enciende: ... -
Page 94: Instrucciones De Instalación
2 mm del borde exterior, después de haber quitado la lámina de protección (3). Encaje: La abertura en la superficie de trabajo será, según el modelo, de: Modelo Abertura 7330240 760 x 350 mm 7331240 560 x 490 mm 7333240 650 x 490 mm 7370240 560 x 490 mm ... -
Page 95: Conexión Eléctrica
CONEXIÓN ELÉCTRICA La instalación de este aparato y su conexión a la red eléctrica sólo deben confiarse a un electricista que esté al día de las prescripciones reglamentarias. La protección contra las piezas bajo tensión eléctrica debe asegurarse después del montaje. - Page 96 Уважаемые клиенты! Благодарим Вас за то, что Вы выбрали нашу индукционную варочную панель со стеклокерамической поверхностью. Чтобы добиться максимальной отдачи от использования этого прибора, мы рекомендуем Вам внимательно прочитать следующую информацию и сохранить буклет для последующего использования. СОДЕРЖАНИЕ БЕЗОПАСНОСТЬ ........................21 М...
-
Page 97: Безопасность
БЕЗОПАСНОСТЬ Меры предосторожности перед использованием Снимите все упаковочные материалы. Установку и подключение прибора должны проводить квалифицированные специалисты. Производитель не несет ответственности за ущерб, возникший в результате ошибок при установке и подключении. Прибор должен быть установлен в кухонную мебель с правильно... -
Page 98: Меры Предосторожности Для Предотвращения Повреждения Прибора
Обращайтесь с прибором осторожно: не обожгитесь во время или после приготовления пищи. Убедитесь, что кабели каких-либо зафиксированных или подвижных приборов не контактируют со стеклом или горячей посудой. Рядом с работающим прибором нельзя помещать намагниченные предметы (кредитные карты, дискеты, калькуляторы). -
Page 99: Меры Предосторожности В Случае Отказа Прибора В Работе
Не ударяйте края стеклокерамической поверхности посудой. Убедитесь, что вентиляция прибора осуществляется в соответствии с указаниями производителя. Не оставляйте пустые кастрюли на стеклокерамической варочной поверхности. Не допускайте контакта зон нагрева с сахаром, синтетическими материалами и алюминиевыми листами. Это... -
Page 100: Другие Меры Предосторожности
ВНИМАНИЕ: Если поверхность треснула, выключите прибор, чтобы предотвратить возможность удара электротоком. Другие меры предосторожности Всегда ставьте посуду в центр зоны нагрева. Дно посуды должно по возможности максимально покрывать зону нагрева. Вниманию лиц с кардиостимулятором: магнитное поле прибора может... -
Page 101: Описание Прибора
ОПИСАНИЕ ПРИБОРА Технические сведения Тип 7330240 7331240 7332240 7370240 Полная мощность 6700 Вт 6700 Вт 7400 Вт 7400 Вт Потребление энергии поверхностью Втч/кг Втч/кг Втч/кг Втч/кг 173.6 176.6 174.2 176.5 Спереди слева pасположение конфорок Ø 200 мм Ø 250 мм... -
Page 102: Панель Управления
Панель управления ПРИМЕНЕНИЕ Дисплей Дисплей Обозначение Функция Ноль Активирована зона нагревания 1 … 9 Уровень мощности Выбор уровня готовки Обнаружение кастрюли Кастрюля отсутствует или не подходит Усилитель мощности Автоматическая готовка нагрева Сообщение об ошибке Отказ электроники Остаточное тепло Зона нагревания горячая Усилитель... -
Page 103: Запуск И Управление Прибором
ЗАПУСК И УПРАВЛЕНИЕ ПРИБОРОМ Перед первым использованием Очистить варочную панель влажной тканью, затем тщательно высушить панель. Запрещается использовать моющие средства – они могут привести к появлению синеватого оттенка стеклокерамической поверхности. Индукционный принцип работы Под каждой зоной нагревания находится индукционная катушка. При ее включении катушка вырабатывает... -
Page 104: Начало Работы
Начало работы Включение/выключение варочной панели: Действие Панель управления Дисплей Запуск Нажать кнопку [ 0/I ] [ 0 ] мигает Выключение Нажать кнопку [ 0/I ] Ничего или [ H ] Включение/выключение зоны нагревания: Действие Панель управления Дисплей Выбор зоны Нажать... -
Page 105: Функция Усиления Мощности
Функция усиления мощности Функция усиления мощности [ B ] обеспечивает усиление мощности в выбранной зоне нагревания. Если эта функция активирована, то зона нагревания в течение 10 минут будет работать на сверхвысокой мощности. Усилитель предусмотрен, например, для быстрого нагревания большого объема воды при приготовлении лапши. ... - Page 106 Чтобы остановить время готовки Например, 13 минут при уровне мощности 7: Действие Панель управления Дисплей Выбрать зону Нажать на дисплей [ 7 ] [ 7 ] и включение нагревания контрольной лампочки Выбрать функцию Нажать кнопку [ 13 ] [ 13 ] «Таймер»...
-
Page 107: Автоматическая Готовка
Автоматическая готовка Все зоны готовки оснащены автоматическим устройством готовки «включения и отключения». Зона готовки работает на полной мощности определенное время, затем автоматически снижает мощность до предустановленного уровня. Запуск: Действие Панель управления Дисплей Выбор зоны готовки Нажать на дисплей [ 0 ] [ 0 ] и... -
Page 108: Функция Поддержки Тепла
[ B ] и [ 0 ] с дисплея или [ H ] передней правой** зоны Лампочка блокировки не горит Нажать на дисплей [ B ] На дисплее ничего не отображается ** для модели 7330240 используйте дисплей задней правой зоны... -
Page 109: Советы По Готовке
СОВЕТЫ ПО ГОТОВКЕ Качество кастрюль Подходящие материалы: сталь, эмалированная сталь, чугун, сталь с намагничивающимся дном, алюминий с намагничивающимся дном Не подходящие материалы: алюминий и сталь с не намагничивающимся дном, медь, латунь, глина, фарфор Чаще всего изготовители указывают, подходит ли посуда для индуктивной плиты. Способ... -
Page 110: Размеры Кастрюли
Размеры кастрюли Конфорки до определенного предела автоматически адаптируются к диаметру кастрюли. Однако днище кастрюли должно соответствовать минимальному диаметру соответствующей конфорки. Чтобы добиться максимально эффективной работы своей варочной поверхности, кастрюлю следует ставить в центр конфорки. Примеры настроек мощности (Приведенные ниже значения являются ориентировочными). от... -
Page 111: Действия В Случае Возникновения Проблем
ДЕЙСТВИЯ В СЛУЧАЕ ВОЗНИКНОВЕНИЯ ПРОБЛЕМ На дисплее отображается символ [ E4 ]: Конфигурация варочной панели должна быть настроена в соответствии со следующей процедурой. I) Внимание: перед началом настройки следует убрать с панели все кастрюли. II) Отключить варочную панель от источника... -
Page 112: Защита Окружающей Среды
На дисплее отображается символ [ U ] На конфорке нет кастрюли. Кастрюля не подходит для индукционного режима. Диаметр дна кастрюли слишком мал. На дисплее отображается символ [ С ] или [ Е ] Связаться с отделом послепродажного обслуживания. Одна... -
Page 113: Инструкции По Установке
поверхности, предварительно сняв с него защитную пленку (3). Подгонка – установка Размеры вырезаемого отверстия: Прибор Отверстие 760 x 350 мм 7330240 560 x 490 мм 7331240 650 x 490 мм 7332240 560 x 490 мм 7370240 Проследить за тем, чтобы расстояние от варочной панели до ближайшей стены или... -
Page 114: Подключение К Электросети
ВНИМАНИЕ: Используйте только защитные ограждения для варочной поверхности, разработанные производителем прибора для приготовления пищи или указанные производителем прибора в руководстве по эксплуатации в качестве подходящего защитного устройства или защитные ограждения для варочной поверхности, непосредственно установленные на приборе. Использование неподходящих защитных ограждений варочной поверхности... - Page 115 Подключение варочной плиты Установка конфигурации: Для различных типов подключения использовать перемычки из латуни, которые находятся в ящике рядом с контактным терминалом. Однофазный 230 В ~ 1P + N Установить первую перемычку между контактами 1 и 2, вторую – между 3 и 4. Заземлите...
- Page 116 Geachte klant Bedankt voor de beslissing om onze inductie kookplaat aan te schaffen Teneinde er voor te zorgen dat u optimaal gebruik kunt maken van deze apparatuur, adviseren wij om deze handleiding nauwkeurig te lezen en te bewaren voor eventueel later gebruik. SAMENVATTING VEIILIGHEID ..........................
-
Page 117: Veiiligheid
VEIILIGHEID Voorzorgmaatregelen vóór het gebruik pak alle materialen uit de installatie en het aansluiten van de apparatuur dient door een erkend vakman te worden gedaan. De fabrikant is niet verantwoordelijk voor beschadigingen anderzijds veroorzaakt zijn door installatiefouten de apparatuur moet op de juiste manier worden geïnstalleerd en op een degelijke ondergrond geplaatst dit apparaat is exclusief ontworpen voor het bereiden van... -
Page 118: Het Vermijden Van Beschadigingen Aan Het Apparaat
gebruik geen metalen voorwerpen, behalve daarvoor geschikte schalen. In het geval van oververhitting kunnen deze smelten of zelfs verbranden bedek apparaat nooit kleding beschermingsdeken. Deze kunnen erg heet worden en in brand vliegen Kinderen jonger dan 8 jaar, personen van wie de psychische en of mentale capaciteit vermindert zijn en personen van wie de kennis onaangepast is, kunnen dit toestel enkel onder toezicht gebruiken of indien zij opgeleid zijn om dit toestel te gebruiken... -
Page 119: Hoe Te Handelen Bij Het Niet Functioneren Van De Apparatuur
Suiker, synthetische materialen of aluminium vellen mogen niet in contact komen met de kookzones. Deze kunnen breuk en wijzigingen veroorzaken van het glas door afkoeling; schakel het apparaat direct uit en verwijder de voorwerpen van de hete zones (voorzichtig dat je jezelf niet brand). ... -
Page 120: Andere Voorzorgen
Andere voorzorgen Overtuig u dat de pan altijd op het midden van de kookzone is geplaatst. De bodem dient zo veel mogelijk de hele kookzone te bedekken. Gebruikers van een pacemaker dienen er rekening mee te houden dat het magnetische veld van invloed kan zijn op de werking. -
Page 121: Omschrijving Van De Apparatuur
OMSCHRIJVING VAN DE APPARATUUR Technische specificities Type 7330240 7331240 7332240 7370240 Total vermogen 6700 W 6700 W 7400 W 7400 W Energieverbruik van de kookplaat EChob** 173.6 Wh/kg 176.6 Wh/kg 174.2 Wh/kg 176.5 Wh/kg Vóórzijde links zone Ø 200 mm Ø... -
Page 122: Bedieningspaneel
Bedieningspaneel controlelampje timer Timer display vermogen display controlelampje kookzone warmhoudtoets controlelampje controlelampje pauze/herstart Aan/Uit vermogen selector “SLIDER” en timer booster pauze/herstart Aan/Uit toets toets toets instel zone IN GEBRUIK NEMEN Display display aanduiding functie de kookzone is geactiveerd. 1…9 vermogensniveau selectie van het vermogensniveau. -
Page 123: In Gebruik Nemen
IN GEBRUIK NEMEN Vóór het eerste gebruik Reinig de kookplaat met een vochtige doek en droog daarna het oppervlak grondig. Gebruik geen middelen die het risico hebben dat een blauwe sluier op het glas achterblijft. Inductie principe Onder iedere kookzone bevindt zich een inductiespoel. Wanneer deze wordt geactiveerd, produceert het een variabel elektromagnetisch veld die een inductiestroming verzorgt in de speciaal ferromagnetische bodem van de pan. -
Page 124: Beginnen
Beginnen Start/uitschakelen van de kookplaat: Actie Bedieningspaneel Display Starten druk toets [ 0/I ] [ 0 ] knippert Stoppen druk toets [ 0/I ] niets of [ H ] Start/uitschakelen van de kookzone: Actie Bedieningspaneel Display Zone keuze druk op display [ 0 ] selectie [ 0 ] controlelampje gaat aan sleep op de “SLIDER“... -
Page 125: Timer
Vermogen controle: De gehele kookplaat is uitgevoerd met een maximaal vermogen. Wanneer de booster functie is ingeschakeld, zorgt het elektronische systeem ervoor dat het vermogen van de andere zones wordt gereduceerd en dat het totale vermogen niet wordt overschreden. De display knippert op [ 9 ] gedurende een paar seconden en toont dan het maximale toegestane vermogen [ 6 ] or [ 8 ]. -
Page 126: Automatisch Koken
Eiwekker functie : Voorbeeld voor 29 minuten: Actie Bedieningspaneel Display Activeer de kookplaat druk op display [ 0/I ] zone controlelampjes aan Selecteer « Timer » druk op display [ CL ] [ 00 ] sleep de “SLIDER“ naar [ 9 ] Stel de unit in [ 0 bevestigd] [ 9 knippert ] Bevestig de units... -
Page 127: Opvraag Functie
Opvraag functie Nadat de kookplaat is uitgeschakeld[ 0/I ], is het mogelijk de laatste instellingen op te vragen. kook trajecten van alle kookzones (vermogen) minuten en seconden van geprogrammeerde kookzone gerelateerde timers opwarm functie de opvraag functie werkt als volgt: ... -
Page 128: Kook Adviezen
KOOK ADVIEZEN Pan kwaliteit Toepasbare materialen: staal, geëmailleerd staal, gietijzer, ferromagnetische roestvrij staal, aluminium met ferromagnetische bodem Niet aangepaste materialen: aluminium en roestvrij staal zonder ferromagnetische bodem, koper, messing, glas, keramiek, porselein. De fabrikanten geven het aan als hun producten geschikt zijn voor inductie Om te controleren of de pannen geschikt zijn : ... -
Page 129: Pan Afmetingen
Pan afmetingen De kookzones zijn, tot een bepaalde limiet, automatisch aangepast aan de diameter van de pan. Alhoewel de bodem van de pan minimaal dezelfde diameter moet hebben als de kookzone Om het beste resultaat uit de kookplaat te halen, moet de pan in het centrum van de kookzone geplaatst worden. -
Page 130: Wat Te Doen Als Een Probleem Zich Voordoet
WAT TE DOEN ALS EEN PROBLEEM ZICH VOORDOET Wanneer het [ E 4 ] symbool verschijnt: De plaat moet worden geconfigureerd. Onderneem de volgende stappen : I) Belangrijk : overtuig je dat er geen pannen meer op de kookplaat staan. II) Ontkoppel het apparaat van het elektriciteitsnet door het verwijderen van de zekering of het onderbreken van de stroomtoevoer. -
Page 131: Bescherming Van De Omgeving
Het bedieningspaneel toont [ C ] of [ E ]: neem contact met de servicedienst. Een of alle kookzones zijn uitgeschakeld: het beveiliging systeem is ingeschakeld. u bent vergeten om de kookzone enige tijd terug uit te schakelen. ... -
Page 132: Installatie Instructies
Plaats de pakking (2) twee millimeter van de buitenste hoek van het glas, na verwijdering van de afdekfolie(3). Installatie voorschriften de uitsnijmaten zijn: referentie uitsnijmaten 7330240 760 x 350 mm 7331240 560 x 490 mm 7332240 650 x 490 mm 7370240 560 x 490 mm ... -
Page 133: Elektrische Aansluiting
ELEKTRISCHE AANSLUITING De installatie en de aansluiting op het elektrisch net mogen enkel worden toevertrouwd aan een vakman (elektricien) die op de hoogte is van de voorgeschreven normen. Na de montage mag geen contact mogelijk zijn met onderdelen die bij het gebruik onder spanning staan. - Page 136 Foster spa 42041 Brescello (RE) - Italy tel. +39.0522.687425 - tel. Servizio Assistenza +39.0522.684450 fax +39.0522.686019 - fax Servizio Ricambi +39.0522.962166 e-mail: service@fosterspa.com www.fosterspa.com 14316-3...
Need help?
Do you have a question about the 7330240 and is the answer not in the manual?
Questions and answers