Philips 8000 Series Manual
Hide thumbs Also See for 8000 Series:

Advertisement

Quick Links

8000 series
S8860
www.philips.com/support/ifu

Advertisement

Table of Contents
loading

Summary of Contents for Philips 8000 Series

  • Page 1 8000 series S8860 www.philips.com/support/ifu...
  • Page 3 HQ87 HQ8508...
  • Page 4 empty page before TOC...
  • Page 5 English 6 简体中文...
  • Page 6: 
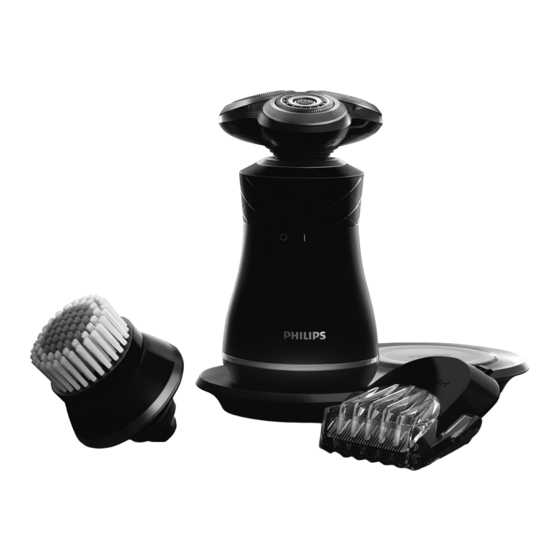
General Description (Fig.1)

    English General description (Fig.1) Protection cap for cleansing brush attachment 2 Click-on cleansing brush attachment 3 Protection cap for shaving unit 4 Click-on shaving unit 5 On/off ring 6 On/off indications 7 Handle 8 Battery low indicator 9 Charging pad 10 Charging platform 11 Charging indicator 12 USB plug...
  • Page 7 English Warning - The appliance is a Class III construction. - To charge the battery, only use the detachable supply unit (supply unit, type HQ87. Charging pad, type HQ8508) provided with the appliance. - This appliance can be used by children aged from 8 years and above and persons with reduced physical, sensory or...
  • Page 8 English - Always check the appliance before you use it. Do not use the appliance if it is damaged, as this may cause injury. Always replace a damaged part with one of the original type. - Do not open the appliance to replace the rechargeable battery.
  • Page 9 Electromagnetic fields (EMF) This Philips appliance complies with all applicable standards and regulations regarding exposure to electromagnetic fields. General - This shaver is waterproof. It is suitable for use in the bath or shower and for cleaning under the tap.
  • Page 10: Battery Charging

    English Charging Charge the appliance before you use it for the first time and when the battery low indicator indicates that the battery is almost empty. Note: The shaver is Qi compliant. Charging takes approx. 2 hours. A fully charged appliance has a operating time of up to 30 minutes.
  • Page 11: Battery Fully Charged

    English Battery fully charged When the battery is fully charged, the charging indicator lights up white continuously. Using the appliance Switching the appliance on and off 1 To switch on the appliance, turn the on/off ring anticlockwise to the 'on' indication (I). 2 To switch off the appliance, turn the on/off ring clockwise to the 'off' indication (0).
  • Page 12 English Note: Do not press too hard, this can cause skin irritation. 3 Switch off the appliance. 4 Clean the appliance after every use. Wet shaving For a more comfortable shave, you can also use this appliance on a wet face with shaving foam or shaving gel.To shave with shaving foam or shaving gel, follow the steps below: 1 Apply some water to your skin.
  • Page 13: Using Click-On Attachments

    English Using click-on attachments Removing or attaching the click-on attachment 1 Make sure the appliance is switched off. 2 Pull the attachment straight off the appliance. Note: Do not twist the attachment while you pull it off the appliance. 3 Insert the lug of the click-on attachment into the slot in the top of the appliance.
  • Page 14 English 2 Press the length selector and then push it to the left or right to select the desired hair length setting. 3 Switch on the appliance. 4 Move the appliance upwards while you exert gentle pressure. Make sure the front of the comb is in full contact with the skin.
  • Page 15 English and dirt, contributing to a healthy and oil-free skin. We advise you to use it no more than twice a day. Do not use the appliance on damaged or irritated skin or on wounds. 1 Make sure the appliance is switched off. 2 Remove the shaving unit from the appliance and attach the click-on cleansing brush.
  • Page 16: Cleaning And Maintenance

    English 8 After approx. 20 seconds, move the appliance to your forehead and start cleansing this part of your face. Gently move the brush head from left to right. Note: We advise you to not overdo the 20 sec. cleansing and to not cleanse any zone longer than 20 seconds.
  • Page 17: Thorough Cleaning

    English 4 Rinse the shaving head holder under a warm tap. 5 Carefully shake off excess water and let the shaving head holder air-dry completely. Never dry the shaving unit with a towel or tissue, as this may damage the shaving heads. 6 Reattach the shaving head holder to the bottom part of the shaving unit ('click').
  • Page 18 English Follow the correct instructions. 1 Switch off the shaver. 2 Pull the shaving head holder off the bottom part of the shaving unit. 3 Rinse the hair chamber and shaving head holder under the tap. 4 Turn the retaining ring anticlockwise and lift it off the shaving head.
  • Page 19 English 5 Remove the shaving heads from the shaving head holder. Each shaving head consists of a cutter and guard. Note: Do not clean more than one cutter and guard at a time, since they are all matching sets. If you accidentally put a cutter in the wrong shaving guard, it may take several weeks before optimal shaving performance is restored.
  • Page 20 English - Orange retaining ring: Place the retaining ring on the shaving head and turn it clockwise to reattach the retaining ring. Repeat this process for the other retaining rings. Each retaining ring has two recesses that fit exactly into the projections of the shaving head holder.
  • Page 21 English 1 Pull the comb off the beard styler attachment. Note: Grab the comb in the center to pull it off the beard styler attachment . Do not pull at the sides of the comb. 2 Rinse the cut hairs off the cutting unit with lukewarm water.
  • Page 22: Replacing The Cleansing Brush Head

    Replacing the shaving heads For maximum shaving performance, we advise you 2yrs to replace the shaving heads every two years. Replace damaged shaving heads immediately. Always replace the shaving heads with original Philips shaving heads (see 'Ordering accessories').
  • Page 23: Ordering Accessories

    Ordering accessories To buy accessories or spare parts, visit www.shop.philips.com/service or go to your Philips dealer. You can also contact the Philips Consumer Care Center in your country (see the international warranty leaflet for contact details). The following accessories and spare parts are...
  • Page 24: Warranty And Support

    Please take your product to an official collection point or a Philips service center to have a professional remove the rechargeable battery. - Follow your country’s rules for the separate collection of electrical and electronic products and rechargeable batteries.
  • Page 25 English Problem Possible cause Solution The charging Wrong supply unit Use the original Philips indicator on the used or supply unit 7.5W supply unit. charging pad malfunction (e.g. no lights up red. original Philips supply unit is used) Metal objects are...
  • Page 26 If the charging light on the charging plate still does not light up or if the appliance still does not charge, take it to your Philips dealer or the nearest Philips service centre. The appliance The battery is Charge the appliance.
  • Page 27 English Problem Possible cause Solution To clean the shaving heads thoroughly, remove the shaving heads from the shaving head holder one by one (see 'Replacement'). Then separate the cutter from its guard and rinse each matching set under the tap. After rinsing, place the cutter back into its corresponding guard.
  • Page 28 English Problem Possible cause Solution The brush feels If you experience the brush too harsh on the head as too harsh, we skin. advise you to start using the Sensitive or Extra Sensitive brush head. The Sensitive and Extra Sensitive brush heads have softer bristles.
  • Page 29 English Problem Possible cause Solution The smartphone is Your smartphone might not compatible not be compatible with Qi with Qi charging. charging; contact smartphone’s manufacturer or retailer. The beard styler Hairs or dirt Clean the beard styler. does not trim as obstruct the cutting well as it used to.
  • Page 30 简体中文 一般说明(图 1) 1 洁面刷附件保护盖 2 卡入式洁面刷附件 3 剃须刀头部件保护盖 4 卡入式剃须刀头部件 5 开/关环 6 开/关指示 7 手柄 8 电池电量不足指示灯 9 充电基座 10 充电架 11 充电指示灯 12 USB 插头 13 USB 插头接口 14 电源部件 15 清洁刷 16 卡入式胡须造型器附件 17 适用于胡须造型器附件的修剪梳 重要安全信息 使用本产品及其附件之前,请仔细阅读本重要信息,并...
  • Page 31 简体中文 警告 - 此符号表示该产品为 III 级构造。 要给电池充电 ,请仅使用该产品随附的可拆卸电源部件(电源 部件,类型 HQ87。 充电基座,类型 HQ8508)。 - 电源部件中包含一个变压器。 请勿自行更换电 源部件的插头,否则将导致严重后果。 - 产品不建议由有肢体、感官或精神能力缺陷或缺 少使用经验和知识的人(包括儿童)使用,除非 有负责他们安全的人对他们进行与产品使用有关 的监督或指导。 - 请照看好儿童,本产品不能用于玩耍。 - 使用前,请务必检查产品。 请勿使用损坏的产 品,否则可能对人体造成伤害。 请务必用原装 型号更换损坏的部件。 - 切勿拆开本产品更换充电电池。 警告 - 切勿将充电基座浸入水中。 - 务必确保充电基座完全干燥后,再将其连接至电 源插座。 - 切勿使用温度高于 60°C 的热水冲洗剃须刀。 - 只能将本产品用于用户手册中所示的原定用途。...
  • Page 32 简体中文 - 切勿使用压缩气体、钢丝绒、研磨性清洁剂或腐 蚀性液体(例如汽油或丙酮)来清洁产品。 - 请勿在包含电动空气清新器的墙壁插座上或其周 围使用电源部件,以免电源部件受到不可修复的 损坏。 电磁场 (EMF) 本 Philips 产品符合所有有关暴露于电磁场的适用标准 和法规。 概述 符号注释:适合于在洗澡或淋浴时使用。 允许在盛 水的浴缸、淋浴、洗脸盆或其他器皿附近使用本器 具。 该剃须刀具有防水性能。 适合在沐浴或淋浴时使 用,也可以放在水龙头下清洗。 电源部件适合在 100 - 240 伏的电源电压下工作。 该电源部件可将 100-240 伏的电压转换为 24 伏以 下的安全低电压。 充电 第一次使用本产品之前,以及当电池电量不足指示灯指 示电池电量快要耗尽时,请先为本产品充电。 注意: 剃须刀兼容 Qi。 充电约需 2 小时。 充满电的产品最长可使用 30 分钟。...
  • Page 33 简体中文 电池正在充电 剃须刀充电时,充电指示灯会呈白色闪烁。 电池电量不足 当电池的电量几乎耗尽时,电池低电量指示灯会呈橙色 闪烁。 电池已完全充满 电池充满电时,充电指示灯将呈白色持续亮起。 使用本产品 打开或关闭产品 1 要打开本产品,请将开/关环逆时针转至“开”指示 处 (I)。 2 要关闭本产品,请将开/关环顺时针转至“关”指示 处 (0)。...
  • Page 34 简体中文 剃须 皮肤适应期 前几次剃须可能不会带给您预期效果,并且您的皮肤可 能会受到轻度刺激。 这是正常的。 您的皮肤和胡须需 要时间适应任何新的剃须系统。 为了让您的皮肤适应 这款新产品,我们建议您在 3 周时间内定期(至少每 周 3 次)仅使用本产品剃须。 干剃 1 启动产品。 2 让剃须刀头在您的皮肤上作迂回运动,以刮剃向不 同方向生长的所有须发。 轻轻按压,以获取舒适贴 面的剃须感受。 注意: 不要用力按压剃须刀,这样做可能会导致皮 肤受刺激。 3 关闭产品。 4 每次使用后均应清洁产品。 湿剃 要获得更舒适的剃须体验,您也可以先用剃须泡沫或剃 须啫喱将脸弄湿,然后再用本产品进行剃须。要用剃须 泡沫或剃须啫喱剃须,请按照下面的步骤执行操作: 1 用水润湿皮肤。 2 在皮肤上涂抹剃须泡沫或剃须啫喱。 3 在水龙头下冲洗一下剃须刀头部件,确保剃须刀头 部件可以在您的皮肤上顺畅滑动。...
  • Page 35 简体中文 注意: 定期冲洗剃须刀头部件,确保其能够继续在 您的皮肤上顺畅滑动。 6 使用后,冲洗并轻轻擦干脸部,然后清洁本产品 (请 参见 '清洁和保养')。 注意: 确保冲洗干净本产品上的所有泡沫或剃须啫 喱。 使用卡入式附件 拆卸或安装卡入式附件 1 确保产品电源已关闭。 2 将附件竖直抽离产品。 注意: 将附件从产品上抽出时,不要旋转。 3 将卡入式附件的凸缘插入本产品顶部的槽内。 然 后,按下附件将其安装到本产品上(可听到“咔 哒”一声)。 使用带修剪梳的卡入式胡须造型器附件 您可以使用带修剪梳的胡须造型器附件以固定设置(也 可使用不同的长度设置)修整胡须。 您也可以在剃须 前用其预先修剪较长须发,以实现更舒适的剃须体验。 胡须造型器附件的长度设置对应修剪后剩余的须发长 度,范围为 1 到 5 毫米(3/64 - 3/16 英寸)。 1 将附件安装到产品上(可听到“咔哒”一声)。 将 修剪梳直接滑入胡须造型器附件两侧的导槽中(可...
  • Page 36 简体中文 2 按下长度选择器,然后将其向左或向右推动以选择 所需的须发长度设置。 3 启动产品。 4 向上移动产品,同时轻轻按压。 确保修剪梳的正面 与皮肤完全接触。 5 使用后要清洁附件。 使用不带修剪梳的卡入式胡须造型器附件 您可以使用不带修剪梳的胡须造型器附件将胡须、须 髭、鬓角或颈部轮廓修整至 0.5 毫米(1/32 英寸)的 长度。 1 将修剪梳抽离胡须造型器附件。 注意: 抓住修剪梳的中间位置,将其抽离胡须造型 器附件。 不要拉拔修剪梳的侧面。 2 启动产品。 3 将胡须造型器附件垂直放在皮肤上,向下移动产 品,同时轻轻按压。 4 使用后要清洁附件。 使用卡入式洁面刷附件 将旋转洁面刷与日常洁面产品一起使用。 洁面刷可去 除油脂和污垢,焕发健康无油脂的肌肤。建议每天使用 本产品不超过 2 次。 请不要在受伤或发炎的皮肤或伤口上使用本产品。...
  • Page 37 简体中文 1 确保产品电源已关闭。 2 从本产品上取下剃须刀头部件,然后装上卡入式洁 面刷。 3 用水湿润洁面刷。 警告: 切勿在洁面刷干燥的情况下使用产品,否则 可能会刺激皮肤。 4 用水润湿面部,并将洁面乳涂抹到脸上。 5 启动产品。 6 在鼻子至耳朵的皮肤上轻轻地移动刷头。 请勿用力 地将附件压在皮肤上,以确保舒适护理。 20 sec. 7 约 20 秒后,可将本产品移至另一侧面颊,开始清洁 这部分面部皮肤。 切勿清洁眼部周围的敏感区域。 20 sec.
  • Page 38 简体中文 8 约 20 秒后,可将本产品移至前额,开始清洁这部分 面部皮肤。 轻轻将刷头从左向右移动。 注意: 建议您不要过度清洁,任何部位的清洁时间 不要超过 20 秒钟。 9 护理后,洗脸并擦干。现在您可以进行日常面部护 20 sec. 肤的下一步了。 10 使用 (请参见 '清洁卡入式附件')后,请清洁洁面刷。 清洁和保养 清洁产品 每次剃须后请清洁剃须刀,以获得出色性能。 1 关闭产品。 2 用温水冲洗剃须刀头部件。 使用热水要当心。 切记先检查水温是否太高,以防 烫手。 3 将剃须刀头支架从剃须刀头部件的底部抽离。 4 用温水冲洗剃须刀头支架。...
  • Page 39 简体中文 5 小心地甩掉多余水分并彻底晾干剃须刀头支架。 不要用毛巾或纸巾擦拭剃须刀头部件,因为这样可 能会损坏剃须刀头。 6 将剃须刀头支架重新装回剃须刀头部件的底部(可 听到“咔哒”一声)。 清洁充电基座 1 使用微湿的布擦拭充电基座表面以清除所有尘垢。 2 清洁后,用干布干燥表面。 警告: 务必确保充电基座完全干燥,然后再连接至 电源插座。 彻底清洁 我们建议您每个月彻底清洁一次剃须刀头,或在剃须效 果没有以前好时进行清洁。 注意: 剃须刀头被蓝色或橙色固定环锁住。 按照正确的说明操作。 1 关闭剃须刀。...
  • Page 40 简体中文 2 将剃须刀头支架从剃须刀头部件的底部抽离。 3 在水龙头下冲洗胡茬储藏室和剃须刀头支架。 4 逆时针转动固定环,然后将它从剃须刀头中取出。 对其他固定环重复此过程。 将其存放在安全的地 方。 5 从剃须刀头支架上卸下剃须刀头。 每个剃须刀头都 包括刀片和网罩。 注意: 不要同时清洁多组刀片和网罩,因为它们都 是相互匹配的。 如果不小心将刀片装到了错误的网 罩上,则需要数周时间才能恢复产品的出色剃须性 能。...
  • Page 41 简体中文 6 在水龙头下清洁刀片和网罩。 7 甩掉多余的水份。 8 将刀片重新装回至网罩。 9 将剃须刀头装到剃须刀头支架中。 注意: 确保剃须刀头两侧的槽口正好卡入剃须刀头 支架上的凸起部位。 10 蓝色固定环: 将固定环放在剃须刀头上,顺时针旋 转以重新安装固定环。 将剃须刀头上的箭头与剃须刀头支架上的凸起部位 对齐。 顺时针旋转固定环,直至听到“咔哒”一 声,表明固定环已就位。 橙色固定环: 将固定环放在剃须刀头上,顺时针旋 转以重新安装固定环。 对其他固定环重复此过程。...
  • Page 42 简体中文 每个固定环均具有两个凹槽,正好能够装入剃须刀 头支架的凸缘上。 顺时针旋转固定环,直至听 到“咔哒”一声,表明固定环已就位。 当您重新插入剃须刀头并重新安装固定环时,请将 剃须刀头支架握在手中。 当您执行此操作时,切勿 将剃须刀头支架放在平面上,否则可能会造成损 坏。 11 将剃须刀头支架安装到剃须刀头部件的底部(可听 到“咔哒”一声)。 清洁卡入式附件 清洁卡入式洁面刷 1 确保产品电源已关闭。 2 从附件基座上卸下刷头。 注意: 将刷头从洁面刷基座上拉下时,不要旋转刷 头。 3 用温水和中性肥皂彻底清洁两个部件。 4 用毛巾擦干洁面刷。 清洁胡须造型器附件 每次使用后都要清洁胡须造型器附件。 1 将修剪梳抽离胡须造型器附件。 注意: 抓住修剪梳的中间位置,将其抽离胡须造型 器附件。 不要拉拔修剪梳的侧面。...
  • Page 43 简体中文 2 用温水冲洗修剪部件上的须发。 3 冲洗修剪梳上的须发。 4 从胡须造型器附件中取下修剪部件。 按下胡须造型 器附件中的修剪部件,您可以清理胡须造型器内积 累的须发。 您也可以冲洗修剪部件的背面。 5 冲洗出胡须造型器附件中的须发。 6 小心甩干多余的水份,并晾干修剪梳、修剪部件和 胡须造型器附件,以备下次使用。 7 修剪部件晾干后,请将其安装到胡须造型器附件。 8 修剪梳晾干后,请将其安装到胡须造型器附件。 9 为达到最佳效果,请定期用一滴缝纫机油润滑附件 齿部。 更换 更换洁面刷头 每 3 个月应更换一次刷头,或当刷毛在更短时间内出 现弯曲或损坏 (请参见 '订购配件')时更换。...
  • Page 44 简体中文 1 关闭产品。 2 从附件基座上卸下刷头。 3 丢弃用过的刷头(请参阅“回收”一章)。 4 将新的洁面刷刷头连接到洁面刷基座。 更换剃须刀头 为达到最佳剃须效果,建议每两年更换一次剃须刀头。 2yrs 立即更换损坏的剃须刀头。 务必使用原装飞利浦剃须刀头 (请参见 '订购配件')进行 更换。 1 要更换剃须刀头,请将剃须刀头从剃须刀头支架上 逐一卸下。 有关如何拆卸固定环和剃须刀头,请参 阅“彻底清洁”一章中的说明。 注意: 剃须刀头被蓝色或橙色固定环锁住。 按照正 确的说明操作。...
  • Page 45 简体中文 订购配件 要购买附件或备件,请访问 www.shop.philips.com/service 或联系您的飞利浦经销 商。 您还可以联系所在国家/地区的飞利浦客户服务中 心(请参阅全球保修卡了解详细联系信息)。 可选配以下附件和备件: SH90 飞利浦剃须刀头 RQ560 飞利浦洁面刷头 RQ111 飞利浦胡须造型器 HQ110 飞利浦剃须刀头清洁喷雾剂  回收 弃置本产品时,请不要将其与一般生活垃圾放在一 起,应将其交给政府指定的回收中心。 这样做将有 利于环保。 此产品包含内置充电电池;请勿将充电电池与一般 生活垃圾一起弃置。 请您将产品送到官方收集中心 或飞利浦服务中心,请专业人士移除充电电池。 遵循您的国家/地区有关分类回收电子电气产品和充 电电池的规定。 正确弃置产品有助于避免对环境和 人类健康造成不良后果。...
  • Page 46 (Cd) (Cr (VI) ) (PBB) (PBDE) PCB’s Electrical contact pins Power plug Internal metal parts SJ/T 11364 GB/T 26572 GB/T 26572 保修和支持 如需信息或支持,请访问 www.philips.com/support 或 阅读国际保修卡。 保修条款 由于剃须刀头(刀片和网罩)属于易磨损物品,因此不 在国际保修条款的涵盖范围之列。 故障处理方法 本章归纳了使用本产品最常遇到的问题。 如果您无法 根据以下信息解决问题,请访问 www.philips.com/support 查阅常见问题列表,或联系 您所在国家/地区的客户服务中心。 问题 可能的原因 解决方法 充电基座上的充电...
  • Page 47 简体中文 问题 可能的原因 解决方法 产品不能充电。 本产品未正确放到充 将本产品放到充电基座的充 电基座上。 电架上。 正确放置时,充电 基座将发出信号音,且充电 基座上的充电指示灯开始呈 白色闪烁。 电源部件插入的电源 检查是否存在电源故障,以 插座未通电。 及连接充电板的插座是否通 电。 如果您使用浴室柜中的 墙壁插座,则可能需要通过 开灯来接通插座电源。 如果充电板的充电指示灯仍 未亮起,或者如果产品仍无 法充电,请将其送往飞利浦 经销商处或附近的飞利浦服 务中心。 产品不能工作。 电池已耗尽。 为产品充电。 产品已关闭电源。 将开/关环逆时针转 至“开”指示处 (I)。 剃须刀头支架被污染 彻底清洁剃须刀头或将其 (请 或损坏,导致马达无 参见 '更换')更换。 有关如何 法运行。...
  • Page 48 简体中文 问题 可能的原因 解决方法 要彻底清洁剃须刀头,请将 剃须刀头从剃须刀头支架上 逐一 (请参见 '更换')卸下。 然后,分离刀片和网罩,并 在水龙头下冲洗每个刀片和 网罩套装。 冲洗后,将刀片 放回对应的网罩中。 最后, 将剃须刀头装回到剃须刀头 支架 (请参见 '更换')中。 我不知道本洁面刷 本洁面刷适合各种皮肤类 是否适合我的皮 型。 但是,如果皮肤存在干 肤。 燥、皲裂、开口伤处、正在 愈合的伤口、处于术后恢复 期,或者存在严重粉刺、晒 伤、皮肤感染、皮肤癌、发 炎、湿疹、牛皮癣等皮肤病 或皮肤过敏症状,请勿使用 本洁面刷。如果您正在服用 类固醇类药物,请勿使用本 洁面刷。 感觉刷头太粗糙。 如果感觉刷头太粗糙,建议 您先使用敏感或超敏感刷 头。 敏感和超敏感刷头的刷 毛更柔软。 建议您在敏感皮 肤上使用敏感刷头,在超敏...
  • Page 49 简体中文 问题 可能的原因 解决方法 适配器插入的电源插 检查是否存在电源故障,以 座未通电。 及连接充电板的插座是否通 电。 如果您使用浴室柜中的 墙壁插座,则可能需要通过 开灯来接通插座电源。 智能手机与 Qi 充电 您的智能手机可能与 Qi 充电 不兼容。 不兼容,请联系智能手机的 制造商或零售商。 胡须造型器的修剪 毛发或污垢堵塞了修 清洁胡须造型器。 效果没有以前好。 剪部件。 修剪部件需要润滑。 使用一滴缝纫机油润滑胡须 造型器附件齿部。 胡须造型器停止工 胡须造型器已损坏或 更换胡须造型器附件。 作。 磨损。 保留备用 发行日期: 01/04/2016...
  • Page 51 Empty page before back cover...
  • Page 52 © 2018 Koninklijke Philips N.V. All rights reserved 保留所有权利 4222.002.5918.3 (21/3/2018)

This manual is also suitable for:

S8860S8880

Table of Contents