Advertisement
Quick Links
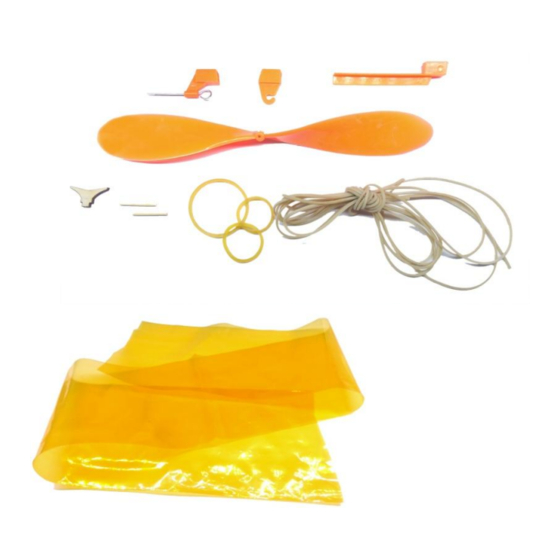
Your kit contains the following items
Pre- cut parts
Propeller rigging and rubber
Sandpaper
Covering sheet
The SkyFox offers great glide performance in a
rubber powered plane due to its built up wing.
With a simple body section and tailplane, this
plane can be built relatively simply.
It also features a unique covering techniques
where the film is supplied as a tube. Virtually no
gluing is required as the film is heated and shrinks
to for a firm fit around the wing.
This plane is a great project for the beginner to
intermediate builder.
Additional Items You May Need
* Foam safe glue
* Wood Glue
* Masking Tape
* Cling Wrap
* Hobby Knife
* Pliers
Advertisement

Related Manuals for MicronWings SkyFox


Summary of Contents for MicronWings SkyFox
- Page 1 Your kit contains the following items Pre- cut parts The SkyFox offers great glide performance in a Propeller rigging and rubber rubber powered plane due to its built up wing. Sandpaper With a simple body section and tailplane, this Covering sheet plane can be built relatively simply.
- Page 2 Refer to these pages as you follow this manual. When you see a part written in bold in the build instructions below, refer back to these pages to see which part it is. Leave the parts in the sheets until they are needed. Main Body Former Wings Main Spars Wings Leading...
-
Page 3: Getting Started
Getting Started For best results you will need a flat surface to work on. It’s preferable to have a flat piece of corkboard or sheet of Depron foam so you will be able to pin parts down if needed. (image for illustration purpose only – no plans supplied with this kit) It’s a good idea to put a layer of cling wrap over the work surface. - Page 4 When gluing in he leading and trailing edges, press them down from the top to slot in the ribs. Glue in place the Wings Leading Edge Spar ensuring that the end with the notch in it is attached to the outermost rib.
- Page 5 Sand the Wings Leading Edge Spar and the Wings Trailing Edge Spar at a slight angle so they fit flush together. Slide in the other Wing’s Main Spar and check that the trailing edge strips and leading edge strips from each wing meet flush in the middle. Finally, glue in place the other wing at the Wing Main Spar Joiner location.
- Page 6 Sand the Wing Boxing pieces to smooth and round off the leading and trailing edges. The wing covering sheet is made from heat shrinkable plastic. Cut the sleeve in half to make 2 sleeves. Next slide one sleeve over one of the wings. Glue it to the wood at the wing root using a foam safe glue.
- Page 7 Then glue in the Wing Mount Pegs and Wing Brace. Finally, glue in place the Wing Mount Boxing pieces for and aft. Propeller Assembly Take the pin and feed it through the Propeller Assembly as shown. Put the propeller on so the rounded part of the hub is toward the back (touching the Propeller Assembly).
- Page 8 Attach the Rubber Hook to the aft end of the Main Body Former leaving about 1cm of the former protruding. It should be a very firm fit, however, you may glue it in place if needed. Push on the Tailplane Mount to the aft end of the Main Body Former.
- Page 9 Rubber bands are attached in an X pattern to the pegs. The point of Balance should be 28mm from the leading edge of the wing. You may need to remove the tailplane and trim one centimetre at a time off the main body former to achieve the correct balance point.
- Page 10 Spare rubber can be purchased on MicronWings website. See a test flight video on Youtube (Link) Copyright © MicronWings 2015: All rights reserved. This manual is for personal use only. No unauthorized copying or digital distributing permitted without permission from MicronWings.
Need help?
Do you have a question about the SkyFox and is the answer not in the manual?
Questions and answers