Extron electronics VSW 2VGA A Setup Manual
Hide thumbs
Also See for VSW 2VGA A:
- User manual (40 pages) ,
- Specifications (2 pages) ,
- User manual (22 pages)
Advertisement
Table of Contents
This guide provides basic instructions for an experienced
installer to set up and operate the Extron VSW 2VGA A.
Installation
Step 1 — Mount the unit
Turn off or disconnect all equipment power sources and
mount the switcher (if applicable) in a rack shelf, under
furniture, or through furniture. See the user's manual for
details.
Step 2 — Power connector wiring
Wire the power connector as shown to the right.
C
Step 3 — Example configurations
The switcher can be configured in a single switcher or a daisy chained configuration.
N
The Extron VSW I AAP interface can be used in conjunction with the switcher. See the user
manual for details.
Sound System
Single switcher configuration
COMPUTER
Extron
VSW 1 AAP
Extron pre-made VGA
with audio cable
assemblies
Out
INPUT 1
INPUT 2
1
2
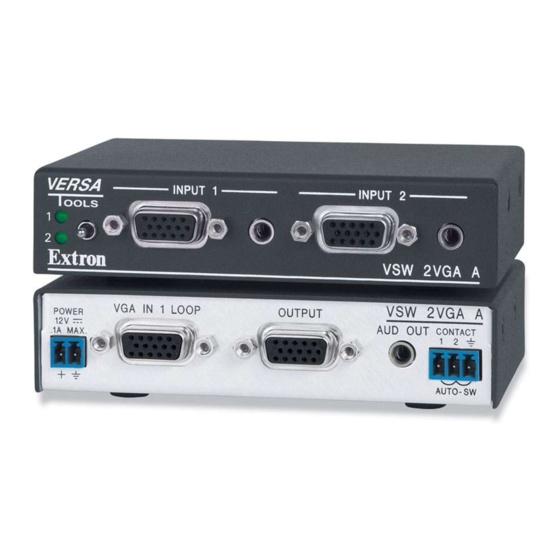
VSW 2VGA A
Multiple switcher daisy chain: loop configuration
Setup Guide — VSW 2VGA A
When connecting the power supply, voltage
polarity is extremely important. Applying power
with incorrect voltage polarity could damage
the power supply an dhte VSW 2VGA A. See
the user's manual for additional cautions and notes.
Projector
Extron
VSW 2VGA A
VGA Switcher
Two Button
Contact Closure
SHOW ME
AUDIO
VSW I AAP
SHOW ME
AUDIO
VSW I AAP
COMPUTER
VSW I
AAP
In 1
Out
INPUT 1
INPUT 2
1
2
VSW 2VGA A
VSW 2VGA A
In 2
Local Monitor
2
U T
I N P
A
G A
2 V
W
V S
1
U T
I N P
1
2
PC
SHOW ME
AUDIO
VSW I AAP
COMPUTER
VSW I
AAP
In 1
INPUT 1
INPUT 2
1
2
VSW 2VGA A
VSW 2VGA A
In 2
Extron pre-made VGA with audio cable assemblies
Smooth
Ridges
A
SECTION A–A
Power Supply
Output Cord
Laptop
SHOW ME
AUDIO
VSW I AAP
COMPUTER
VSW I
AAP
In 1
In 2
Out
INPUT 1
INPUT 2
1
2
VSW 2VGA A
VSW 2VGA A
VSW 2VGA A
In 2
(Continued on reverse side)
Captive
Screw
A
Connector
Tie
Wrap
3"
16 (5 mm)
Max.
Projector
Out
Advertisement
Table of Contents

Related Manuals for Extron electronics VSW 2VGA A


Summary of Contents for Extron electronics VSW 2VGA A
- Page 1 Setup Guide — VSW 2VGA A This guide provides basic instructions for an experienced installer to set up and operate the Extron VSW 2VGA A. Installation Step 1 — Mount the unit Turn off or disconnect all equipment power sources and...
- Page 2 Setup Guide — VSW 2VGA A VSW I AAP VSW I AAP VSW I AAP VSW I AAP SHOW ME SHOW ME SHOW ME SHOW ME AUDIO AUDIO AUDIO AUDIO COMPUTER VSW I AAP COMPUTER VSW I AAP VSW I AAP...
Need help?
Do you have a question about the VSW 2VGA A and is the answer not in the manual?
Questions and answers