
Subscribe to Our Youtube Channel
Related Manuals for Tektronix KEITHLEY 2450-EC


Summary of Contents for Tektronix KEITHLEY 2450-EC
- Page 1 www.tek.com/keithley Models 2450-EC, 2460-EC, and 2461-EC Potentiostats and Galvanostats User’s Manual 077110402 / November 2016 *P077110402* 077110402 A Gr eate r Me a s u re o f C onf id enc e...
- Page 2 Models 2450-EC, 2460-EC, and 2461-EC Potentiostats And Galvanostats User's Manual © 2016, Keithley Instruments Cleveland, Ohio, U.S.A. All rights reserved. Any unauthorized reproduction, photocopy, or use of the information herein, in whole or in part, without the prior written approval of Keithley Instruments is strictly prohibited. All Keithley Instruments product names are trademarks or registered trademarks of Keithley Instruments.
- Page 3 Safety precautions The following safety precautions should be observed before using this product and any associated instrumentation. Although some instruments and accessories would normally be used with nonhazardous voltages, there are situations where hazardous conditions may be present. This product is intended for use by qualified personnel who recognize shock hazards and are familiar with the safety precautions required to avoid possible injury.
- Page 4 For safety, instruments and accessories must be used in accordance with the operating instructions. If the instruments or accessories are used in a manner not specified in the operating instructions, the protection provided by the equipment may be impaired. Do not exceed the maximum signal levels of the instruments and accessories. Maximum signal levels are defined in the specifications and operating information and shown on the instrument panels, test fixture panels, and switching cards.
-
Page 5: Table Of Contents
Table of Contents Introduction ....................... 1-1 Introduction .......................... 1-1 Getting started ........................1-2 ® Configure the SMU Instrument for TSP scripts ................ 1-3 Select the high-impedance, output-off state ................1-3 Copy a script to the instrument ....................1-4 Cable assembly details ......................1-5 Connections and usage ....................... - Page 6 Table of Contents Models 2450-EC, 2460-EC, and 2461-EC Potentiostats And Galvanostats User's Manual Run the Potential Pulse and Square Wave test application ............4-3 Review the Menu controls ......................4-4 Configure the Pulse Settings ..................... 4-4 Adjust the End Conditions ......................4-8 Save or load the test parameter data ..................
-
Page 7: Introduction
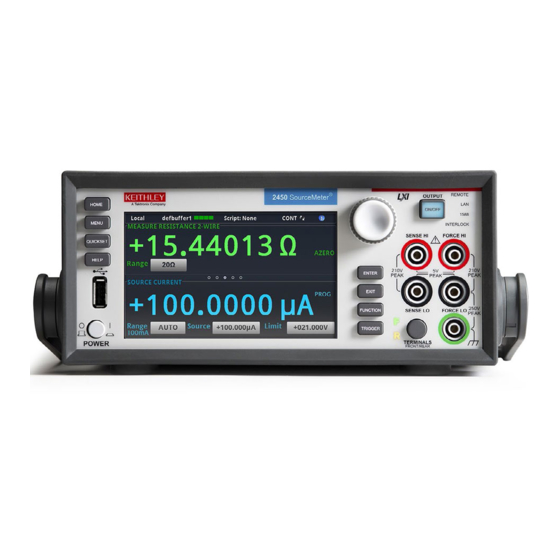
Section 1 Introduction In this section: Introduction ................1-1 Getting started ................1-2 Cable assembly details ............1-5 Connections and usage ............1-6 Introduction The Keithley Instruments Models 2450-EC, 2460-EC, and 2461-EC Potentiostat/Galvanostat systems are alternatives to traditional electrochemistry potentiostats and galvanostats. Your instrument features a full-color, high-resolution touchscreen, which lets you configure tests and immediately view results. -
Page 8: Getting Started
Section 1: Introduction Models 2450-EC, 2460-EC, and 2461-EC Potentiostats And Galvanostats User's Manual Getting started In addition to your SourceMeter instrument, you should have received the following items: • One electrochemistry interface cable that connects the instrument to a 2-, 3-, or 4-terminal electrochemical cell •... -
Page 9: Configure The Smu Instrument For Tsp Scripts
Models 2450-EC, 2460-EC, and 2461-EC Potentiostats And Galvanostats User's Manual Section 1: Introduction ® Configure the SMU Instrument for TSP scripts Make sure to select the TSP command set on your SourceMeter Instrument before running test scripts on your instrument. You only need to select the TSP command set once. To select the TSP command set: 1. -
Page 10: Copy A Script To The Instrument
Section 1: Introduction Models 2450-EC, 2460-EC, and 2461-EC Potentiostats And Galvanostats User's Manual Copy a script to the instrument Your SMU is shipped with all test applications and supporting scripts loaded into memory. If you accidentally delete a test application or a supporting script (EC_Framework.tsp or EC_Images.tsp), you can copy the files from the flash drive to your instrument. -
Page 11: Cable Assembly Details
Models 2450-EC, 2460-EC, and 2461-EC Potentiostats And Galvanostats User's Manual Section 1: Introduction 5. Select <. The test script is transferred to the instrument, and the corresponding filename is displayed in the Internal Scripts list. Figure 3: Copying the file to the instrument Cable assembly details The cable is an electrically-shielded 1 m (39.37 in.) assembly with stackable, safety banana plugs on both ends. -
Page 12: Connections And Usage
Section 1: Introduction Models 2450-EC, 2460-EC, and 2461-EC Potentiostats And Galvanostats User's Manual Connections and usage The cable assembly can be used with Keithley SMUs for electrochemistry applications. Each connector of the assembly is labeled according to its function: Figure 5: Cable assembly connector labels and definitions Make the SMU connections Connect to the instrument (all tests): The front panel of your SMU has four banana-style input and output jacks. -
Page 13: Make The Device Connections
Models 2450-EC, 2460-EC, and 2461-EC Potentiostats And Galvanostats User's Manual Section 1: Introduction Make the device connections The test cable lets you make connections to test cells with two, three, or four electrodes. For two-electrode applications, the device-side cable connectors are used in stacked pairs. Connect the WE and WES pair to the working electrode of your electrochemical cell, and connect the CE and RE pair to the counter electrode of the cell. -
Page 14: Attach The Alligator Clips
Section 1: Introduction Models 2450-EC, 2460-EC, and 2461-EC Potentiostats And Galvanostats User's Manual Attach the alligator clips Four insulated alligator clips are supplied. You can attach these clips to the ends of the device-side connectors, as shown in the following graphic. The clips provide a safe, secure way to connect to your device. -
Page 15: Home And Menu Screen Overview
Models 2450-EC, 2460-EC, and 2461-EC Potentiostats And Galvanostats User's Manual Section 1: Introduction Home and Menu screen overview Before you run a test application, the default Home and Menu screens of your SourceMeter instrument appear like those in the next graphic. Press the HOME or MENU keys on your instrument to access these screens. -
Page 16: Cyclic Voltammetry
Section 2 Cyclic Voltammetry In this section: Cyclic Voltammetry ..............2-1 Cyclic Voltammetry Cyclic Voltammetry, a type of potential sweep method, is the most commonly-used measurement electrochemical technique. In a Cyclic Voltammetry experiment, the working electrode potential is ramped linearly versus time. The current that flows through the circuit is measured. -
Page 17: Test Application Parameters
Section 2: Cyclic Voltammetry Models 2450-EC, 2460-EC, and 2461-EC Potentiostats And Galvanostats User's Manual Test application parameters You must enter test parameters that are consistent with the following values. Otherwise, you may receive unsettled and inaccurate measurements. The Cyclic Voltammetry test application parameters are listed below. Model 2450-EC •... -
Page 18: Run The Cyclic Voltammetry Test Application
Models 2450-EC, 2460-EC, and 2461-EC Potentiostats And Galvanostats User's Manual Section 2: Cyclic Voltammetry Run the Cyclic Voltammetry test application To run the test application: 1. Press the HOME key. 2. Select the active script indicator at the top of your home screen. If there is no script activity, the indicator displays "No Script."... -
Page 19: Review The Menu Controls
Section 2: Cyclic Voltammetry Models 2450-EC, 2460-EC, and 2461-EC Potentiostats And Galvanostats User's Manual The test home screen controls include: Select this control to immediately stop the test and return to normal SMU End App operation. Select this control to define the graph based upon the plotted data. This is Autoscale useful for constraining all of the data to the screen's viewing size. -
Page 20: Define The Potential Scan Parameters
Models 2450-EC, 2460-EC, and 2461-EC Potentiostats And Galvanostats User's Manual Section 2: Cyclic Voltammetry Define the potential scan parameters You will define the potential scan parameters: Number of Vertices, vertex potentials, potential reference, scan rate, and number of cycles. An example of a potential scan performed during a Cyclic Voltammetry test is shown in the next figure. - Page 21 Section 2: Cyclic Voltammetry Models 2450-EC, 2460-EC, and 2461-EC Potentiostats And Galvanostats User's Manual 3. Enter the number of potential vertices. You can define two, three, or four vertices. 4. The vertex selections will change based on the number of vertices you choose. Select each vertex to enter its potential.
-
Page 22: Define The Scan Settings
Models 2450-EC, 2460-EC, and 2461-EC Potentiostats And Galvanostats User's Manual Section 2: Cyclic Voltammetry Define the Scan Settings You can specify the scan rate in units of millivolts per second. The scan rate, defined as the change of the potential as a function of time (∆E/∆t), determines the rate at which the potential is linearly scanned during the experiment. -
Page 23: Select The Sampling Rate Units, Sampling Rate, And Current Range
Section 2: Cyclic Voltammetry Models 2450-EC, 2460-EC, and 2461-EC Potentiostats And Galvanostats User's Manual The following figure shows an example of a potential versus time graph showing three cycles of a three-vertex voltage sweep. Figure 23: Example potential versus time graph Select the Sampling Rate Units, Sampling Rate, and Current Range Specify how often to make measurements during the scan by selecting one of the sampling rate units shown in the following table and setting a value for the sampling rate. - Page 24 Models 2450-EC, 2460-EC, and 2461-EC Potentiostats And Galvanostats User's Manual Section 2: Cyclic Voltammetry To set the Sampling Rate: 1. From the Measure Settings screen, select Sampling Rate. 2. Enter a value. 3. Select OK. Now, you will select the Current Range to measure the current from the scan. Choose the range based upon the largest current magnitude you expect during the test.
-
Page 25: Save Or Load The Test Parameter Data
Section 2: Cyclic Voltammetry Models 2450-EC, 2460-EC, and 2461-EC Potentiostats And Galvanostats User's Manual Save or load the test parameter data You can save your test parameters to the front-panel flash drive at any time. Up to five test parameter configurations can be stored. - Page 26 Models 2450-EC, 2460-EC, and 2461-EC Potentiostats And Galvanostats User's Manual Section 2: Cyclic Voltammetry To load saved test parameters: Test parameters can only be loaded to the same instrument model on which they were created and saved. For example, you cannot load test parameter settings created with a 2450-EC to a 2460-EC. 1.
-
Page 27: Run The Test And View The Graph
Section 2: Cyclic Voltammetry Models 2450-EC, 2460-EC, and 2461-EC Potentiostats And Galvanostats User's Manual Run the test and view the graph To run the test and view the graph: 1. Press the HOME key. 2. Select Start Test. The output turns on automatically, and the display shows the current measurements plotting in real time, along with a progress bar at the bottom of the screen. -
Page 28: Acquire The Open Circuit Potential (Eoc)
Models 2450-EC, 2460-EC, and 2461-EC Potentiostats And Galvanostats User's Manual Section 2: Cyclic Voltammetry Acquire the open circuit potential (Eoc) If you selected Eoc as the potential reference for the scan, then the open circuit potential will be measured immediately after starting the test. You are prompted by the test application, as shown in the next figure. -
Page 29: Save The Test Data To The Flash Drive
Section 2: Cyclic Voltammetry Models 2450-EC, 2460-EC, and 2461-EC Potentiostats And Galvanostats User's Manual Save the test data to the flash drive You can save the data generated from the test to the front-panel flash drive. The data is stored in a .csv file that also includes instrument information and parameter settings. -
Page 30: View The Event Log
Models 2450-EC, 2460-EC, and 2461-EC Potentiostats And Galvanostats User's Manual Section 2: Cyclic Voltammetry View the Event Log From the main Menu, you can select Event Log. The event log records events, which can be errors, warnings, and information reported by your instrument. Through the Event Log menu, you can view these events. -
Page 31: Cyclic Voltammetry Theory
Section 2: Cyclic Voltammetry Models 2450-EC, 2460-EC, and 2461-EC Potentiostats And Galvanostats User's Manual Cyclic Voltammetry theory A typical electrochemical measurement circuit, which consists of an electrochemical cell, an adjustable voltage source (V ), an ammeter (A ), and a voltmeter (V ), is shown in the following figure. - Page 32 Models 2450-EC, 2460-EC, and 2461-EC Potentiostats And Galvanostats User's Manual Section 2: Cyclic Voltammetry The voltage peaks in the waveform are the anodic (E ) and the cathodic (E ) peak potentials. Figure 38: Example voltammogram generated by a 2450-EC In this example, the scan begins at E1 and the potential becomes more positive, causing the anodic current (to rise rapidly and peak at the anodic peak potential (E At E2, the scan direction switches to negative for the reverse scan.
- Page 33 Section 2: Cyclic Voltammetry Models 2450-EC, 2460-EC, and 2461-EC Potentiostats And Galvanostats User's Manual Analog integration current method To measure the resulting current at each step, many digital potentiostats make a single current measurement at a fixed point (t) for each discrete voltage step, which may not be at the same time for each step.
- Page 34 Models 2450-EC, 2460-EC, and 2461-EC Potentiostats And Galvanostats User's Manual Section 2: Cyclic Voltammetry Open circuit potential theory When the open circuit potential is measured, no current or voltage is applied to the cell. This voltage measurement is made using the galvanostat to source current and measure voltage (see the next figure).
-
Page 35: Open Circuit Potential
Section 3 Open Circuit Potential In this section: Open Circuit Potential .............. 3-1 Open Circuit Potential The Open Circuit Potential (OCP) of an electrochemical cell is the voltage between the reference and working electrodes. When the open circuit potential is measured, a voltmeter with high impedance is used to measure the voltage with no current or voltage applied to the cell. -
Page 36: Test Application Parameters
Section 3: Open Circuit Potential Models 2450-EC, 2460-EC, and 2461-EC Potentiostats And Galvanostats User's Manual Test application parameters You must enter test parameters that are consistent with the following values. Otherwise, you may receive unsettled and inaccurate measurements. The Open Circuit Potential test application parameters are listed below. Model 2450-EC •... -
Page 37: Review The Menu Controls
Models 2450-EC, 2460-EC, and 2461-EC Potentiostats And Galvanostats User's Manual Section 3: Open Circuit Potential 4. Select OpenCircuitPotential. The test application begins to run immediately and the OCP Home screen is displayed. Figure 46: Open Circuit Potential test home screen The test home screen controls include: Select this control to immediately stop the test and return to normal SMU End App... -
Page 38: Adjust The Measure Settings
Section 3: Open Circuit Potential Models 2450-EC, 2460-EC, and 2461-EC Potentiostats And Galvanostats User's Manual Adjust the Measure Settings When you run the test application, you must define the parameters for the open circuit potential measurements. These parameters are the Potential range, Sample Count, and the Sample Interval. To select the Potential Range: 1. - Page 39 Models 2450-EC, 2460-EC, and 2461-EC Potentiostats And Galvanostats User's Manual Section 3: Open Circuit Potential 2. Enter a value. Now you will specify the sample interval time in seconds per point. The sample interval time is illustrated in the next figure. You can choose an interval from 0.75 to 100 seconds per point. Figure 51: Sample Interval time, graphic description To specify the Sample Interval: 1.
-
Page 40: Save Or Load The Test Parameter Data
Section 3: Open Circuit Potential Models 2450-EC, 2460-EC, and 2461-EC Potentiostats And Galvanostats User's Manual Save or load the test parameter data You can save your test parameters to the front-panel flash drive at any time. Up to five test parameter configurations can be stored. -
Page 41: Run The Test And View The Graph
Models 2450-EC, 2460-EC, and 2461-EC Potentiostats And Galvanostats User's Manual Section 3: Open Circuit Potential To load saved test parameters: Test parameters can only be loaded to the same instrument model on which they were created and saved. For example, you cannot load test parameter settings created with a 2450-EC to a 2460-EC. 1. -
Page 42: Save The Test Data To The Flash Drive
Section 3: Open Circuit Potential Models 2450-EC, 2460-EC, and 2461-EC Potentiostats And Galvanostats User's Manual You can use the touchscreen to manipulate the graph or add cursors. See your Interactive ® SourceMeter Instrument Reference Manual for more information. You can save a screen capture to a flash drive inserted into the USB port of the galvanostat by simultaneously pressing the HOME key and the ENTER key. -
Page 43: View The Results Saved To The Flash Drive
Models 2450-EC, 2460-EC, and 2461-EC Potentiostats And Galvanostats User's Manual Section 3: Open Circuit Potential View the results saved to the flash drive To view the test results, open the saved file in a spreadsheet program on a computer. Current, voltage, time, and general parameters for the test are included in the file. -
Page 44: View The Event Log
Section 3: Open Circuit Potential Models 2450-EC, 2460-EC, and 2461-EC Potentiostats And Galvanostats User's Manual View the Event Log From the main Menu, you can select Event Log. The event log records events, which can be errors, warnings, and information reported by your instrument. Through the Event Log menu, you can view these events. -
Page 45: Potential Pulse & Square Wave
Section 4 Potential Pulse & Square Wave In this section: Potential Pulse and Square Wave ..........4-1 Potential Pulse and Square Wave In the Potential Pulse and Square Wave test, the SMU potentiostat supplies a series of up to 100,000 potential pulses. -
Page 46: Test Application Parameters
Section 4: Potential Pulse & Square Wave Models 2450-, 2460-, & 2461-EC Potentiostats And Galvanostats User's Manual Test application parameters You must enter test parameters that are consistent with the following values. Otherwise, you may receive unsettled and inaccurate measurements. The Potential Pulse and Square Wave test application parameters are listed below: Model 2450-EC •... -
Page 47: Run The Potential Pulse And Square Wave Test Application
Models 2450-, 2460-, & 2461-EC Potentiostats And Galvanostats User's Manual Section 4: Potential Pulse & Square Wave Run the Potential Pulse and Square Wave test application To run the test application: 1. Press the HOME key. 2. Select the active script indicator at the top of your home screen. If there is no script activity, the indicator displays "No Script."... -
Page 48: Review The Menu Controls
Section 4: Potential Pulse & Square Wave Models 2450-, 2460-, & 2461-EC Potentiostats And Galvanostats User's Manual The test home screen controls include: Select this control to immediately stop the test and return to normal SMU End App operation. Select this control to define the graph based upon the plotted data. This is Autoscale useful for constraining all of the data to the screen's viewing size. - Page 49 Models 2450-, 2460-, & 2461-EC Potentiostats And Galvanostats User's Manual Section 4: Potential Pulse & Square Wave To adjust the Base Potential: 1. From the Pulse Settings screen, select Base Potential. 2. Enter a value. Figure 67: Entering a Base Potential 3.
- Page 50 Section 4: Potential Pulse & Square Wave Models 2450-, 2460-, & 2461-EC Potentiostats And Galvanostats User's Manual To set the Current Range: 1. Select Current Range. 2. Choose a value. Note that the choices are different depending on your potentiostat. Figure 69: Selecting the Current measure Range The current measure range constrains the maximum current that will flow through the device under test (DUT).
- Page 51 Models 2450-, 2460-, & 2461-EC Potentiostats And Galvanostats User's Manual Section 4: Potential Pulse & Square Wave To adjust the Pulse Width: 1. From the Pulse Settings screen, select Pulse Width. 2. Enter a value. The Pulse Width can be no more than 99 percent of the Period setting. Figure 71: Entering the Pulse Width 3.
-
Page 52: Adjust The End Conditions
Section 4: Potential Pulse & Square Wave Models 2450-, 2460-, & 2461-EC Potentiostats And Galvanostats User's Manual Adjust the End Conditions The End Conditions menu lets you choose the conditions that stop the pulse wave. You can enable or disable each condition. See the next graphic. Figure 73: End Conditions menu enable or disable option If you enable the Number of Cycles, the Program Time is disabled. -
Page 53: Save Or Load The Test Parameter Data
Models 2450-, 2460-, & 2461-EC Potentiostats And Galvanostats User's Manual Section 4: Potential Pulse & Square Wave Use the Program Time end condition to stop generating the waveform after a specified time interval. The pulse wave stops at the nearest half-cycle after the time interval elapses. To configure the Program Time end condition: 1. - Page 54 Section 4: Potential Pulse & Square Wave Models 2450-, 2460-, & 2461-EC Potentiostats And Galvanostats User's Manual 2. You are notified when the save is complete. Select OK to clear the prompt. Figure 76: Successful file save To load saved test parameters: Test parameters can only be loaded to the same instrument model on which they were created and saved.
-
Page 55: Run The Test And View The Graph
Models 2450-, 2460-, & 2461-EC Potentiostats And Galvanostats User's Manual Section 4: Potential Pulse & Square Wave Run the test and view the graph To run the test and view the graph: 1. Press the HOME key. 2. Select Start Test. The output turns on and the display automatically shows the current measurements plotting in real time, along with a progress bar at the bottom of the screen. -
Page 56: Save The Test Data To The Flash Drive
Section 4: Potential Pulse & Square Wave Models 2450-, 2460-, & 2461-EC Potentiostats And Galvanostats User's Manual Save the test data to the flash drive You can save the data generated from the test to the front-panel flash drive. The data is stored in a .csv file that also includes instrument information and parameter settings. -
Page 57: View The Event Log
Models 2450-, 2460-, & 2461-EC Potentiostats And Galvanostats User's Manual Section 4: Potential Pulse & Square Wave You can also view the measurement statistics. Select Statistics from the Menu screen. Figure 81: Viewing measurement Statistics View the Event Log From the main Menu, you can select Event Log. The event log records events, which can be errors, warnings, and information reported by your instrument. -
Page 58: Current Pulse And Square Wave
Section 5 Current Pulse and Square Wave In this section: Current Pulse and Square Wave ..........5-1 Current Pulse and Square Wave In the Current Pulse and Square Wave test, the SMU galvanostat supplies a series of up to 100,000 current pulses. -
Page 59: Test Application Parameters
Section 5: Current Pulse and Square Wave Models 2450-, 2460-, & 2461-EC Potentiostats And Galvanostats User's Manual Test application parameters You must enter test parameters that are consistent with the following values. Otherwise, you may receive unsettled and inaccurate measurements. The Current Pulse and Square Wave test application parameters are listed below: Model 2450-EC •... -
Page 60: Run The Current Pulse And Square Wave Test Application
Models 2450-, 2460-, & 2461-EC Potentiostats And Galvanostats User's Manual Section 5: Current Pulse and Square Wave Run the Current Pulse and Square Wave test application To run the test application: 1. Press the HOME key. 2. Select the active script indicator at the top of your home screen. If there is no script activity, the indicator displays "No Script."... -
Page 61: Review The Menu Controls
Section 5: Current Pulse and Square Wave Models 2450-, 2460-, & 2461-EC Potentiostats And Galvanostats User's Manual The test home screen controls include: Select this control to immediately stop the test and return to normal SMU End App operation. Select this control to define the graph based upon the plotted data. This is Autoscale useful for constraining all of the data to the screen's viewing size. - Page 62 Models 2450-, 2460-, & 2461-EC Potentiostats And Galvanostats User's Manual Section 5: Current Pulse and Square Wave To adjust the Base Current: 1. From the Pulse Settings screen, select Base Current. 2. Enter a value. Figure 89: Entering the Base Current 3.
- Page 63 Section 5: Current Pulse and Square Wave Models 2450-, 2460-, & 2461-EC Potentiostats And Galvanostats User's Manual The potential range constrains the potential that can develop across the device under test (DUT). Make sure to choose a range higher than your expected maximum potential. Setting the potential range also sets a potential limit, which can be used to stop the test or otherwise protect your DUT.
-
Page 64: Adjust The End Conditions
Models 2450-, 2460-, & 2461-EC Potentiostats And Galvanostats User's Manual Section 5: Current Pulse and Square Wave The Sample Time is the length of time over which the actual measurement is taken. The sample time cannot exceed the Pulse Width minus 1 ms (PW - 1 ms). The measurement is taken at the end of the pulse. - Page 65 Section 5: Current Pulse and Square Wave Models 2450-, 2460-, & 2461-EC Potentiostats And Galvanostats User's Manual If you enable the Number of Cycles, the Program Time is disabled, Conversely, if you enable the Program Time, the Number of Cycles condition is disabled. The Source Limit setting is independent of the other two settings.
-
Page 66: Save Or Load The Test Parameter Data
Models 2450-, 2460-, & 2461-EC Potentiostats And Galvanostats User's Manual Section 5: Current Pulse and Square Wave Save or load the test parameter data You can save your test parameters to the front-panel flash drive at any time. Up to five test parameter configurations can be stored. -
Page 67: Run The Test And View The Graph
Section 5: Current Pulse and Square Wave Models 2450-, 2460-, & 2461-EC Potentiostats And Galvanostats User's Manual To load saved test parameters: Test parameters can only be loaded to the same instrument model on which they were created and saved. For example, you cannot load test parameter settings created with a 2450-EC to a 2460-EC. 1. -
Page 68: Save The Test Data To The Flash Drive
Models 2450-, 2460-, & 2461-EC Potentiostats And Galvanostats User's Manual Section 5: Current Pulse and Square Wave You can use the touchscreen to manipulate the graph or add cursors. See your Interactive ® SourceMeter Instrument Reference Manual for more information. You can save a screen capture to a flash drive inserted into the USB port of the galvanostat by simultaneously pressing the HOME key and the ENTER key. -
Page 69: View The Results Saved To The Flash Drive
Section 5: Current Pulse and Square Wave Models 2450-, 2460-, & 2461-EC Potentiostats And Galvanostats User's Manual View the results saved to the flash drive To view the test results, open the saved file in a spreadsheet program on a computer. Current, voltage, time, and general parameters for the test are included in the file. -
Page 70: View The Event Log
Models 2450-, 2460-, & 2461-EC Potentiostats And Galvanostats User's Manual Section 5: Current Pulse and Square Wave View the Event Log From the main Menu, you can select Event Log. The event log records events, which can be errors, warnings, and information reported by your instrument. Through the Event Log menu, you can view these events. -
Page 71: Chronoamperometry
Section 6 Chronoamperometry In this section: Chronoamperometry ..............6-1 Chronoamperometry In the Chronoamperometry test, your SMU potentiostat steps the potential to a user-defined value where it is held constant for a specified period. As this potential is held, the instrument measures the resulting current at user-defined time intervals. -
Page 72: Test Application Parameters
Section 6: Chronoamperometry Models 2450-EC, 2460-EC, and 2461-EC Potentiostats And Galvanostats User's Manual Test application parameters You must enter test parameters that are consistent with the following values. Otherwise, you may receive unsettled and inaccurate measurements. The Chronoamperometry test application parameters are listed below: Model 2450-EC •... - Page 73 Models 2450-EC, 2460-EC, and 2461-EC Potentiostats And Galvanostats User's Manual Section 6: Chronoamperometry 3. Select the preloaded Chronoamperometry test script (potentiostats and galvanostats only) or connect the supplied USB drive to your SMU instrument to locate the included Chronoamperometry test. If you connect the USB drive, scripts on the drive are displayed with usb1/ before the script file name.
-
Page 74: Review The Menu Controls
Section 6: Chronoamperometry Models 2450-EC, 2460-EC, and 2461-EC Potentiostats And Galvanostats User's Manual Review the Menu controls You have different options in the Menu screen, depending on the application. The following graphic shows the Chronoamperometry main Menu. You will learn the function for each option later in this section. - Page 75 Models 2450-EC, 2460-EC, and 2461-EC Potentiostats And Galvanostats User's Manual Section 6: Chronoamperometry The Chronoamperometry test application allows you to add up to ten steps, though such multi-step procedures are not common. The most common protocols for Chronoamperometry tests use a single step.
- Page 76 Section 6: Chronoamperometry Models 2450-EC, 2460-EC, and 2461-EC Potentiostats And Galvanostats User's Manual To select the Current Range: 1. From the Measure Settings window, select Current Range. 2. Choose a range greater than the highest current you expect to measure. The available current ranges for the 2450-EC and 2460-EC / 2461-EC are shown in the next figure.
-
Page 77: Save Or Load The Test Parameter Data
Models 2450-EC, 2460-EC, and 2461-EC Potentiostats And Galvanostats User's Manual Section 6: Chronoamperometry To select the Sample Time: 1. From the Measure Settings window, select Sample Time. 2. Enter a value, then select OK. Figure 114: Entering the Sample Time Save or load the test parameter data You can save your test parameters to the front-panel flash drive at any time. - Page 78 Section 6: Chronoamperometry Models 2450-EC, 2460-EC, and 2461-EC Potentiostats And Galvanostats User's Manual 2. You are notified when the save is complete. Select OK to clear the prompt. Figure 116: Successful file save To load saved test parameters: Test parameters can only be loaded to the same instrument model on which they were created and saved.
-
Page 79: Run The Test And View The Graph
Models 2450-EC, 2460-EC, and 2461-EC Potentiostats And Galvanostats User's Manual Section 6: Chronoamperometry Run the test and view the graph To start the experiment and view the graph: 1. Press the HOME key. 2. Select Start Test. The output turns on and the display automatically shows the current measurements plotting in real time, along with a progress bar at the bottom of the screen. -
Page 80: Save The Test Data To The Flash Drive
Section 6: Chronoamperometry Models 2450-EC, 2460-EC, and 2461-EC Potentiostats And Galvanostats User's Manual Save the test data to the flash drive You can save the data generated from the test to the front-panel flash drive. The data is stored in a .csv file that also includes instrument information and parameter settings. -
Page 81: View The Event Log
Models 2450-EC, 2460-EC, and 2461-EC Potentiostats And Galvanostats User's Manual Section 6: Chronoamperometry You can also view the measurement statistics. Select Statistics from the Menu screen. Figure 121: Viewing measurement Statistics View the Event Log From the main Menu, you can select Event Log. The event log records events, which can be errors, warnings, and information reported by your instrument. -
Page 82: Chronopotentiometry
Section 7 Chronopotentiometry In this section: Chronopotentiometry ..............7-1 Chronopotentiometry In the Chronopotentiometry test, your SMU steps the supplied current to a user-defined value where it is held constant for a specified period. As this current is held, the instrument measures the resulting potential at user-defined time intervals. -
Page 83: Test Application Parameters
Section 7: Chronopotentiometry Models 2450-EC, 2460-EC, and 2461-EC Potentiostats And Galvanostats User's Manual Test application parameters You must enter test parameters that are consistent with the following values. Otherwise, you may receive unsettled and inaccurate measurements. The Chronopotentiometry test application parameters are listed below: Model 2450-EC •... - Page 84 Models 2450-EC, 2460-EC, and 2461-EC Potentiostats And Galvanostats User's Manual Section 7: Chronopotentiometry 3. Select the preloaded Chronopotentiometry test script (potentiostats and galvanostats only) or connect the supplied USB drive to your SMU instrument to locate the included Chronopotentiometry test. If you connect the USB drive, test scripts on the drive are displayed with usb1/ before the script file name.
-
Page 85: Review The Menu Controls
Section 7: Chronopotentiometry Models 2450-EC, 2460-EC, and 2461-EC Potentiostats And Galvanostats User's Manual Review the Menu controls You have different options in the Menu screen, depending on the application. The following graphic shows the Chronopotentiometry main Menu. You will learn the function for each option later in this section. - Page 86 Models 2450-EC, 2460-EC, and 2461-EC Potentiostats And Galvanostats User's Manual Section 7: Chronopotentiometry To define the Number of Steps: 1. Press the MENU key, then select Step Settings. 2. Select Number of Steps. 3. Enter a value, then select OK. The next figure shows three steps defined. Figure 130: Step Settings menu Next, you must define the Current and Duration for each step.
- Page 87 Section 7: Chronopotentiometry Models 2450-EC, 2460-EC, and 2461-EC Potentiostats And Galvanostats User's Manual To select the Potential Range: 1. From the Measure Settings window, select Potential Range. 2. Choose a range greater than the highest voltage you expect to measure. The available potential ranges for the 2450-EC and 2460-EC / 2461-EC are shown in the next figure.
-
Page 88: Save Or Load The Test Parameter Data
Models 2450-EC, 2460-EC, and 2461-EC Potentiostats And Galvanostats User's Manual Section 7: Chronopotentiometry To select the Sample Time: 1. From the Measure Settings window, select Sample Time. 2. Enter a value, then select OK. Figure 134: Entering the Sample Time Save or load the test parameter data You can save your test parameters to the front-panel flash drive at any time. - Page 89 Section 7: Chronopotentiometry Models 2450-EC, 2460-EC, and 2461-EC Potentiostats And Galvanostats User's Manual 2. You are notified when the save is complete. Select OK to clear the prompt. Figure 136: Successful file save To load saved test parameters: Test parameters can only be loaded to the same instrument model on which they were created and saved.
-
Page 90: Run The Test And View The Graph
Models 2450-EC, 2460-EC, and 2461-EC Potentiostats And Galvanostats User's Manual Section 7: Chronopotentiometry Run the test and view the graph To start the experiment and view the graph: 1. Press the HOME key. 2. Select Start Test. The output turns on and the display automatically shows the potential measurements plotting in real time, along with a progress bar at the bottom of the screen. -
Page 91: Save The Test Data To The Flash Drive
Section 7: Chronopotentiometry Models 2450-EC, 2460-EC, and 2461-EC Potentiostats And Galvanostats User's Manual Save the test data to the flash drive You can save the data generated from the test to the front-panel flash drive. The data is stored in a .csv file that also includes instrument information and parameter settings. -
Page 92: View The Event Log
Models 2450-EC, 2460-EC, and 2461-EC Potentiostats And Galvanostats User's Manual Section 7: Chronopotentiometry You can also view the measurement statistics. Select Statistics from the Menu screen. Figure 140: Viewing measurement Statistics View the Event Log From the main Menu, you can select Event Log. The event log records events, which can be errors, warnings, and information reported by your instrument. - Page 93 Specifications are subject to change without notice. All Keithley trademarks and trade names are the property of Keithley Instruments. All other trademarks and trade names are the property of their respective companies. Keithley Instruments Corporate Headquarters • 28775 Aurora Road • Cleveland, Ohio 44139 • 440-248-0400 • Fax: 440-248-6168 • 1-800-935-5595 • www.tek.com/keithley A Gr eater M easur e of C onfi dence 12/15...
Need help?
Do you have a question about the KEITHLEY 2450-EC and is the answer not in the manual?
Questions and answers