Alert-it Companion Mini Handbook
Connect
Hide thumbs
Also See for Companion Mini:
- Handbook (20 pages) ,
- Quick start manual (16 pages) ,
- User manual (20 pages)
Table of Contents
Advertisement
Advertisement
Table of Contents

Related Manuals for Alert-it Companion Mini


Summary of Contents for Alert-it Companion Mini
- Page 1 Companion Mini Connect H A N D B O O K L E S S S T R E S S C A R I N G...
- Page 2 If you have any questions or require assistance in regards to the Companion mini, Connect-iT or any other Alert-iT product, our experienced team are on hand to help. Please find contact details below.
-
Page 3: Table Of Contents
Turning the Connect-iT on Pairing Clearing the Memory Function Front panel Lights Wired Output Resetting an Alarm (Excluding the Companion mini) Common Fault Conditions Alarm Conditions Normal Alarms Mounting the unit to a wall Removing the Connect-iT from Service Continued Overleaf... - Page 4 Contents Installation Nurse Call Cables/Leads Leads available from Alert-iT Wired Output Specification Advanced Options Maintenance Instructions for Connect-iT Routine Testing of the Backup Battery How to Clean the Device Additional Info Third Party Radio Transmitters Troubleshooting Warranty Information Companion mini Specification...
-
Page 5: Product Information
The Connect-iT will normally be powered from a mains adapter, but it features a battery backup that provides over 24 hours of power in case of a power cut. The Companion mini is a battery powered device with a 1 year battery life. -
Page 6: In The Box
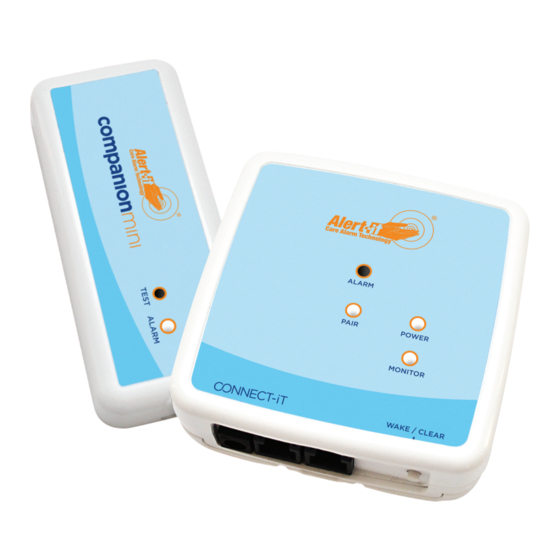
In The Box The Companion Mini Pack Contains: 1 x Companion Mini - P176A (C0) Includes 2 x AAA Non-rechargeable Batteries 1 x Foam Block 1 x Companion Mini Mounting Kit 1 x Connect-iT - P155B MKII Includes 2 x AA Ni-MH Rechargeable Batteries... -
Page 7: Quickstart
Quickstart Unpack box Turn on the Companion mini by pressing the recessed “Test” button with a pen tip Place the mini under the bed Press the “Pair” button on the Connect-iT to turn it on Plug the P171 Power Supply into a mains socket, then plug the other end into the socket labelled “12v DC”. - Page 8 Now ensure that the “Monitor” LED flashes green every time the radio product transmits (Every 8 seconds for a Safelink enabled product like the Companion mini) Ensure the “Alarm” LED flashes and the Wired output activates when the monitor is triggered.
- Page 9 Quickstart Using the device with a 3rd party radio module As you are paired with a Safelink enabled epilepsy monitor, the Connect-iT will raise a “Radio Fail” fault and trigger an alarm if it does not receive any radio signals for 2 minutes. So if the wired output is activating unexpectedly and the “Monitor”...
-
Page 10: Companion Mini Function
Device Installation Turning on the Companionmini (Monitor) The Companion mini monitor is shipped in a low-power state. The monitor is turned on by pressing the recessed ‘Test’ button on the front of the monitor (Figure 1), typically using a pen tip. The monitor will first enter a 60 second test mode. -
Page 11: Postioning And Setup
This is used to enhance the sensitivity of the 3 settings available if you require the Companion Mini to detect small tremors associated with the seizure. Please use the sticky pads provided and secure the foam block to the bottom of the Companion mini, place the unit under the mattress in a central location and test by simulating the seizure. -
Page 12: System Operation
When prolonged movements are detected, the “Alarm” LED on the Connect-iT will light up and the Wired output will activate (Or the internal 3rd party radio transmitter will trigger). A minute after the spasm activity has ceased, the Companion mini will send an “All Clear” signal to the Connect-iT. SAFETY NOTICE:... - Page 13 Companion mini Function Opening Unit in Situ If the unit has been mounted to a flat surface using screws, remove the top by inserting the tip of a flat-headed screwdriver into the slot next to the USB connector, applying gentle pressure and twisting. See figures 7 & 8.
-
Page 14: Maintenance Instructions For The Mini
Maintenance Instructions for the mini Routine Testing It is recommended to test the system weekly by simulating spasm movements on the bed for 15 seconds (the default time unless changed by a user via programming) & ensure the Connect-iT is triggered by observing the red “Alarm”... -
Page 15: Connect-It Function
Alert-iT radio monitors to the Connect-iT. To pair the Connect-iT with an Alert-iT radio monitor you can either use the “Pair” button on the front of the unit OR connect the unit to a PC via a micro USB cable (Not provided). -
Page 16: Function
The “Monitor” LED indicates the current state of the paired radio monitors. (See page 17 for more details). If you have paired the Connect-iT to a Safelink enabled device such as Alert-iT’s EP-iT range, the green “Monitor” LED will blink each time the 8 second heartbeat signal is received. -
Page 17: Common Fault Conditions
Alarm Conditions Normal Alarms When a paired monitor sends out an alarm call, the Connect-iT’s “Monitor” LED will turn solid red. The “Alarm” LED will flash every second. The wired output will activate every 2 minutes until the monitors alarm condition has been cleared. -
Page 18: Mounting The Unit To A Wall
Installation Mounting the unit to a wall This Connect-iT is sealed to a IP53 rating (not waterproof) and should be used indoors in a dry area of between 5°C to 35°C and a maximum of 90% Relative Humidity. The unit should be permanently fitted to a wall near a mains plug and near to the desired nurse call point. A suitable P145 nurse call cable* should be plugged into the wired output and into the desired nurse call point. -
Page 19: Nurse Call Cables/Leads
Nurse Call Cables/Leads Leads available from Alert-iT Our wide selection of nurse call leads has grown over many years so it is very likely that we will already have a suitable lead available to connect the Nurse Call Receiver to your nurse call system. -
Page 20: Advanced Options
Advanced Options There are some additional configuration options that can be changed using the Alert-iT Profile Editor. Once the device has been connected to a computer running the software (Available via our website) using a micro-USB cable (not provided), the following options can be changed;... -
Page 21: Maintenance Instructions For Connect-It
Maintenance Instructions for Connect-iT Routine Testing of the Backup Battery After each year in service the backup battery should be checked by simulating a power cut. This can be done by turning the plug off at the socket / un-plugging the 3-pin plug from the wall / or pulling the 12v DC jack out of the Connect-iT. -
Page 22: Additional Info
The 3-pin header provides 3v power and has an enable pin that is activated whenever the wired output is activated. This means that when the Connect-iT is activated by an alarm call from a paired Alert-iT Radio monitor the enable pin is activated, triggering the third party radio module which then triggers the third party radio system. -
Page 23: Troubleshooting
Troubleshooting Power LED Monitor LED Alarm LED Output Off or blinking Green Normal (Powered every 8 seconds if Solid Green by Mains Power) paired to a Safelink enabled monitor Mains Power off Blink every and running on — 4 seconds Backup Battery Backup Battery Blinking every... -
Page 24: Warranty Information
Warranty Information For 3 years from the date of purchase of the initial equipment, Alert-iT will offer you; Access to support between the hours of 9.00am and 5.00pm each weekday (excluding Public Holidays) via the telephone help-line for the purposes of fault diagnosis and the provision of advice. -
Page 25: Companion Mini Specification
The product complies with 93/42/EEC as a Class 1 Medical Device for use in a Home Healthcare environment. Hereby, Alert-iT Care Alarms declares that this product is in compliance with the Radio Equipment Directive (2014/53/EU). The product contains a radio transmitter compliant to EN 300-220-2 operating at 434.075 MHz wideband, 10mW power (Class 8) less than 1% duty cycle (Class 2). -
Page 26: Connect-It Specification
Up to 200 meters Certification Hereby, Alert-iT Care Alarms declares that this product is in compliance with the Radio Equipment Directive (2014/53/EU). The system has a radio receiver compliant to EN 300-220-2 ‘Class 2’ operating at 434.075 MHz wideband. The full text of the EU declaration of conformity is available at the following internet address;... -
Page 27: Routine Test Sheet
Routine Testing Sheet Serial Number: Test Signature Date... - Page 28 Routine Testing Sheet Serial Number: Test Signature Date...
-
Page 29: Profiler Editor Software
All the Companion Mini’s are supplied with a default setting; Medium sensitivity (3) 15 Seconds delay (The Companion Mini with detects 15 seconds of continuous movement before alarming). If required, these setting can be adjusted using the Alert-iT profile Editing software which is available to down load free from our Support page www.alert-it.co.uk/support... - Page 30 Notes...
-
Page 31: Product Information
The Alert-it system has been designed with due regard to reliability and integrity. While it offers a highly vigilant monitoring method, it is always possible that a distress condition can go undetected for a variety of reasons (including malfunction) and in life threatening situations it is advisable to use the Alert-it system in conjunction with additional monitoring techniques (e.g. - Page 32 Address: Alert-iT Care Alarms Fernie House, Unit 3 Jackson Street Coalville Business Park Leicester. LE67 3NR Call: +44 (0) 1530 239 900 Visit: www.alert-it.co.uk Social: AlertitCareAlarms Alert_iT_Care Alert-iT or join our supportive Epilepsy Forum UH1479A v3 April 2020 L E S S S T R E S S C A R I N G DESIGNED &...
Need help?
Do you have a question about the Companion Mini and is the answer not in the manual?
Questions and answers