Advertisement
Quick Links
DaySaver Quick Installation Guide
Sep 08, 2020 20:09
DaySaver Quick Installation Guide
DaySaver Quick Installation Guide describes how to connect and configure the gateway.
DaySaver Datasheet:
Min. supported WMS Version: 4.01.43713.08
SMS Support: starting from firmware version 2.53.4.20
Updated: July 2020
Permalink:
https://confluence.wildix.com/x/Z4A2Ag
Overview and LED indicators
DaySaver Overview
LED indicators description
Installation and connection
Provisioning and configuration
Data connection backup
Enable VoLTE
Set uplink config
Enable DHCP Server
Set Static IP Address for WAN port
Test the network topology
Use DaySaver as Trunk backup (optional)
How to send/ receive SMS
Time indexes of SMS sending
Factory reset and reboot
Recovery
Step 1
Step 2
Step 3
Step 4
Overview and LED indicators
DaySaver Overview
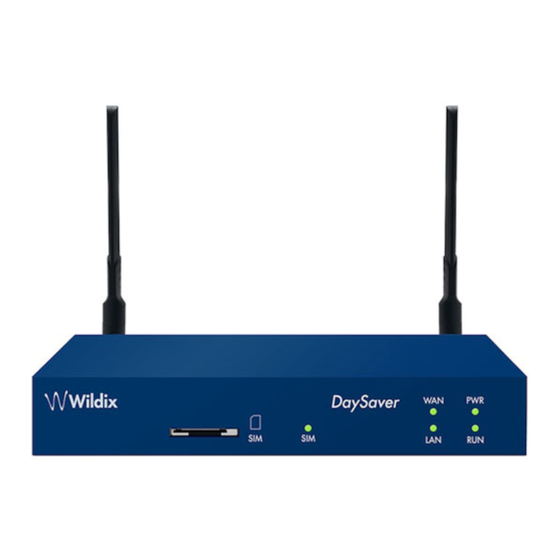
Front panel:
DaySaver Quick Installation Guide
Media Gateways Datasheet
Page 1 of 15
Advertisement

Related Manuals for Wildix DaySaver


Summary of Contents for Wildix DaySaver
- Page 1 DaySaver Quick Installation Guide Sep 08, 2020 20:09 DaySaver Quick Installation Guide DaySaver Quick Installation Guide describes how to connect and configure the gateway. DaySaver Datasheet: Media Gateways Datasheet Min. supported WMS Version: 4.01.43713.08 SMS Support: starting from firmware version 2.53.4.20...
- Page 2 DaySaver Quick Installation Guide 1 - SIM slot: insert and press a SIM card to the slot 2 - SIM LED indicator: shows SIM registration status 3 - LAN LED indicator 4 - Running indicator: indicates network registration status 5 - Power indicator: shows power supply status 6 - WAN LED indicator 7 - 2 antennas: one for data connections;...
- Page 3 DaySaver Quick Installation Guide 1 - DC 12V power supply (optional, WMP code: PS-12V2A) 2 - WAN/ PoE port 3 - LAN port (static IP address 192.168.11.1) Reset button Reboot button LED indicators description Indicator State Description There is no power supply or it is abnormal...
-
Page 4: Installation And Connection
Settings -> System -> /SMS server doesn't work if another DaySaver is registered to one of the PBXs. Provisioning and configuration For provisioning of DaySaver, consult Provisioning of Wildix devices Guide For remote/unreachable media gateways behind NAT/ Firewall, follow Remote Provisioning of Wildix devices... - Page 5 How does it work? DaySaver is your small remote office. It can work as a data connection backup, in case if your Internet goes down, and as a backup for Cloud PBX. And, same as its predecessor, it provides phone calls and SMS even if your operator becomes unreachable (since it allows you placing calls via Mobile network).
- Page 6 DaySaver: Enable VoLTE VoLTE Network allows using DaySaver as a backup for Cloud PBXs, as a backup for the cable Internet connection, or, even as the only Internet access for small offices or during the events.
- Page 7 If WAN loses 3 pings to 8.8.8.8, it failovers to VoLTE. When WAN becomes available again (Count of up), WAN becomes the master again. Enable DHCP Server Note: Enable DHCP Server to use DaySaver as a backup for an entire office. All other DHCP servers connected to a network switch should be disabled. Go to Network ->...
- Page 8 Connect LAN into Switch that powers phones Important: If you do not connect DaySaver via WAN port to a router, you must assign a static IP to it. Otherwise the port will be assigned to 0.0.0.0 IP address and DaySaver won't be registered to a PBX through LTE.
- Page 9 DaySaver Quick Installation Guide Status Page Example Go to Status -> Overview Check the network status: Test the network topology To test the network topology, you can use some of the following tools: 1. Tracert DaySaver Quick Installation Guide Page 9 of 15...
- Page 10 DaySaver Quick Installation Guide Plug into Switch that has DHCP server set from Daysaver You can run tracert to 8.8.8.8. The first hop should be Daysaver LAN address, Second hop should be the WAN gateway address Example: Traceroute has started…...
- Page 11 This is the number to be used for routing your calls from DaySaver to your applications. In the example, 6000 is used: Once the above has been completed, access DaySaver and edit VoLTE trunk settings: go to Trunk ->...
- Page 12 Requirements: WMS 5.0X/ WMS 4.0X DaySaver firmware version 2.53.4.20 or higher Starting from WMS v. 4.03.44914.04, it is possible to select a specific DaySaver for each user by editing a config file. Consult Custom config parameters List for detailed configuration.
- Page 13 This will put the device into recovery: Step 2 Run a cable between the LAN port and your laptop/ machine ensuring the DaySaver is still powered up Note: If you machine uses Wi-Fi, please disable it as this prevents you browse to the recovery interface (192.168.11.1).
- Page 14 DaySaver Quick Installation Guide Step 3 Once connected, you are be able to browse to the recovery interface “192.168.11.1” and upload the firmware file Click Choose file and select the firmware version from your machine Click Upload, then wait 10 - 15 minutes for this process to be completed...
- Page 15 DaySaver Quick Installation Guide DaySaver Quick Installation Guide Page 15 of 15...
Need help?
Do you have a question about the DaySaver and is the answer not in the manual?
Questions and answers