Table of Contents
Advertisement
Quick Links
Copyright
This publication, including all photographs, illustrations and software, is protected
under international copyright laws, with all rights reserved. Neither this manual, nor
any of the material contained herein, may be reproduced without written consent of
the author.
Version 1.0
Disclaimer
The information in this document is subject to change without notice. The manufac-
turer makes no representations or warranties with respect to the contents hereof and
specifically disclaims any implied warranties of merchantability or fitness for any
particular purpose. The manufacturer reserves the right to revise this publication and
to make changes from time to time in the content hereof without obligation of the
manufacturer to notify any person of such revision or changes.
Trademark Recognition
Windows
7/8 are registered trademarks of Microsoft Corp.
®
Other product names used in this manual are the properties of their respective
owners and are acknowledged.
FCC
This equipment has been tested and found to comply with the limits for a Class B
digital device, pursuant to Part 15 of the FCC Rules. These limits are designed to
provide reasonable protection against harmful interference in a residential installa-
tion. This equipment generates, uses, and can radiate radio frequency energy and, if
not installed and used in accordance with the instructions, may cause harmful inter-
ference to radio communications. However, there is no guarantee that interference
will not occur in a particular installation. If this equipment does cause harmful
interference to radio or television reception, which can be determined by turning the
equipment off and on, the user is encouraged to try to correct the interference by one
or more of the following measures:
•
Reorient or relocate the receiving antenna
•
Increase the separation between the equipment and the receiver
•
Connect the equipment onto an outlet on a circuit different from that to
which the receiver is connected
•
Consult the dealer or an experienced radio/TV technician for help
Shielded interconnect cables and a shielded AC power cable must be employed with
this equipment to ensure compliance with the pertinent RF emission limits govern-
ing this device. Changes or modifications not expressly approved by the system's
manufacturer could void the user's authority to operate the equipment.
Preface
i
Preface
Advertisement
Table of Contents
Troubleshooting

Related Manuals for ECS G24


Summary of Contents for ECS G24
- Page 1 Preface Copyright This publication, including all photographs, illustrations and software, is protected under international copyright laws, with all rights reserved. Neither this manual, nor any of the material contained herein, may be reproduced without written consent of the author. Version 1.0 Disclaimer The information in this document is subject to change without notice.
- Page 2 Declaration of Conformity This device complies with part 15 of the FCC rules. Operation is subject to the following conditions: • This device may not cause harmful interference, and • This device must accept any interference received, including interfer- ence that may cause undesired operation This product has been tested and found to comply with the limits of the European Council Directive on the approximation of the laws of the member states relating to electromagnetic compatibility according to 2004/108/EC.
- Page 3 Safety Instructions Your system is designed and tested to meet the latest standards of safety for informa- tion technology equipment. However, to ensure your safety, it is important that you read the following safety instructions. Setting up your system • Read and follow all instructions in the documentation before you oper- ate your system.
- Page 4 Safety cautions and warnings Optical Drive Safety Information Optical drive sold with this system contains a CLASS 1 LASER PRODUCT. CAUTION: Invisible laser radiation when open. Do not stare into beam or view directly with optical instructions. WARNING: Makeing adjustments or performing procedures other than those speci- fied in the user’s manual may result in hazardous laser exposuer.
-
Page 5: Table Of Contents
T T T T T ABLE OF CONTENTS ABLE OF CONTENTS ABLE OF CONTENTS ABLE OF CONTENTS ABLE OF CONTENTS Preface Chapter 1 Introducing the PC Introduction..................1 1.1 Specfications................1 1.2 Front view..................2 1.3 Left and right view of the computer.........3 1.4 Back view..................5 1.5 VESA Mount Installation............6 1.6 Connecting your computer............7... - Page 6 Memo...
-
Page 7: Introducing The Pc
Introducing the PC Introduction Thank you for choosing G24 which has great performance with stylish and flexible design. The G24 will give you an exciting PC experience by allowing you to choose your own favorite motherboard to install in. 1.1 Specifications •... -
Page 8: Front View
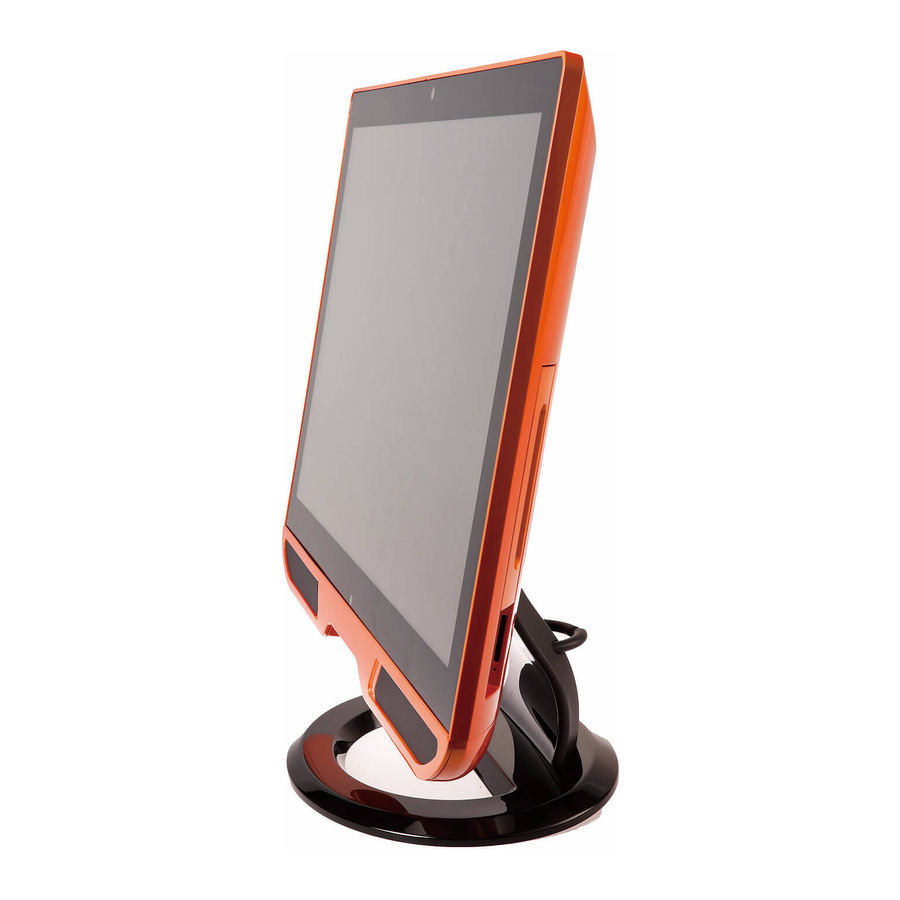
1.2 Front view Note: ID design may vary. Webcam/Webcam LED Light The built-in webcam with the microphone can be used for picture taking, video recording, online conference and any other interactive applications. Webcam LED light is on when webcam is activated. Built-in Microphone The built-in microphone can be used for online video chatting. -
Page 9: Left And Right View Of The Computer
1.3 Left and right view of the computer 1. Brightness Up 2. Brightness Down 3. Display On/Off (Depend on motherboard support) 4. Power Button 5. USB Ports 6. Headphone Jack 7. Microphone Jack 1.Brightness Up Press this button to turn up the brightness of screen. 2.Brightness Down Press this button to turn down the brightness of screen. - Page 10 6. Headphone Jack (Green) This is a jack for headphone. 7. Microphone Jack (Pink) This is a jack for microphone. 8. External HDD Box or Optical drive 9. Multi Card Reader 8. External HDD Box or Optical Drive To switch the external HDD box with optical drive (vice versa), press the eject button to pull out the external HDD or optical drive.
-
Page 11: Back View
1.4 Back view Ventilator The ventilator on the enclosure is used for air convection and to prevent the equipment from overheating. Do not cover the ventilator. Attention: Be sure not to block any air vent on the computer. Blocked air vents may cause thermal problems. -
Page 12: Vesa Mount Installation
Rear I/O There are many ports below of the main chassis, it mainly depends on the mother- board you choose. There are USB ports, Lan connector, HDMI ports and audio jacks on the motherboard. Please refer to the specification in motherboard manual. You will find the I/O position as below. -
Page 13: Connecting Your Computer
1.6 Connecting your computer Use the following information to connect your computer: Look for the small connector icons on the back of your computer. Match the connectors to the icons. Note: Your computer might not have all of the connectors that are described in this section. - Page 14 4. Connect the R45J LAN cable to the LAN port. 5. Your computer is equipped with a Memory Card Reader Connector, it is able to read/write data from: SD/MMC, MS, MS pro, SD Pro. Introducing the PC...
-
Page 15: Optional-Remote Controller
1.7 Optional-Remote controller Using the Remote Controller You use the remote control to interact with most of the features in Media Center. No software or setup procedure is required. Just point the remote control at the receiver, and then enter your commands. Your remote control has five types of buttons: ... - Page 16 Navigation Buttons Use the navigation buttons on the remote control to move between items on the screen in Media Center. Command Task Icon Start Take the user to the Windows Media Center Start menu. Move the focus point up one position. Down Move the focus point down one position. Left Move the focus point to the left one position. Right Move the focus point to the right one position. Perform the action at the focus point. Back Move back one position in the user interface stack. More Provide information for the focus point. AV and Power Buttons Use the AV and power buttons to change channels, adjust volume, access a DVD menu, or to put Media Center in standby mode.
- Page 17 Playback Buttons Playback buttons in Media Center behave just like similar controls on common home electronic devices, such as CD or DVD players. Playback buttons are used to control the playback or display of your media – music, pictures, video, and radio. Command ...
- Page 18 Shortcut Buttons These buttons provide a quick way for users to access key media experiences in Windows Media Center. Command Task Icon Guide Display the Guide in Windows Media Center. Live TV Show live TV on the currently selected channel. Display the Recorded TV page in Windows Media Record TV Center. Music Display the Music Library in Windows Media Center. Pictures Display the Picture Library in Windows Media Center. Videos Display the Video Library in Windows Media Center. Radio Display the main Radio page in Windows Media Center. DVD Menu Display the DVD menu. [if available] Toggle between various aspect modes in Zoom Teletext Buttons (if available) Media Center supports Teletext when it is available.
-
Page 19: Packing Contents
Packing Contents Driver DVD Manual Power Cable Quick Guide Heat Pipe & CPU Fan Adapter (Options: depend on motherboard) Remote Controller (Optional) NOTE: Please contact us immediately if any of the items is damaged or missing. Introducing the PC... - Page 20 Memo Introducing the PC...
-
Page 21: Trouble Shooting
Chapter 2 Trouble Shooting Start up problems during assembly After assembling the PC for the first time you may experience some start up problems. Before calling for technical support or returning for warranty, this chapter may help to address some of the common questions using some basic troubleshooting tips. -
Page 22: Troubleshooting Audio Problems
• Change the desktop background • Select a screen saver • Select colors and appearance options for icons and characters • Set resolution and colors by using Display Settings options. Problem: Ripple on screen Troubleshooting and problem resolution: 1. Check for devices located less than one meter from the computer such as refrigerators, electric fans, electric dryers, UPSs, regulators, fluorescent lamps or other computers that may be generating magnetic interference. -
Page 23: Troubleshooting Remote Controller Problems
Troubleshooting Remote Controller Problems When I press a button on the remote, but nothing happens. Make sure that the following is true: • You are pointing the remote control directly at the receiver. • The IR sensor on the receiver is not covered up, and no natural or artificial light is shining directly on it. - Page 24 Memo Trouble Shooting...
Need help?
Do you have a question about the G24 and is the answer not in the manual?
Questions and answers