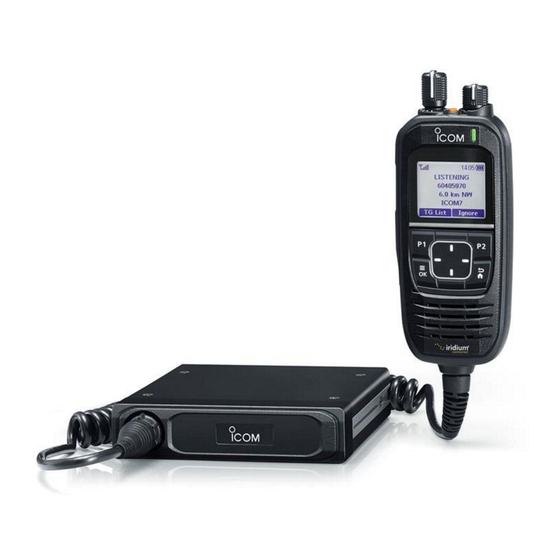
Icom IC-SAT100M Basic Manual
Satellite ptt
Hide thumbs
Also See for IC-SAT100M:
- Operating manual (25 pages) ,
- Network setting manual (10 pages) ,
- Operating manual (30 pages)
Table of Contents
Advertisement
Available languages
Available languages
Quick Links
Advertisement
Chapters
Table of Contents

Subscribe to Our Youtube Channel
Related Manuals for Icom IC-SAT100M


Summary of Contents for Icom IC-SAT100M
-
Page 2: Features
ENGLISH Thank you for choosing this Icom product. This product is designed and built with Icom’ s state of the art technology and craftsmanship. With proper care, this product should provide you with years of trouble-free operation. Important READ ALL INSTRUCTIONS carefully and completely before using the transceiver. -
Page 3: Precautions
Contact *Only when the microphone is attached. your Icom dealer or distributor for advice. CAUTION: NEVER connect the transceiver Other microphones have different pin to a power source of more than 33 V DC. -
Page 4: About The Gps Receiver
® word mark and logos are registered trademarks owned by Bluetooth SIG, Inc. and any use of such marks by Icom Inc. is under license. Other trademarks and trade names are those of their respective owners. 3M, PELTOR, and WS are trademarks of 3M Company. -
Page 5: About Ce And Doc
About E-marking: Detailed installation notes for • Consult the dealer or an experienced radio/ are available. Please contact your Icom dealer or TV technician for help. distributor. CAUTION: Changes or modifications to this transceiver, not expressly approved by Icom Inc., could void your authority... -
Page 6: Safety Training Information
For small vehicle Electromagnetic Interference/Compatibility as worst case, the antenna shall be During transmissions, your Icom radio located on the roof top at any place generates RF energy that can possibly on the center line along the vehicle in cause interference with other devices order to achieve 20 centimeters (7.9... -
Page 7: Table Of Contents
Table of contents Important .......................1 ....................1 Features ........................1 Precautions ......................2 About the GPS receiver ..................3 ......................3 About CE and DOC ....................4 Disposal ........................4 FCC information ....................4 Safety training information ..................5 Table of contents ....................6 PANEL DESCRIPTION ....................7 Microphone Description ..................7 Function display ....................8 BASIC OPERATION ....................9 Receiving and transmitting ..................9... -
Page 8: Panel Description
PANEL DESCRIPTION Microphone Description P1/P2 KEYS [P1]/[P2] Push to use the function assigned in the ([OK] > Functions > Key Setup) SIDE 2 KEY [S2] Hold down to turn ON or OFF the RX Speaker function. SIDE 3 KEY [S3] Push to display the Public Address. -
Page 9: Function Display
PANEL DESCRIPTION Function display 00:00 Icon area Text area Last call Key display area Scan The display is shown in English as an example. Select other languages on the Menu screen, if necessary. ([OK] > Display > Language) Icon Area RECORD Displayed when the Record function is ON. -
Page 10: Basic Operation
Push [Last Call] to playback the You can continuously transmit up to the received call. period of time allowed by the system. (See the IC-SAT100M OPERATING MANUAL for Last Call Play function details.) Push [UP] or [DOWN] to display the TALKING Talkgroup List. -
Page 11: Menu Screen
To select an item, push [UP] or [DOWN]. One-touch PTT See the OPERATING MANUAL for each Waiting Pairing menu item’s details. You can download Functions the OPERATING MANUAL from the Icom Auto Keypad Lock website. Key Setup The menu items contained in the P1 Key transceiver may be different, depending on the transceiver’s version or presettings. -
Page 12: Connecting And Maintenance
CONNECTING AND MAINTENANCE Rear panel connection Optional speaker WARNING! NEVER remove the fuse holders from the DC power cable. Red : Black : Fuse holders NOTE: Use the terminals as shown below for the cable connections. Crimp Solder 12 V or 24 V Battery EXTERNAL SPEAKER JACK Change the static IP address when the... -
Page 13: Antenna Unit
CONNECTING AND MAINTENANCE Antenna unit Supplied accessories A key element in the performance of any communication systems is the antenna. Contact your dealer for information regarding antennas and how to install Angle bracket them. NOTE: • Connect the Antenna unit with the LAN cable (Category 5e or higher). -
Page 14: Options And Technical Information
About the third party Bluetooth headsets: ® Icom has checked the PTT operation with some 3M Peltor headsets such as the WS Headset XP, WS ProTac XP and WS Alert XP. (Compatibility not guaranteed.) External speakers • SP-30, SP-35/35L EXTERNAL SPEAKERS... - Page 15 DEUTSCH Wir danken Ihnen für die Wahl dieses Icom- Icom ist nicht verantwortlich für die Produkts.Dieses Produkt wurde auf der Zerstörung, Beschädigung oder Leistung Basis der hochmodernen Technologie und eines Icom- oder Nicht-Icom-Geräts, wenn Kompetenz von Icom entwickelt und gebaut.
- Page 16 Für den optionalen Netzadapter NIEMALS den Transceiver an Orten mit Temperaturen unter –30 °C oder über +60 °C, WARNUNG! NIEMALS mit einem anderen oder an Orten mit direkter Sonneneinstrahlung Gerät als dem Transceiver verwenden. Das verwenden oder zurücklassen, wie z. B. auf kann zu einem Stromschlag führen, einen Brand einem Armaturenbrett.
- Page 17 Über CE und Icom, Icom Inc. und das Icom-Logo sind eingetragene Warenzeichen von Icom Incorporated (Japan) in Formitätserklärung Japan, den Vereinigten Staaten, Großbritannien, Deutschland, Frankreich, Spanien, Russland, Australien, Neuseeland und/oder anderen Ländern. Hiermit erklärt Icom Die Wortmarke Bluetooth und die Logos sind ®...
- Page 18 Inhaltsverzeichnis Wichtig ........................14 ...............14 Leistungsmerkmale ....................14 Sicherheitshinweise ....................14 Über den GPS-Empfänger ..................16 ......................16 Über CE und Formitätserklärung ................16 Entsorgung ......................16 Inhaltsverzeichnis....................17 BESCHREIBUNG DES BEDIENFELDS ..............18 Beschreibung des Mikrofons .................18 Funktionsanzeige ....................19 GRUNDLEGENDE BEDIENUNG ................20 Empfangen und Senden ..................20 MENÜ-BILDSCHIRM ....................21 Aufbau ........................21 ANSCHLÜSSE UND WARTUNG ................22 Rückseitenanschluss ....................22...
-
Page 19: Beschreibung Des Bedienfelds
BESCHREIBUNG DES BEDIENFELDS Beschreibung des Mikrofons TASTEN P1/P2 [P1]/[P2] zugewiesenen Funktion drücken. Key Setup SEITE-2-TASTE [S2] Gedrückt halten, um die RX- Lautsprecherfunktion ein- oder auszuschalten. SEITE-3-TASTE [S3] Zum Anzeigen der Öffentlichen Adresse drücken. MENU/OK-TASTE [OK] Zum Aufrufen des Menübildschirms drücken. Zur Auswahl eines Elements auf dem Menübildschirm drücken. -
Page 20: Funktionsanzeige
BESCHREIBUNG DES BEDIENFELDS Funktionsanzeige 00:00 Symbolbereich Textbereich Last call Tastenanzeigebereich Scan Die Anzeige wird im Beispiel auf Englisch dargestellt. Sie können auf dem Menübildschirm Language) Symbolbereich AUFNAHME Wird angezeigt, während die Aufnahmefunktion aktiv ist. Anzeigen SCAN SIGNALSTÄRKE • Wird angezeigt, wenn der Suchlauf angehalten ist. Zeigt den relativen Empfangssignalpegel an. -
Page 21: Grundlegende Bedienung
GRUNDLEGENDE BEDIENUNG Empfangen und Senden Einschalten des Senden Transceivers VORSICHT: NICHT ohne eine Antenne senden. gedrückt, um den Transceiver einzuschalten. • Der Transceiver sucht einen Satelliten. der Transceiver die Übertragung anfordert. • Wenn der Transceiver mit dem Satelliten verbunden und registriert ist, werden der sprechen Sie mit Ihrer normalen Stimme. -
Page 22: Menü-Bildschirm
One-touch PTT Waiting Pairing Functions Sie im BEDIENUNGSHANDBUCH. Sie Auto Keypad Lock können das BEDIENUNGSHANDBUCH Key Setup von der Icom-Webseite herunterladen. P1 Key Welche Menüpunkte der Transceiver hat, kann je nach Transceiver-Version oder P2 Key den Voreinstellungen verschieden sein. PC Command Für Einzelheiten wenden Sie sich an Ihren... -
Page 23: Anschlüsse Und Wartung
ANSCHLÜSSE UND WARTUNG Rückseitenanschluss Optionaler Lautsprecher WARNUNG! NIEMALS die Sicherungshalter vom Gleichstromkabel entfernen. HINWEIS: Verwenden Sie die unten Sicherungshalter angegebenen Anschlüsse für die Kabelverbindungen. Crimpen Rot: Schwarz: 12-V- oder 24-V-Batterie BUCHSE FÜR EXTERNEN LAUTSPRECHER Ändern Sie die statische IP- Adresse, wenn der Transceiver mit Netzwerkgeräten verbunden ist. -
Page 24: Reinigung
ANSCHLÜSSE UND WARTUNG Antenneneinheit Mitgeliefertes Zubehör Ein Schlüsselelement für die Leistung aller Kommunikationssysteme ist die Antenne. Informationen über Antennen und ihre Aufstellung erhalten Sie von Ihrem Fachhändler. HINWEIS: Winkelhalterung • Schließen Sie die Antenneneinheit mit einem LAN-Kabel an (Kategorie 5e oder höher). •... -
Page 25: Zubehör Und Technische Informationen
® Über Bluetooth -Headsets von Drittanbietern: ® Icom hat die PTT-Funktion mit einigen Headsets von 3M Peltor getestet, wie dem WS- Headset XP, WS ProTac XP und WS Alert XP. (Kompatibilität nicht garantiert.) Externe Lautsprecher • SP-30, SP-35/35L EXTERNE LAUTSPRECHER... - Page 26 • Fuerza mayor, incluyendo, entre otros, incendios, terremotos, tormentas, inundaciones, relámpagos u otros desastres naturales, disturbios, revueltas, guerras o contaminación radioactiva. • El uso de los transceptores de Icom con cualquier equipo que no haya sido fabricado o aprobado por Icom.
- Page 27 (unidad principal)*/IP55 (micrófono)/IP67 o humo. Póngase en contacto con su (unidad de antena) de protección contra concesionario o distribuidor de Icom en el polvo y resistencia a salpicaduras. Sin busca de asesoramiento. embargo, una vez que el transceptor se haya caído, la resistencia al agua y al...
- Page 28 La marca y logotipos de Bluetooth ® son marcas comerciales registradas propiedad de Bluetooth SIG, Inc. y cualquier uso de tales marcas por Icom Inc. se realiza con licencia. El resto de marcas y nombres comerciales son propiedad de sus respectivos propietarios.
- Page 29 Acerca del marcado E: Existen instrucciones adicionales para la instalación de los transceptores • Conecte el equipo a una toma de corriente móviles Icom en vehículos. Diríjase a su proveedor de un circuito diferente de aquel al que está o distribuidor Icom.
- Page 30 Contenido Importante ......................25 ......................25 Características ......................25 Precauciones ......................26 Acerca del receptor del GPS.................27 ......................27 Acerca De CE y la DDC ..................28 Desecho ........................28 Información de la FCC ..................28 Información de formación de seguridad ..............29 Contenido ......................30 DESCRIPCIÓN DEL PANEL ..................31 Descripción del micrófono ..................31 Pantalla de funciones ....................32 FUNCIONAMIENTO BÁSICO ..................33...
-
Page 31: Descripción Del Panel
DESCRIPCIÓN DEL PANEL Descripción del micrófono TECLA LADO 2 [S2] Manténgala pulsada para activar o desactivar la función Altavoz RX. TECLA LADO 3 [S3] Púlsela para visualizar la Dirección pública. TECLA MENÚ/ACEPTAR [OK] Púlsela para entrar a la pantalla Menú. Púlsela para seleccionar un elemento en la pantalla Menú. -
Page 32: Pantalla De Funciones
DESCRIPCIÓN DEL PANEL Pantalla de funciones 00:00 Área de iconos Área de texto Last call Área de visualización Scan de teclas Se muestra la pantalla en inglés a modo de ejemplo. Se pueden seleccionar otros idiomas en la pantalla Menú, si es necesario. ([OK] > Display > Language) Área de iconos GRABACIÓN Se muestra cuando la función de grabación... -
Page 33: Funcionamiento Básico
Pulse [Last Call] para reproducir la Puede transmitir continuamente durante llamada recibida. el período permitido por el sistema. (Consulte el MANUAL DE INSTRUCCIONES DEL IC-SAT100M para obtener detalles sobre la función de reproducción de la última llamada.) TALKING Pulse [UP] o [DOWN] para visualizar la TRANSCEIVER1 Lista de grupos de conversación. -
Page 34: Pantalla De Menú
Auto Keypad Lock cada elemento del menú. Puede descargar Key Setup el MANUAL DE FUNCIONAMIENTO desde P1 Key el sitio web de Icom. Los elementos de menú que se P2 Key encuentran en el transceptor pueden ser PC Command diferentes dependiendo de la versión Auto TX Mic Sel del transceptor o de los ajustes previos. -
Page 35: Conexión Y Mantenimiento
CONEXIÓN Y MANTENIMIENTO Conexión del panel posterior Altavoz opcional ¡ADVERTENCIA! NUNCA retire el portafusibles del cable de alimentación CC. NOTA: Utilice los terminales tal y como se Portafusibles muestra a continuación para las conexiones de los cables. Rojo: Presionar Soldar Negro: Batería de 12 V o 24 V... -
Page 36: Antena
CONEXIÓN Y MANTENIMIENTO Unidad de antena Accesorios suministrados La antena es un elemento clave en el rendimiento de cualquier sistema de comunicación. Póngase en contacto con su distribuidor para obtener información sobre Soporte en antenas y cómo instalarlas. ángulo NOTA: •... -
Page 37: Opciones Y Información Técnica
Acerca de los auriculares Bluetooth de terceros: ® Icom ha comprobado el funcionamiento PTT con algunos auriculares 3M Peltor, como WS Headset XP, WS ProTac XP y WS Alert XP. (No se garantiza la compatibilidad). Altavoces externos • ALTAVOCES EXTERNOS SP-30, SP-35/35L... - Page 38 Merci d'avoir choisi ce produit Icom. Cet appareil a été conçu et fabriqué avec le meilleur de la technologie et du savoir- faire Icom. Avec un bon entretien, ce produit devrait vous procurer des années de fonctionnement sans problèmes. Important LIRE TOUTES LES INSTRUCTIONS attentivement et entièrement avant d'utiliser...
- Page 39 (unité d’antenne) pour la protection Contactez votre revendeur ou distributeur contre la poussière et la résistance aux Icom pour obtenir des conseils. éclaboussures. Cependant, en cas de chute de l'émetteur-récepteur, la protection ATTENTION : NE BRANCHEZ JAMAIS contre la poussière et la résistance aux...
- Page 40 Cela risquerait de provoquer un choc électrique ou d’entraîner des blessures. Le logo Icom, Icom Inc. et Icom sont des marques déposées de Icom Incorporated (Japon) au Japon, aux États-Unis, au Royaume-Uni, en Allemagne, en France, en Espagne, en Russie, en Australie, en Nouvelle-Zélande et/ou dans d'autres pays.
- Page 41 • Éloigner l'équipement et le récepteur. • Connecter l'équipement sur une prise sur un autre circuit que celui sur lequel le récepteur À propos de l'E-marking : Icom fournit des instructions détaillées pour l’installation des est connecté. émetteurs-récepteurs mobiles à bord de véhicules.
- Page 42 Interférence électromagnétique et compatibilité central du véhicule, afin de respecter En mode de transmission, votre radio Icom une distance de 20 cm (7.9 pouces) produit de l’énergie de RF qui peut provoquer du bord le plus rapproché du véhicule des interférences avec d’autres appareils ou...
- Page 43 Table des matières Important .......................38 ....................38 Caractéristiques ....................38 Précautions ......................39 À propos du récepteur GPS ..................40 ......................40 Informations CE et DOC ....................41 Mise au rebut ......................41 Informations FCC ....................41 Informations sur la formation à la sécurité ............42 Table des matières ....................43 DESCRIPTION DU PANNEAU .................44 Description du microphone ...................44 ..................45...
-
Page 44: Description Du Panneau
DESCRIPTION DU PANNEAU Description du microphone TOUCHES P1/P2 [P1]/[P2] Appuyer sur la touche pour utiliser la fonction attribuée dans le menu « Key [OK] > Fonctions > TOUCHE CÔTÉ 2 [S2] Maintenir la touche enfoncée pour activer ou désactiver la fonction de haut-parleur RX. TOUCHE CÔTÉ... - Page 45 DESCRIPTION DU PANNEAU Affichage des fonctions 00:00 Zone d'icônes Zone de texte Last call Scan des touches l'écran du menu, si nécessaire. ([OK] > Display > Language) Zone d'icônes ENREGISTRER est activée. Indicateurs BALAYAGE FORCE DU SIGNAL • • Clignote pendant le balayage. réception correspondant.
-
Page 46: Fonctions De Base
FONCTIONS DE BASE Émission et réception Mise en marche de Émission l'émetteur-récepteur ATTENTION : NE PAS émettre sans antenne. Maintenir [VOL] enfoncé pendant 1 seconde pour mettre en marche Maintenir la touche [PTT] enfoncée. l'émetteur-récepteur. • L'émetteur-récepteur recherche un que l’émetteur-récepteur demande la satellite. -
Page 47: Écran Du Menu
Auto Keypad Lock en savoir plus sur chaque élément du Key Setup menu. Vous pouvez télécharger le MODE P1 Key D'EMPLOI depuis le site web d'Icom. Les éléments de menu contenus dans P2 Key l'émetteur-récepteur peuvent être PC Command différents, selon la version de l'émetteur- Auto TX Mic Sel récepteur ou les préréglages. -
Page 48: Connexion Et Entretien
CONNEXION ET ENTRETIEN Raccordement du panneau arrière Haut-parleur en option AVERTISSEMENT ! NE JAMAIS retirer les portes-fusibles du câble d'alimentation CC. REMARQUE : Utilisez les bornes comme illustré ci-dessous pour les connexions Portes-fusibles des câbles. Rouge : Noir : À pincer Soudure Batterie 12 V ou 24 V... -
Page 49: Nettoyage
OPTIONS ET INFORMATION TECHNIQUE Unité d'antenne Accessoires fournis L'antenne est un élément clé pour les performances de tout système de communication. Contactez votre revendeur pour plus d’informations concernant les Support d’angle antennes et leur installation. REMARQUE : • Connecter l’antenne à l’aide du câble LAN (Catégorie 5 ou supérieure). -
Page 50: Options Et Information Technique
À propos des casques Bluetooth d'autres fabricants : ® Icom a contrôlé le fonctionnement PTT avec plusieurs casques Peltor 3M tels que le casque WS XP, WS ProTac XP et WS Alert XP. (Compatibilité non garantie.) Haut-parleurs externes • SP-30, SP-35/35L HAUTS-PARLEURS EXTERNES SP-30 : Entrée nominale 20 W... - Page 51 ITALIANO Grazie per aver scelto questo prodotto Icom. Icom non è responsabile per la distruzione, Questo prodotto è stato progettato e realizzato il danneggiamento o le prestazioni di avvantaggiandosi della superiore capacità qualsiasi attrezzatura Icom o non Icom se tecnologica e costruttiva Icom. Se trattato il malfunzionamento è...
- Page 52 Icom, Icom Inc. e il logo Icom sono marchi registrati di Icom Incorporated (Giappone) in Giappone, Stati Uniti, Regno Unito, In alcuni Paesi, l’uso di un dispositivo di Germania, Francia, Spagna, Russia, Australia, Nuova Zelanda e/o altri Paesi.
- Page 53 Non smaltire questi con il ricetrasmettitore. Smaltirli in base alle leggi vigenti nella ([OK] > Informazioni > propria area. Certificazione Informazioni sull’E-marking: Sono disponibili note dettagliate per l’installazione di ricetrasmettitori mobili Icom su veicoli. Contattare il rivenditore o il distributore Icom.
- Page 54 Sommario Importante ......................51 ....................51 Caratteristiche .......................51 Precauzioni ......................51 Informazioni sul ricevitore GPS ................53 ......................53 Informazioni su CE e sulla DDC................53 Smaltimento ......................53 Sommario ......................54 DESCRIZIONE DEL PANNELLO ................55 Descrizione del microfono ..................55 Display delle funzioni ....................56 OPERAZIONI DI BASE ....................57 Ricezione e trasmissione ..................57 SCHERMATA MENU ....................58 Struttura ........................58...
-
Page 55: Descrizione Del Pannello
DESCRIZIONE DEL PANNELLO Descrizione del microfono TASTO LATO 2 [S2] Tenere premuto per attivare o disattivare la funzione Altoparlante RX. TASTO LATO 3 [S3] Premere per visualizzare l’Indirizzo pubblico. TASTO MENU/OK [OK] Premere per entrare nella schermata Menu. Premere per selezionare una voce nella schermata Menu. -
Page 56: Display Delle Funzioni
DESCRIZIONE DEL PANNELLO Display delle funzioni 00:00 Area dell’icona Area di testo Last call Scan Area display tasti Il display viene visualizzato in inglese come esempio. Selezionare altre lingue sulla schermata Menu, se necessario. ([OK] > Display > Language) Area dell’icona REGISTRA Visualizzata quando la funzione Registrazione è... -
Page 57: Operazioni Di Base
Premere [Last Call] per riprodurre È possibile trasmettere continuamente per l’ultima chiamata ricevuta. il periodo di tempo consentito dal sistema. (Vedere il MANUALE DI FUNZIONAMENTO IC-SAT100M per i dettagli della funzione Riproduzione ultima chiamata.) TALKING Premere [UP] o [DOWN] per visualizzare TRANSCEIVER1 l’elenco dei gruppi di conversazione. -
Page 58: Schermata Menu
MANUALE DI Auto Keypad Lock FUNZIONAMENTO. È possibile scaricare Key Setup il MANUALE DI FUNZIONAMENTO dal P1 Key sito web di Icom. Le voci del menu contenute nel P2 Key ricetrasmettitore potrebbero variare PC Command a seconda della versione del Auto TX Mic Sel ricetrasmettitore o delle preimpostazioni. -
Page 59: Connessione E Manutenzione
CONNESSIONE E MANUTENZIONE Connessione pannello posteriore Altoparlante opzionale AVVERTENZA! MAI rimuovere i portafusibili dal cavo di alimentazione CC. NOTA: Usare i terminali come illustrato Portafusibili di seguito per i collegamenti dei cavi. Crimpare Saldare Rosso: Nero: Batteria 12 V o 24 V JACK ALTOPARLANTE ESTERNO il ricetrasmettitore è... -
Page 60: Antenna
CONNESSIONE E MANUTENZIONE Unità antenna Accessori in dotazione L’antenna è un elemento essenziale nelle prestazioni di qualsiasi sistema di comunicazione. Contattare il rivenditore per informazioni sulle antenne e su come installarle. Staffa NOTA: angolare • Collegare l’unità antenna con il cavo LAN. -
Page 61: Opzioni E Informazioni Tecniche
[PTT]. Informazioni sugli auricolari Bluetooth di terzi: ® Icom ha controllato il funzionamento PTT con alcuni auricolari 3M Peltor, come WS Headset XP, WS ProTac XP e WS Alert XP. (Compatibilità non garantita.) Altoparlanti esterni • SP-30, SP-35/35L ALTOPARLANTI ESTERNI...
Need help?
Do you have a question about the IC-SAT100M and is the answer not in the manual?
Questions and answers