
Related Manuals for Chicco Corso


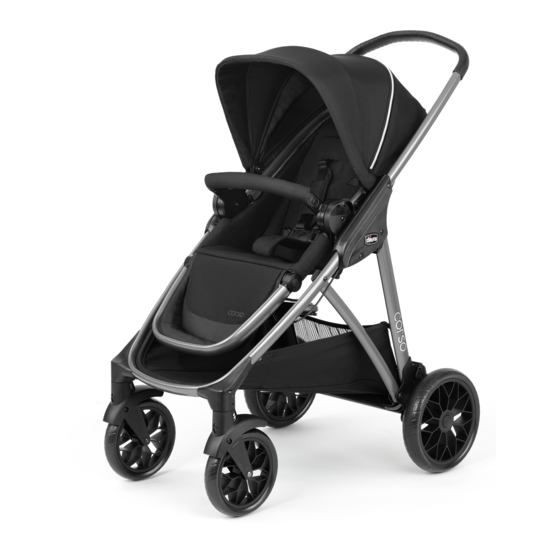
Summary of Contents for Chicco Corso
- Page 1 Read all instructions BEFORE assembly and USE of product. KEEP INSTRUCTIONS FOR FUTURE USE. Corso ™ Stroller Owner's Manual IS0185E_01 ©2019 Artsana USA, INC. 09/19 www.chiccousa.com...
- Page 2 (22.7 kg), will cause excessive wear infant car seat to the stroller other and stress on the stroller. Use the than the Chicco infant car seat. stroller with only one child at a Injury or death may result when time.
- Page 3 • Infant Car Seat Adapter must be properly attached to use the Chicco infant car seat. • ONLY USE a Chicco infant car seat with this product. • Only use this product to transport infants that are within the size and weight limitations of the infant car seat.
- Page 4 Components A. - Stroller Frame B. - Front Wheels C. - Rear Wheels D. - Rear Axle...
- Page 5 Components E. - Washers F. - Pins G. - Hubcaps Note: Parts E, F, and G are in a small red bag. H. - Seat Frame I. - Armbar...
- Page 6 Components J. - Canopy K. - Infant Car Seat Adapter...
- Page 7 How to Assemble Stroller WARNING When opening the Stroller, ensure that your child, or other children, are at a safe distance. Ensure that during these operations, the movable parts of the Stroller do not come into contact with your child. If you have hardwood floors or linoleum you may want to perform this step on carpeting...
- Page 8 How to Assemble Stroller 2. Insert the Rear Axle (D) into the opening on the Rear Stroller Frame, as shown. Make sure to insert the end without the ears first. Slide it through until the axle comes out on the other side. Make sure the Axle is centered between both brake levers.
- Page 9 How to Assemble Stroller 3A. On one side of the Rear Axle, slide a Rear Wheel (C), and turn the Wheel until the brake tab fits into one of the grooves on the Wheel.
- Page 10 How to Assemble Stroller 3B. On the same side slide a Washer (E) onto the Rear Axle. 3C. Secure the Wheel to the Rear Axle using the Pin (F). Push the straight side of the Pin through the hole on the Rear Axle. The curve on the Pin must curve around the outside of the Rear Axle, as shown.
- Page 11 How to Assemble Stroller WARNING Check that the wheels are fitted correctly. 3D. Line up the tabs on the Hubcaps (G) with the holes on the Wheel. Snap the Hubcap onto the Wheel to cover the Washer and Pin. Repeat Step 3 for other side. Pull on each Wheel to make sure the Wheel assembly is securely attached to the frame.
- Page 12 How to Assemble Stroller 4. Attach the Front Wheel (B) to the Stroller Frame by lining up and inserting the Front Wheel Pin into the corresponding opening on the Stroller Front Leg, as shown. Repeat for the other side. Make sure both Wheels are secure by pulling down on Wheel assemblies.
- Page 13 Front Wheel Swivel Locks The stroller has front Swivel/Fixed wheels. It is recommended that you use the Fixed Mode on uneven surfaces and the Swivel Mode on normal road surfaces. When using swivel locks, make sure you lock both front wheels. 5.
- Page 14 Remove Front Wheels 6. Remove the Front Wheels by pushing in on the Release Button, just above the wheel (as shown). And, at the same time, pull the Front Wheel off of the Stroller Frame. Repeat for the other side.
- Page 15 How to Use the Seat 7A. Open the Seat Frame (H). Line up and insert the hubs on both sides of the Seat Frame into the hub slots on the Stroller Frame as shown (7B). Pull up on the Seat Frame to make sure it is securely attached to the Stroller Frame.
- Page 16 How to Use the Seat 8. Press the buttons on both hubs, as shown, and pull up to remove the Seat Frame. Note: The Seat Frame can be attached in a Forward Facing position and a Parent Facing position, as shown. Forward Facing Position Parent Facing Position...
- Page 17 How to Use the Seat The Seat can be adjusted to 3 positions. 9. To recline the Seat, press the Recline Button on the back of the Seat, as shown. Rotate the Seat up or down to the desired position.
- Page 18 How to Use the Seat The Footrest can be adjusted to 4 positions. 10. Press in on both Footrest Buttons and, at the same time, rotate the Footrest up or down to the desired position.
- Page 19 How to Use the Canopy 11. To attach the Canopy, slide the Canopy attachment clips onto the corresponding attachment points on the Seat Frame, as shown. Make sure that back panel of Canopy is located behind the seat frame.
- Page 20 How to Use the Canopy 12A. To open the Canopy, pull the front edge of the Canopy forward. Reverse this step to close the Canopy. 12B. Pull forward on the Canopy flap to uncover the mesh panel. Reverse this step to close the mesh panel.
- Page 21 How to Use the Canopy 12C. To Extend the Canopy, unzip the zipper and pull forward on the front Canopy edge. Reverse this step to close the extension panel.
- Page 22 How to Use the Canopy 13. To remove the Canopy, pull up on the attachment clips on each side of the Canopy at the same time.
- Page 23 Using the Brakes WARNING Always apply the brakes whenever the stroller is stationary. Never leave the stroller on a sloped surface, with a child onboard, even with the brakes applied. 14A. Push down on the Brake Lock Levers located on each side of the Rear Wheel assembly, to lock the Rear Wheels.
- Page 24 Using the Suspension The Stroller has 2 Suspension Modes. 15. Flip the Lever up for smooth terrain and flip the Lever down for rough terrain. Make sure both of the Suspension Levers are in the same position. A straight line ( ) indicates a stiff suspension, a stable ride for more control on smooth terrain.
- Page 25 Accessory Pockets WARNING Never place more than 1 lb (0.5 kg) in each seat back pocket. 16A. Locate the 4 accessory pockets on the inside of the basket. 2 bottle pockets in back corners and 2 organizer pockets on sides. 16B.
- Page 26 How to Use Safety Harness WARNING This stroller features three harness positions. Always use a harness position located ABOVE the child's shoulder line. If multiple harness positions are above the child's shoulder line, use the one closest to it. 17A. The Shoulder Straps can be adjusted to 3 height positions as shown.
- Page 27 How to Use the Safety Harness 17B. To adjust the Shoulder Harness to another height position, locate the D-ring on the back of the seat as shown. Slide the D-ring through opening on the seat back. Then pull through the opening on the seat pad.
- Page 28 How to Use the Safety Harness 18. This stroller has a 5-point safety harness. The Shoulder Strap Connector is designed to break away from the Waist Clip when not secured in the Crotch Strap Buckle. Make sure the Shoulder Strap Connector is in the correct position, as shown.
- Page 29 How to Use the Safety Harness WARNING Never leave child unattended. Avoid serious injury from falling or sliding out. Always use seat belt. 19. The Safety Harness can be released by pressing the button on the center of the Buckle and pulling both Waist Clips out.
- Page 30 How to Use the Safety Harness 20. The length of the Shoulder Straps can be adjusted by pulling on the adjustment buckles to tighten or loosen. The length of the waist straps can be adjusted. Press the tab at the end of the Waist Strap Clip and pull on the strap to tighten or loosen, to better fit your child.
- Page 31 How to Use the Armbar 21A. To use Armbar (I), Insert the Armbar Tongues into the corresponding openings on the Seat Frame. To release the Armbar press in on the buttons located at the sides of the Armbar, as shown (21B).
- Page 32 How to Use the Infant Car Seat Adapter WARNING Do not remove the Seat from the Stroller frame with the child inside. 22A. Remove the Seat from the Stroller Frame (refer to Step 8). Rotate both arms on the Infant Car Seat Adapter (K) down, as shown.
- Page 33 How to Use the Infant Car Seat Adapter 22B. Line up the Tongues on both sides of the Infant Car Seat Adapter to the slots on the Stroller frame as shown. Push down until it clicks into place. Pull up on the Infant Car Seat Adapter to make sure it is securely attached to the Stroller Frame.
- Page 34 How to Use the Infant Car Seat Adapter 22C. To remove the Infant Car Seat Adapter, press both buttons on the attachement and pull up.
- Page 35 Using the Chicco Infant Car Seat WARNING ONLY USE a Chicco infant car seat with this product. Always make sure child is properly harnessed in the car seat. Only use this product to transport infants that are within the size and weight limitations of the infant car seat.
- Page 36 Using the Chicco Infant Car Seat 23A. With the Infant Car Seat Adapter attached, place the Chicco infant car seat into the Stroller Frame. The infant car seat can be attached in a Forward Facing or Parent Facing position. Make sure infant car seat clicks into the Stroller Frame on both sides.
- Page 37 Using the Chicco Infant Car Seat 24. To remove the infant car seat , squeeze the Release Handle on the back of the infant car seat and lift up on the carrying handle. Note: The infant car seat can be...
- Page 38 How to Fold the Stroller WARNING When folding the Stroller, make sure that your child and other children are at a safe distance. Ensure that during the operations, the movable parts of the Stroller do not come in contact with your child. With the Seat attached: 25A.
- Page 39 How to Fold the Stroller 25B. Locate the Fold Handle and lift up on the handle, as shown. When the Stroller is folding, the front wheels will swivel to the side and Push Handle will fold down to make the Stroller compact.
- Page 40 How to Fold the Stroller With the Infant Car Seat Adapter attached: 26. To Fold the Stroller, lock rear wheel brakes, and make sure the Front Wheels are in Swivel Mode. Fold the front section of the Infant Car Seat Adapter towards the back section.
- Page 41 How to Remove the Seat Fabric 27. Remove the Seat from the Stroller Frame. Flip the Seat frame over and undo the Seat strap. Unsnap 2 snap buttons on one side of the Stroller Frame as shown. Repeat for the other side.
- Page 42 How to Remove the Seat Fabric 28. Locate both snap buttons on the footrest frame. Press in the snap button and pull the footrest from stroller frame. Repeat for the other side and slide the seat frabric from the footrest as shown.
- Page 43 How to Remove the Seat Fabric 29. Flip the Seat back over to the front. Remove the Seat from the Stroller Frame. Locate the zipper on the side of the seat and undo the zipper.
- Page 44 How to Remove the Seat Fabric 30A. Undo the hook and loop and locate the Shoulder Strap D-rings. Push the Shoulder Strap D-rings through the seat back (refer to Step 17B). Pull the Shoulder Straps through the front side to remove. 30B.
- Page 45 How to Remove the Seat Fabric 30C. Remove the plastic board in the seat back.
- Page 46 How to Remove the Seat Fabric 31A. Undo the hook and loop and locate the crotch strap D-ring. Push the D-ring through the opening on the seat bottom. Pull the crotch strap through the front side to remove. 31B. Remove the plastic board in the seat bottom.
- Page 47 How to Remove the Seat Fabric 32. To remove the crotch strap pad and the shoulder pads. Locate the positioner strap tab (on the crotch strap) and thread it through the buckle slot. Repeat for the D-ring on the crotch strap and both shoulder straps.
- Page 48 How to Reattach the Seat Pads 33. To attach the crotch strap pad, thread the crotch strap through the crotch pad. Locate both positioner strap tabs and insert the tab into the opening below the crotch buckle and the slot on the D-ring.
- Page 49 How to Reattach the Seat Pads 34. To attach the shoulder strap pad, thread the shoulder strap through the shoulder pad. Locate the positioner strap tab and insert the tab into the slot on the D-ring, as shown. Repeat for the other shoulder strap pad.
- Page 50 Cleaning and Maintenance This product requires regular maintenance. The cleaning and maintenance of the stroller must only be carried out by an adult. CLEANING Removable fabric parts of the product may be machine washed separately in cold water and mild soap on delicate cycle. No bleach. Drip dry. Periodically wipe clean plastic parts with a soft damp cloth.
- Page 51 For More Information If you have any questions or comments about this product, or are missing any of the parts please do not return this product to the store. Contact us in one of the following ways: (877)-424-4226 info.usa@artsana.com www.chiccousa.com 1826 William Penn Way Lancaster, PA 17601...
- Page 53 www.chiccousa.com...
Need help?
Do you have a question about the Corso and is the answer not in the manual?
Questions and answers