
Related Manuals for Reely Drone Copter 2-in-1


Summary of Contents for Reely Drone Copter 2-in-1
- Page 1 Operating Instructions Electric quadrocopter “Drone Copter 2-in-1” RtF Item no. 2142121...
-
Page 2: Table Of Contents
Table of contents Page Introduction ................................3 Explanation of symbols ............................3 Intended use ................................4 Package contents ..............................4 Product description ..............................5 Safety instructions ...............................6 a) General information ............................6 b) Before first use ..............................7 c) During use ..............................7 Battery information ...............................8 Transmitter controls .............................9 Using the transmitter ............................10 a) Inserting the batteries ..........................10 b) Switching on the transmitter ........................ -
Page 3: Introduction
Page 24. Disposal ................................32 a) General information .............................32 b) Batteries ..............................32 25. Declaration of Conformity (DOC) ........................32 26. Troubleshooting ..............................33 27. Technical data ..............................34 a) Transmitter..............................34 b) Quadrocopter ...............................34 1. Introduction Dear customer, Thank you for purchasing this product. This product complies with statutory, national and European regulations. To ensure that the product remains in this state and to guarantee safe operation, always follow the instructions in this manual. -
Page 4: Intended Use
3. Intended use The electric quadrocopter “Drone Copter 2-in-1” is an electrically powered helicopter-like model that is wirelessly con- trolled using the included radio remote control. The quadrocopter is designed solely for private use within the domain of model construction with the associated operating times. -
Page 5: Product Description
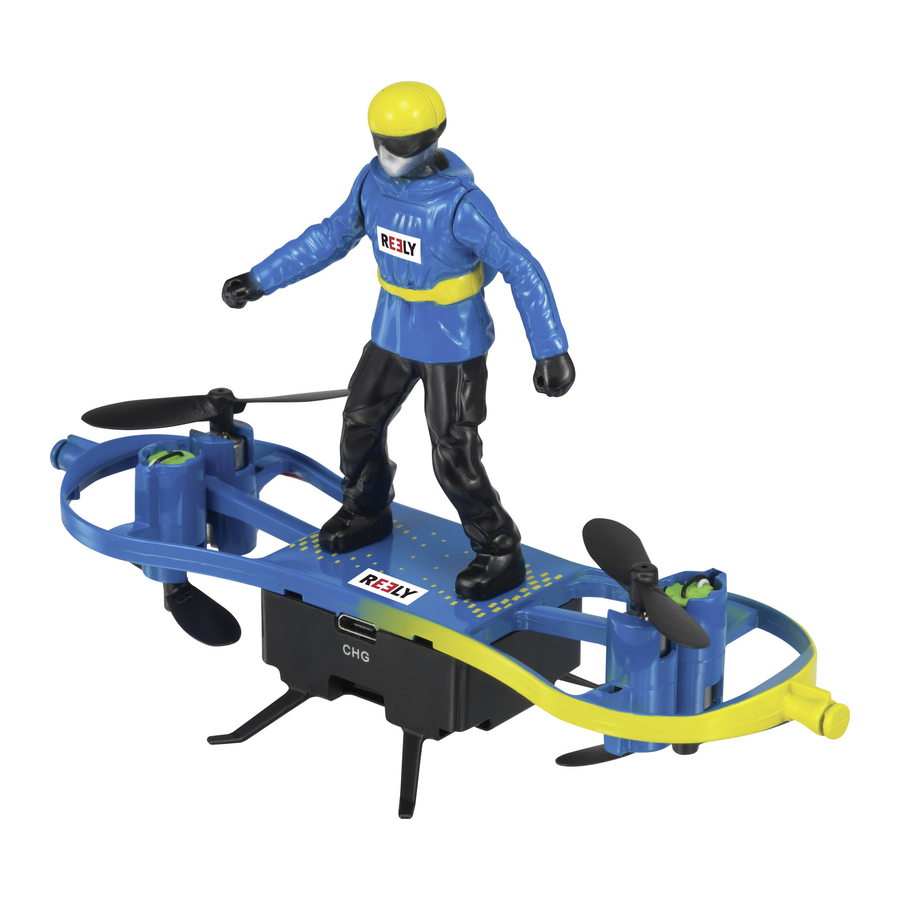
5. Product description The ready-to-fly quadrocopter “Drone Copter 2-in-1” has 4 separately controlled motors, each of which drives its own propeller. Using the simultaneous acceleration of all propellers, the quadrocopter can lift off from the ground and hover steadily in the air at appropriate propeller speeds. -
Page 6: Safety Instructions
6. Safety instructions Damage caused due to failure to observe these instructions will void the warranty. We shall not be liable for any consequential damages! We shall not be liable for damage to property or personal injury caused by incorrect handling or failure to observe the safety information! Such cases will void the warranty/guarantee. -
Page 7: B) Before First Use
b) Before first use • Select a suitable location to operate your model. • When switching on the quadrocopter, follow the procedure described below in a separate section. This ensures that the transmitter and receiver connect properly and that your model responds reliably to remote control commands from your transmitter. -
Page 8: Battery Information
7. Battery information Batteries and rechargeable batteries present numerous hazards and problems, although their handling is a matter of course today in daily life. Therefore, always observe the following general information and safety instructions when handling batteries and rechargeable batteries. •... -
Page 9: Transmitter Controls
8. Transmitter controls Figure 1 1 LED function display 2 Push button for the flip function 3 Push button for pitch trimming forward 4 Joystick for the pitch and roll function 5 Push button for roll trimming to the right 6 Push button for roll trimming to the left 7 Push button for pitch trimming backward 8 Push button for the slalom function... -
Page 10: Using The Transmitter
9. Using the transmitter The numbers used in these instructions refer to the figure alongside the text or the figures within the re- spective section. For this reason, the same number represents different locations and different controls in different images. Cross-references to other figures are indicated with the corresponding figure number. a) Inserting the batteries Two Micro batteries are required to supply the transmitter. -
Page 11: B) Switching On The Transmitter
b) Switching on the transmitter Caution, important! The quadrocopter can be operated in skater mode or in para mode. In principle, the two modes differ only in the orientation of the quadrocopter. • Para mode In para mode, the forward orientation corresponds exactly to the direction of the pilot's figure. Therefore, the orienta- tion to the back corresponds to the back of the pilot figure. -
Page 12: Operating The Quadrocopter
10. Operating the quadrocopter a) Charging the flight battery The flight battery can be charged using the included USB charging cable. The charging cable in Figure 4 is wound up for photo-technical reasons. Before first use, remove the cable tie and fully unwind the charging cable. For charging, the quadrocopter must be switched off. -
Page 13: B) Checking The Drive
b) Checking the drive Before operating the quadrocopter, test the drive. Only when all four propellers run smoothly and in a perfect circle can the model be flown with the minimum energy consumption. For this reason, you should quickly check the function of the drive propellers before each flight. -
Page 14: C) Switching On The Quadrocopter
c) Switching on the quadrocopter So that the receiver in the quadrocopter can respond to the transmitter signals, the receiver and the transmitter must have the same digital coding (pairing). For this reason, it is important that you switch the quadrocopter on as described below. -
Page 15: Basic Information On Controlling The Quadrocopter In Skater Mode
11. Basic information on controlling the quadrocopter in skater mode The following sections describe the operation of the quadrocopter in skater mode. The conversion for the para-mode and the differences in the control are described below in a separate section. Before you start using your model, you should first get acquainted with the control options available in skater mode in order to be able to control the model safely. - Page 16 Yaw function The torques that act on the model are balanced by the two right-turning and the two left-turning propellers, and the quadrocopter hovers steadily in the air. If you move the left joystick (see Figure 1, no. 13) to the left, the electronics in the model increase the speed of the propellers that turn to the right (clockwise, as seen from above) and at the same time reduce the speed of the propel- lers turning to the left (counter-clockwise).
- Page 17 Pitch function The pitch function allows you to move the quadrocopter forwards and backwards (see Figure 10). This steering is carried out with the right joystick (see also Figure 1, no. 4). When the right joystick is pushed slightly forward, the quadrocopter electronics change the propeller speeds so that the model tilts forward slightly and thus also flies forward (see dark arrows in Figure 10).
-
Page 18: Practical Flight Tips For Starting The Model
12. Practical flight tips for starting the model We recommend that you use a free area of at least 3 x 3 m for the first test flights, even if the model is very manoeu- vrable. When flying the quadrocopter outdoors for the first time, there should be absolutely no wind. Place yourself directly behind your quadrocopter. -
Page 19: Calibrating The Position Sensors
13. Calibrating the position sensors Before starting the quadrocopter, you should calibrate the position sensors. This ensures that the quadrocopter hovers smoothly at one spot and does not fly in one direction spontaneously and without a control command. Proceed as follows: Place the ready-to-fly quadrocopter on a flat, horizontal surface. -
Page 20: Starting The Quadrocopter
14. Starting the quadrocopter With the quadrocopter and transmitter switched on and the sensors successfully calibrated, the quadrocopter can be taken off. To do this, briefly move the left joystick all the way forward and then back to the middle position. The propellers will start to rotate at low speed. -
Page 21: Landing The Quadrocopter
15. Landing the quadrocopter There are two methods for landing the quadrocopter: Manual landing: If the quadrocopter is hovering, carefully reduce the flight altitude with the left joystick (see also Figure 1, no. 13) until the quadrocopter is safely back on the ground. Once the quadrocopter has landed, move the joystick to the lowest position and hold it in this position until the pro- pellers stop. -
Page 22: Trimming The Quadrocopter
16. Trimming the quadrocopter If you find out while flying that the quadrocopter wants to fly laterally to the left or to the right or to the front or the back without control command from the transmitter, correct the flight behaviour with the trimming. If you have secure control of the quadrocopter, you can adjust the trim during the flight. - Page 23 Pitch trimming: If you want to drift the quadrocopter forward (see dark arrows in Figure 15), press the button for pitch trimming back- ward several times (see also Figure 1, no. 7). If you want to drift the quadrocopter backward (see light arrows in Figure 15), press the push button for pitch trimming forward several times (see also Figure 1, no.
-
Page 24: Beginner/Sport/Expert Mode
17. Beginner/Sport/Expert mode The remote control enables individual adjustment of the control sensitivity of the quadrocopter by switching between beginner, sport and expert modes. • Beginner mode In beginner mode, the quadrocopter responds less strictly to the transmitter control commands and can thus be controlled very gently. -
Page 25: Flip Function
18. Flip function In the skater mode, the quadrocopter is able to fly lateral flips. You should fly the first flips outside when there is ab- solutely no wind. To do this, let the quadrocopter ascend to a safe altitude of approx. 2 m and then hover in position. To switch the transmitter to flip mode, briefly press the push button for the flip function (see also Figure 1, no. - Page 26 Sightseeing flight function If the sightseeing flight function is enabled, the quadrocopter automatically flies two large circles counter-clockwise. After completion of the two circles, the quadrocopter hovers again at one spot (see sketch in Figure 18). To activate the sightseeing flight function, press the button for the sightseeing flight function on the transmitter (see also Figure 1, no.
-
Page 27: Conversion Of The Quadrocopter To The Paraglider
20. Conversion of the quadrocopter to the paraglider To convert the quadrocopter from skater to paraglider, proceed as fol- lows: Step 1, see Figure 20 A: Pull the pilot figure (1) upwards off the quadrocopter. The shape of the connection in the soles of the shoe prevents the figure from being put back on the wrong side later. -
Page 28: Basic Information On Controlling The Quadrocopter In Para Mode
21. Basic information on controlling the quadrocopter in para mode Before you start using your model, you should first get acquainted with the control options available in para mode in order to be able to control the model safely. In contrast to the skater mode, where the left side of the pilot figure was directed forward, now the forward direction is identical to the viewing direction of the pilot figure. - Page 29 Yaw function If you move the left joystick (see Figure 1, no. 13) to the left, the electronics in the model increase the speed of the propellers that turn to the right (clockwise, as seen from above) and at the same time reduce the speed of the propel- lers turning to the left (counter-clockwise).
-
Page 30: Further Information On Para Mode
Pitch function The pitch function allows you to move the quadrocopter forwards and backwards (see Figure 24). This steering is carried out with the right joystick (see also Figure 1, no. 4). When the right joystick is pushed slightly forward, the quadrocopter electronics change the propeller speeds so that the model tilts forward slightly and thus also flies forward (see dark arrows in Figure 24). -
Page 31: Maintenance And Cleaning
23. Maintenance and cleaning Clean the exterior of the model and the remote control with a soft, dry cloth or brush. Never use abrasive cleaning agents or chemical solutions, as these may damage the surface of the housing. The propellers must move smoothly and motor shafts should not be bent or have any play in the bearing. Propellers that are cracked or bent or from which small pieces have broken off must always be replaced. -
Page 32: Disposal
24. Disposal a) General information Electrical and electronic devices must not be discarded with domestic waste! At the end of its service life, dispose of the product according to the relevant statutory regulations. Remove any inserted batteries/rechargeable batteries and dispose of them separately from the product. b) Batteries You are required by law to return all used batteries. -
Page 33: Troubleshooting
26. Troubleshooting This model and the remote control were built using the latest technology. However, faults and malfunction may still occur. We would, therefore, like to show you how to correct potential faults. Problem Solution The transmitter does not respond, the LEDs do not •... -
Page 34: Technical Data
27. Technical data a) Transmitter Frequency band ........2.450 – 2.478 GHz Transmission power......6 dBm Number of channels ......4 Transmission range ......approx. 40 m Operating voltage .........3 V/DC via 2x AAA/micro batteries Dimensions (W x H x D) .......119 x 75 x 50 mm Weight without batteries .......74 g b) Quadrocopter Power supply ........3.7 V/300 mAh (1S LiPo) - Page 36 This is a publication by Conrad Electronic SE, Klaus-Conrad-Str. 1, D-92240 Hirschau (www.conrad.com). All rights including translation reserved. Reproduction by any method, e.g. photocopy, microfilming, or the capture in electronic data processing systems require the prior written approval by the editor. Reprinting, also in part, is prohibited. This publication represent the technical status at the time of printing.
Need help?
Do you have a question about the Drone Copter 2-in-1 and is the answer not in the manual?
Questions and answers