Table of Contents
Advertisement
Available languages
Available languages
Advertisement
Table of Contents

Related Manuals for EAS Electric EMV70DGW


Summary of Contents for EAS Electric EMV70DGW
- Page 1 EMV70DGW • Manual de instrucciones • Users Manual www.easelectric.es...
- Page 2 AGRADECIMIENTOS Le agradecemos la compra de nuestro producto. Esperamos que saque el máximo provecho de todas las características y funciones que ofrece. Antes de utilizar el producto, por favor, lea con detenimiento y en su totalidad este Manual de Instrucciones. Conserve este manual en un lugar seguro para futuras consultas.
- Page 3 Durante horno calienta mucho. Tome precauciones para evitar tocar las resistencias del interior del horno. Impida que los niños se acerquen al horno durante su uso. Asegúrese de que el horno esté desconectado antes de cambiar la bombilla interior para evitar el riesgo de descarga eléctrica. ...
- Page 4 INDICADORES DE SEGURIDAD No utilice el horno descalzo/a. No toque el horno si tiene las manos o los pies mojados o húmedos. No abra frecuentemente la puerta del horno durante la cocción de la comida. El horno deberá ser instalado y puesto a punto por un técnico ...
-
Page 5: Instalación Del
INSTALACIÓN HORNO ESPACIO COCINA Coloque el horno en el espacio reservado para este electrodoméstico en la cocina; puede colocarse debajo de una superficie de trabajo o en un armario vertical. Fije el horno en su lugar mediante dos tornillos utilizando los dos agujeros de fijación situados en el marco del horno. -
Page 6: Exclusiones De La Garantía
CONDICIONES GARANTIA COMERCIAL Este horno tiene una garantía de reparación de dos años, a partir de fecha venta, contra todo defecto funcionamiento proveniente de la fabricación, incluyendo mano de obra y piezas de recambio. Para justificar la fecha de compra será obligatorio presentar la factura o el ticket de compra. -
Page 7: Descripción Del Producto
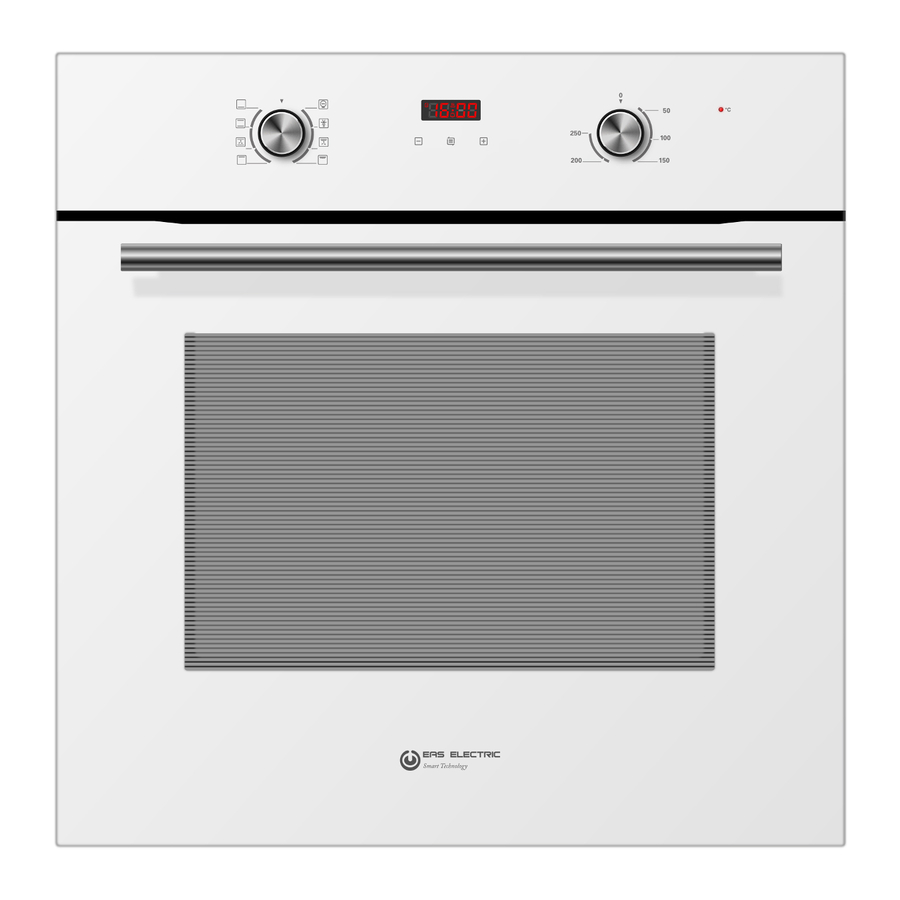
DESCRIPCIÓN DEL PRODUCTO Temperatura Modos de cocción Aumento Disminución Reloj Símbolo Descripción de funciones Lámpara Horno: permite al usuario observar el progreso de la cocción sin abrir la puerta, salvo en la función ECO. Descongelación: La circulación de aire a temperatura ambiente permite una descongelación más rápida de los alimentos congelados, sin el uso de cualquier calor. - Page 8 INSTRUCCIONES DE USO Cuando el horno se conecta por primera vez a la red eléctrica, espere a que la pantalla automáticamente muestre "12,30", una señal sonora una vez y se ilumina el "." flash. Establezca el horario actual antes de utilizar el horno. Por favor tenga en cuenta que el reloj es de 24 horas, por ejemplo 14:00 horas se muestra como 14,00.
- Page 9 1> Pulse el botón " " hasta que aparezca "Fin" en la pantalla del temporizador. (Antes de ajustar el tiempo de finalización). 2> Use "+" "-" para ajustar la hora de finalización. (Consulte las instrucciones para configurar la hora correcta del día. 3>...
- Page 10 ACCESORIOS Parrillas: Para gratinar platos o colocar recipientes para asar u hornear alimentos. Soporte desmontable: Este soporte se sitúa en el lado derecho y en el lado izquierdo del horno, pudiéndose quitar para limpiar las paredes del horno. (sólo para modelos específicos). Bandeja universal: Para cocinar grandes cantidades de alimentos como...
-
Page 11: Sustitución De La Bombilla
AVISO SOBRE LA COLOCACIÓN DE LAS PARRILAS: Para un uso seguro de las parrillas, es obligatorio colocarlas siempre entre los raíles laterales del horno. Esto garantizará una correcta retirada de la parrilla y que los alimentaros calientes no se deslicen ni se caigan. SUSTITUCIÓN DE LA BOMBILLA La bombilla de iluminación del horno es una bombilla especial resistente a altas temperaturas (240V-25W).Para sustituirla, proceder de la... -
Page 12: Instalación
ABERTURAS DE VENTILACIÓN Una vez finalizado la cocción,la temperatura de las aberturas de ventilación será mayor de 70 grados. La ventilación a través de las aberturas seguirá funcionando, hasta que la temperatura comience a estar por debajo de 60 grados. Aberturas de ventilación CONEXIÓN DEL HORNO... -
Page 13: Limpieza Y Mantenimiento
LIMPIEZA Y MANTENIMIENTO Para un buen aspecto y funcionamiento, debe de mantener el horno limpio. El moderno diseño del horno facilita su mantenimiento, reduciéndolo al mínimo. Los elementos del horno que entren en contacto con los alimentos deberán ser limpiados regularmente. ... - Page 14 ACKNOWLEDGMENT Thank you for purchasing our product. We hope you enjoy using the many features and benefits it provides. Before using this product please study this entire Instruction Manual carefully. Keep this manual in a safe place for future reference. Ensure that other people using the product are familiar with these instructions as well.
- Page 15 supervision or instruction concerning use of the appliance in a safe way and understand the hazards involved. Children shall not play with the appliance. Cleaning and user maintenance shall not be made by children without supervision. During use, the appliance becomes very hot. Care should be taken to avoid touching heating elements inside the oven.
- Page 16 If the supply cord is damaged, it must be replaced by the manufacturer, its service agent or similarly qualified persons in order to avoid a hazard. Do not use harsh abrasive cleaners or sharp metal scrapers to clean the oven door glass since they can scratch the surface, which may result in shattering of the glass.
-
Page 17: Safety Hints
SAFETY HINTS Do not use the oven unless you are wearing something on your feet. Do not touch the oven with wet or damp hands or feet. For oven: Oven door should not be opened often during the cooking period. ... -
Page 18: Warranty Exclusions
CONDITIONS OF COMMERCIAL WARRANTY This appliance has a repair warranty of two years from the date of sale, against any malfunction from the manufacture, including labor and spare parts. To justify the purchase date will be required to submit the invoice or receipt. This warranty is only effective in Spain. -
Page 19: Product Description
PRODUCT DESCRIPTION Cooking function Increasing control Temperture knob Time function Decreasing control Symbol Function description Oven Lamp: Which enables the user to observe the progress of cooking without opening the door. Oven lamp will light for all cooking functions. except ECO function. Defrost: The circulation of air at room temperature enables quicker thawing of frozen food (without the use of any heat). - Page 20 OPERATION INSTRUCTIONS When the oven is first connected to the electrical supply wait for the display automatically show "12.30", a beep sound once and the flash Ensure the correct time of the day is set before using the oven. "12""." please note that is hour clock for example PM shown as 14.00.
- Page 21 Audible warning time adjustment: This function can be used to receive audible warning at the completion of the ajusted time period. Press button to select the minute minder function The relevant symbol will flash 1> " " " " " " button to adjust minute minder Refer to the instructions for setting the correct time 2>...
- Page 22 Full automatic programming This function is used to cook after a certain period of time with a certain duration The food to be cooked is put into the oven The oven is adjusted to the desired cooking function The oven temperature is adjusted to the desired degree depending on the food to be cooked First: Press...
- Page 23 ACCESSORIES Wire shelf : For grill .dishes, cake pan with items for roasting and grilling. Slider bracket : These shelf support rails on the right and left sides of the oven can be removed for cleaning oven walls. (only for specific modles) Universal pan: For cooking large quantities of food such as moist cakes, pastries, frozen food etc,or for collecting fat/ spillage and meat juices.
-
Page 24: Shelf Placement Warning
SHELF PLACEMENT WARNING: To ensure the oven shelves operate safely, correct placement of the shelves between the side rail is imperative. Shelves and the pan only can be used between the first and fifth layers. The shelves should use with the right direction, it will ensure that during careful removal of the shelf or tray, hot food items should not slide out. -
Page 25: Ventilating Openings
VENTILATING OPENINGS When cooking is finished or in pause state or in waiting state, if the oven's center temperature is over 75 degree, the cooling fan will continue working for 15 minutes. Or when the oven's center temperature becomes lower than 75 degree, the cooling fan will stop in advance. Ventilating openings CONNECTION OF THE OVEN INSTALLATION... -
Page 26: Cleaning And Maintenance
CLEANING AND MAINTENANCE For the sake of a good appearance and reliability, keep the unit clean. The modern design of the unit facilitates maintenance to a minimum. The parts of the unit which come into contact with food have to be cleaned regularly.
Need help?
Do you have a question about the EMV70DGW and is the answer not in the manual?
Questions and answers