Table of Contents
Advertisement
Quick Links
Advertisement
Table of Contents

Related Manuals for X-Rite COLOREYE XTH


Summary of Contents for X-Rite COLOREYE XTH
- Page 1 COLOREYE Spectrophotometer OPERATION MANUAL...
- Page 2 Customer shall be responsible for packaging and shipping the defective product to the service center designated by X-Rite. X-Rite shall pay for the return of the product to Customer if the shipment is to a location within the region in which the X-Rite service center is located. Customer shall be responsible for paying all shipping charges, duties, taxes, and any other charges for products returned to any other locations.
-
Page 3: Table Of Contents
Table of Contents INSTALLATION ......................1-1 About This User Guide .................... 1-1 Basic Tasks to Get Started ..................1-1 Important Safeguards ....................1-2 Unpacking the Instrument ..................1-3 Contents of the Carrying Case ................1-3 Activating the Display ....................1-4 Optimizing Battery Performance ................ - Page 4 TABLE OF CONTENTS Options on the Hardware Menu ..............2-10 Checking NetProfiler Status ................... 2-11 NetProfiler Indicators on XTH Displays ............2-12 Choosing the Language ..................2-13 Diagnostics ......................2-13 About Your XTH ....................2-13 Sensor Peaks ....................2-13 Go To Sleep ....................2-13 Using the Driver Software ..................
-
Page 5: Installation
CHAPTER INSTALLATION About This User Guide The ColorEye XTH Operation Manual contains the information you need to install and set up the instrument, take measurements, and perform maintenance procedures on the spectrophotometer. The manual is presented in four chapters: Chapter 1: INSTALLATION, presents all important safeguards, describes the process of unpacking and connecting any cables, and understanding the basic operation of your instrument. -
Page 6: Important Safeguards
Use the Battery Properly—The rechargeable battery contains Nickel Metal-Hydride Cells. Do not incinerate, short circuit, or puncture. Use only the X-Rite approved charger. The Battery may generate explosive hydrogen gas; do not expose to flame or source of ignition. Do not use the battery inside a gas-tight package. -
Page 7: Unpacking The Instrument
INSTALLATION Unpacking the Instrument Your ColorEye XTH comes in a durable, handy carrying case. You should use this case whenever you need to transport the instrument. Below is a picture of the carrying case and its contents. Instrument (Optional) Extra Battery... -
Page 8: Activating The Display
XTH without having to remove the batteries. Simply insert the power supply/charger cable into the ColorEye XTH power connector and charging begins. You can continue to use the ColorEye XTH while the batteries are charging. For more information, refer to “Charging a Battery Installed In the Instrument”... -
Page 9: Charging The Battery
The Nickel Metal Hydride Battery Pack and Charger supplied with your unit was custom designed to provide optimum performance and minimum charge time. Use of any battery or charger not approved by X-Rite will affect your instrument’s performance and could result in damage to the unit and its charger. - Page 10 INSTALLATION the instrument. The red LED on the charger will flash for 2 seconds and then remain illuminated. Note: The label on the power cable should correspond to the label on the instrument housing. RS-232 Connection (4-pin) Charger Connection (3-pin) Figure 1-3.
-
Page 11: Operating The Keypad
INSTALLATION 4. Connect the Charger Power Cable at the Power Plug to a power outlet. The Red LED will illuminate. When the charge is complete, the Green LED will illuminate. 5. Disconnect the battery from the Charger at the Charger Connector. 6. -
Page 12: Start Up Display
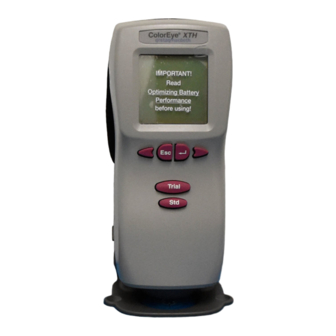
The Start Up Display is the very first to appear whenever you “wake up” your instrument. This display also appears whenever you press ESC at the Main Menu. **********50%----------- Battery Indicator Battery % ColorEye XTH Factory Certification and Re-certification Certified: 10/04/1998 Date Expires: 11/03/1999 <<darker lighter>>... -
Page 13: Using The Main Menu
The profile is sent back to you via the Internet. All future measurements will benefit from any corrections made to the profile. Refer to the following table for an understanding of different NetProfiler Status indicators you may see on your ColorEye XTH screen. -
Page 14: Installing And Removing The Targeting Foot
INSTALLATION NetProfiler Status Status Indicator on NetPalette NetPalette NetPalette NetPalette XTH Menu Loaded? Enabled? Active? Expired? Solid NP? Solid NP- Solid NP+ Blinking NP- Blinking NP+ In these cases, NetProfiler is either disabled, inactive, or both. Installing and Removing the Targeting Foot The Targeting Foot should be installed and removed with care. - Page 15 INSTALLATION To install the Targeting Foot, proceed as follows: 1. Locate the targeting foot in the carrying case. 2. Insert the targeting foot alignment tabs into the alignment slots on the instrument. You will hear the targeting foot snap into place. Refer to Figure 1-10. Targeting Foot Alignment Tabs Instrument...
-
Page 16: Taking Measurements
Connecting the Instrument Cables AC Power Supply/Battery Charger and Interim Cable Connection The ColorEye XTH is supplied with an AC Power Supply/Battery Charger (referred to throughout the manual as the “Charger”). Most of the time you will use your instrument with the battery. -
Page 17: Rs-232 Communication Cable Connection
INSTALLATION The Charger has two cables: the Power Cable and the Battery Connection Cable. A third cable, the Interim Cable, needs to be connected to the Charger and the Instrument. To perform these connections, proceed as follows: Instrument Power Battery Connection Cable Cable Charger Instrument... -
Page 18: Color Software
This Windows based software is available through your Applications Engineer or by calling X-Rite. You can use this software to download your ColorEye XTH measurement data from the instrument to your computer for quality control and then upload the new data from your computer back to the instrument. -
Page 19: General
If you should attempt unauthorized repairs yourself, you may invalidate the warranty. b. Call X-Rite when You Have Questions— A full complement of service and applications experts are ready to deliver the finest customer support and service available in the industry. When you contact X-Rite, you contact a group of professionals who are totally dedicated to your individual satisfaction in products and services. - Page 20 INSTALLATION 1-16...
-
Page 21: Setup
To set up your options, you may choose from using the actual unit to select all of the instrument options or the ColorEye XTH Instrument Driver Software program. If you are using your instrument in an environment where your color settings will frequently change (for example, you need to switch color equations or change tolerances), you should use the Setup Options on the instrument. -
Page 22: Assessments
SETUP Assessments The Assessments Display mode lists the literal description of the differences between the trial and the standard. For example, “PASS- The Trial is lighter, and stronger.” The Assessments Display is shown as Figure 2-2.The assessments apply to each component of the chosen color equation. -
Page 23: Details
SETUP DISP options data ^^^^ Index Trial D1925-YI 121. 121. Taube- WI -291. -220 NetProfiler: Active CIELAB: A - 2 RAV-SCI S:NP: Measured_Std T:NP: Measured_Trial Figure 2-4. Example of an Indices Display Details The Details Display mode lists the measurements details such as time, date, and instrument configuration for the standard and trials. -
Page 24: Area View
You may change any of these options if your environment and needs change. Using the Color Setup The Color Setup contains ColorEye XTH options that you can customize based on your unique color environment. The options will impact the measurement calculations. The Color Setup options are the following: •... -
Page 25: Choosing The Illuminants
SETUP Choosing the Illuminants The ColorEye XTH offers 16 plus 4 customized illuminants. To choose an illuminant, proceed as follows: 1. Select OPTIONS from the ColorEye XTH Main Menu. 2. Select COLOR SETUP from the Options Menu. 3. Select ILLUMINANTS from the Color Setup Menu. -
Page 26: Setting Up The Tolerances
You can set up the tolerance values for the color equation you chose in “Choosing the Color Equation”. To set up the tolerance values for this equation, proceed as follows: 1. Select OPTIONS from the ColorEye XTH Main Menu. 2. Select COLOR SETUP from the Options Menu. -
Page 27: Instrument Settings
NetProfiler Setup and Status • Language Choosing System Setup Options 1. Select OPTIONS from the ColorEye XTH Main Menu. 2. Select SETTINGS from the Options Menu. 3. Select SYSTEM SETUP from the Settings Menu. 4. The System Setup Screen is shown below: SYSTEM SETUP: >... - Page 28 You can choose to have the trial or standard information printed automatically each time a measurement is taken. This option is different than the Print Report option, which prints a standard ColorEye XTH report. Possible values are: • Standard-This option automatically prints the display each time a standard is measured.
-
Page 29: Setting The Date And Time
BLUE standard measured on September 12, 1998 (091298). Auto Saving The ColorEye XTH allows you to automatically save the current measurement values each time a standard and/or trial is measured. Possible values are: • Standard-This option automatically saves the new standard measurement data. -
Page 30: Choosing Hardware Settings
When the [save] (lowercase) changes to [SAVE] (uppercase), press Enter. The date and time settings have been saved. Choosing Hardware Settings 1. Select OPTIONS from the ColorEye XTH Main Menu. 2. Select SETTINGS from the Options Menu. 3. Select HARDWARE SETUP from the Settings Menu. -
Page 31: Checking Netprofiler Status
Checking NetProfiler Status This option is for checking NetProfiler Status and enabling or disabling NetProfiler on your spectrophotometer. 1. Select OPTIONS from the ColorEye XTH Main Menu. 2. Select SETTINGS from the Options Menu. 3. Select NETPROFILER from the Settings Menu. -
Page 32: Netprofiler Indicators On Xth Displays
SETUP NetProfiler Indicators on XTH Displays Many ColorEye XTH displays (Colorimetric, Assessments, Tristimulus, Indices, and 555 Shade Sort) contain NetProfiler Indicators. Shown below is an example display showing the NetProfiler Indicators. DISP options data NetProfiler ^^^^ Status Line: 555 Shade Sort... -
Page 33: Choosing The Language
About Your XTH This option displays the Start Up Display with the Firmware Version numbers. This information will be helpful to you in the event you need to contact X-Rite Service Personnel. To use the option, proceed as follows: 1. Select OPTIONS from the ColorEye XTH Main Menu. -
Page 34: Using The Driver Software
Refer to “Using the Driver Software” on page 2-14. If you have decided to forgo using the instrument to make your color settings and will use the software to do so, you need to first decide which of the following ColorEye XTH user profiles fits your situation: 1. -
Page 35: Setup
SETUP Figure 2-8. ColorEye XTH Driver Software Dialog Box The Driver Software Dialog Box contains four tabs: Setup, Status, Translations, and Menu. They are described below. Setup The Setup Tab contains the options for Color Space Parameters, Data Options, Contrast, Measurements, Auto Naming, Tolerance Options and values. - Page 36 Associations: You should choose Yes if you want to associate trials with a standard when data is uploaded to the PC. • Auto Save: The ColorEye XTH allows you to automatically save the current measurement values each time a standard and/or trial is measured. •...
-
Page 37: Status
The Status Tab contains information about your instrument. It is shown as Figure 2-9 Figure 2-9. Status Tab in the ColorEye XTH Driver Software Dialog Box There are no changes to make on the Status Tab. It is for informational purposes only. -
Page 38: Translations
2. The Original Text column displays the original text for the language you have chosen. This is a reference column and has all the text used in the ColorEye XTH program. It cannot be edited. The Translated Text column displays any modified version of original text. - Page 39 SETUP this column to change certain terms used in the program to accommodate your specific application. 3. Use the scroll bars at the right side of the dialog box to scroll through the Text lists. 4. To search for a specific word or phrase, a.
-
Page 40: Menu
Make Invisible button. The selected item is now displayed in the “Invisible Items” list. 2. Repeat step for each item you don’t want to appear in the ColorEye XTH display screens. 3. If you wish to start all over from the original list of Visible and Invisible Items, click the Default button. -
Page 41: Operation
Saving Data The ColorEye XTH has a setup option called Auto Save that automatically saves a standard, trial, or both standard and trial each time one is measured. For more information on the Auto Save option, refer to “Auto Saving” on page 2-9. This option works in conjunction with another setup option called Auto Name that automatically names the, trial each time a measurement is saved. -
Page 42: Recalling Data
For more information, refer to “Recent Recalls” on page 3-3. Deleting Data The ColorEye XTH is capable of storing 500 measurements. You may need to delete some previously saved measurements if you are no longer using some of the data, or need to make room for new measurements. -
Page 43: Recent Recalls
Recall data option. You can quickly find an item in the list and recall it once again to the active display: 1. Select DATA from the ColorEye XTH Main Menu. 2. Select RECENT RECALLS from the Data Menu. -
Page 44: Performing Functions
750 nm. Using the Print Function The ColorEye XTH allows you to automatically print the data currently on your display. You must have a printer connected to your instrument to use this option. For more information on the ColorEye XTH printer, refer to “Using the Printer”... -
Page 45: Using The Print Spectral Data Function
Trial from 360 to 750 nm. To use this feature, you must measure or recall a trial and have a printer attached to your instrument. Proceed as follows: 1. Select OPTIONS from the ColorEye XTH Main Menu. 2. Select FUNCTIONS from the Options Menu. - Page 46 OPERATION...
-
Page 47: Maintenance
CHAPTER MAINTENANCE General This chapter provides step-by-step routine maintenance and minor repair procedures. Cleaning the Exterior of the Instrument The exterior of the instrument should be periodically cleaned since grime buildup can occur during heavy use. Gently wipe off the Touch Pad and instrument casing with a dust free tissue. -
Page 48: Calibrating The Instrument
MAINTENANCE Calibrating the Instrument The ColorEye XTH should be calibrated with the White Ceramic Calibration Standard (tile) provided with the instrument in the pocket of the carrying strap. It is best to calibrate the instrument at the location it is to be used. This will accommodate ambient temperature changes. -
Page 49: Removing The Battery
MAINTENANCE Top Alignment Notch Calibration Standard Aperture Foot Figure 4-2. White Calibration Standard At Aperture Opening 6. Once the standard is properly aligned, press Enter. 7. The instrument makes a series of flashes. When the flashes stop, the calibration is complete. - Page 50 MAINTENANCE Step 6. Press down with Step 5. your thumbnail Lift out battery body on the battery without disconnecting connector tab. the battery wires from the instrument. Figure 4-3. Removing the Battery 7. Carefully pull out the connector from the instrument. 8.
-
Page 51: Installing The Battery
MAINTENANCE Installing the Battery In the event that you must install a new battery, proceed as follows: 1. Unscrew the wrist strap from the instrument. 2. Apply downward pressure with your fingertips to loosen the back cover snaps. 3. Loosen the back cover and open the cover towards you. 4. - Page 52 MAINTENANCE Note: It is very important to align the yellow arrow decal on the battery pack cable connector with the decal at the connection in the battery compartment. Failure to do so could result in damage to the instrument and battery pack. 6.
-
Page 53: Parts List
GM52006550 GM51802570 Cleaning Kit ColorEye XTH 3-D Targeting RAV Template/Foot (Set 5), PN: ATGT/X3DRF Provides the ability to develop customized, quick change targeting fixtures for reproducible sample presentation to significantly reduce measurement error. Package includes five customized plastic templates and five target foot devices. Regular Area of View. - Page 54 MAINTENANCE...
-
Page 55: Appendix
Appendix Initial Settings Your instrument is shipped with initial settings and options. We encourage you to change the settings and options to match those of your color environment. However, in the event that you need a starting point from which to begin again after you have changed the settings, the following table is provided. -
Page 56: Color Check Procedure
APPENDIX Color Check Procedure The ColorEye XTH comes with a Color Check Calibration Cap that allows you to monitor the accuracy of your measurements and performance of your instrument. You should perform the Color Check Procedure each day for the first 10 days of instrument operation. - Page 57 APPENDIX Color Check Record Temperature: Aperture Size: Serial Number of Instrument Date...
- Page 58 APPENDIX...
- Page 59 color Numerics check 555 Shade Sort Display equation Colorimetric Display 1-3, 1-13 communication cables 2-13 about the XTH 1-12 AC Power activating the display Data Menu 1-12 active mode database adjusting the display contrast date agreement and time 1-15 interinstrument format aperture degree observer...
- Page 60 Index 1-15 agreement Regular Area of View international service repeatability 1-15 interval maximum 1-15 1-15 wavelength typical 2-13 Italian requirements 1-14 electrical 1-14 environmental 1-14 2-13 space Japanese resolution 1-15 photometric Right Arrow key 2-13 language 1-13 RS-232 LED display Left Arrow key safety 1-15, 2-4...
- Page 61 Index system setup tolerances 1-12 taking measurements targeting 1-3, 1-10 foot time and date tolerances editing standard system touch pad cleaning trial average averaging name Tristimulus Display Unpacking US service 1-4, 1-12 waking up the instrument Warnings wavelength 1-15 interval whiteness yellowness Index-3...
- Page 64 Althardstrasse 70 8105 Regensdorf Switzerland Phone (+41) 44 842 24 00 Fax (+41) 44 842 22 22 Asia Pacific Headquarters X-Rite Asia Pacific Limited 36th Floor, No. 169 Electric Road Hong Kong, China Phone (852)2568-6283 Fax (852)2885 8610 Please visit www.xrite.com...
Need help?
Do you have a question about the COLOREYE XTH and is the answer not in the manual?
Questions and answers