Table of Contents
Advertisement
Quick Links
Acuva Eco NX-Silver
O W N E R ' S P R O D U C T M A N U A L
Acuva Eco NX-Silver
O W N E R ' S P R O D U C T M A N U A L
Acuva Technologies Inc.
Unit 1 - 3771 North Fraser Way, Burnaby, BC. Canada V5J 5G5
Telephone: 1-800-980-8810 | Email: service@acuvatech.com
acuvatech.com
Advanced UV-LED Water Purification |
acuvatech.com
Page 1
Advertisement
Table of Contents

Related Manuals for Acuva Eco NX-Silver


Summary of Contents for Acuva Eco NX-Silver
- Page 1 Acuva Eco NX-Silver O W N E R ’ S P R O D U C T M A N U A L Acuva Eco NX-Silver O W N E R ’ S P R O D U C T M A N U A L Acuva Technologies Inc.
-
Page 2: Table Of Contents
O W N E R ’ S P R O D U C T M A N U A L Summary This document is the product manual for the Eco NX-Silver, and includes safety, product specifications, installation, and maintenance information. -
Page 3: Product Overview
Enjoy the peace of mind that your Eco NX-Silver will deliver and please contact us if you have any questions. The Eco NX-Silver is certified by IAPMO R&T to NSF/ANSI 55 Class “B” for the supplemental bacterial treatment of disinfected public drinking water or other drinking water that has been tested and deemed acceptable for human consumption by the state or local health agency having jurisdiction. -
Page 4: Safety Information And Warnings
WARNING A steady blue indicator light (illuminating the Acuva logo) on the device and smart faucet (if installed) while water is flowing is the only indication that the water is safe to drink. If the blue light is not lit while the faucet is open, please check the “Troubleshooting”... -
Page 5: Product Information
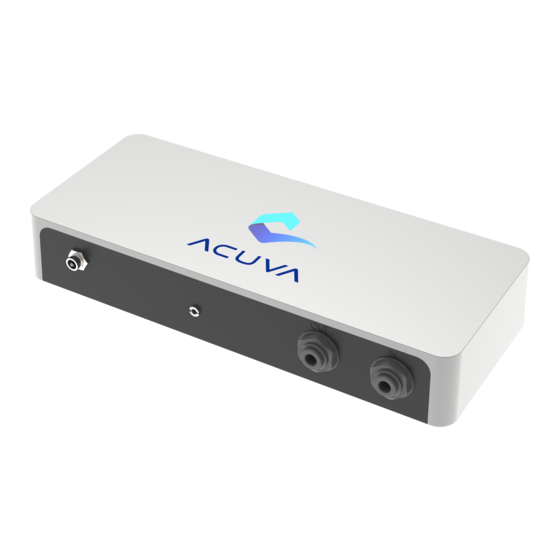
Maximum Water Temperature Maximum Working Pressure 100 PSI Minimum Working Pressure 12 PSI LED Life-time 1,000 hr (on demand) Maximum Ambient Relative Humidity Overview of Your Eco NX-Silver Water Purifier Indicator Light Advanced UV-LED Water Purification | acuvatech.com Page 5... -
Page 6: Installation Guide
Eco NX-Silver* Flow Restricter Power Plug Cable Smart Faucet *Item No. 5 (Eco NX-Silver) is certified for NSF 55 and 372 and other installation components are not included as part of the certification. Advanced UV-LED Water Purification | acuvatech.com Page 6... -
Page 7: Installation Instructions
Snap the pre-filter into its wall- mounted clips. 6. To install the Eco NX-Silver (item no. 5), mount it to the DIN-rail as seen in the “Mounting the Unit” figure. 7. Cut a length of 1/4” tubing that will connect the pre-filter to the Eco NX- Silver’s inlet and push both ends of the tubing into place. -
Page 8: Mounting The Unit
2. Connect the DC power source or AC to DC power adapter to the device. Hand-tighten the nut to the threaded jack to secure it. 3. If there is no water flow on powering up, the Acuva logo should glow green for 30 seconds. -
Page 9: Maintenance
O W N E R ’ S P R O D U C T M A N U A L Maintenance The Eco NX-Silver is designed to give years of trouble-free use. Acuva products use state-of-the-art UV-LEDs, meaning there are no mercury bulbs to replace. -
Page 10: Standard Terms And Conditions
Limited Warranty. Where you purchased the Product from Acuva’s Site or other online vendors the date of purchase is the date of the purchase invoice issued to you by Acuva or such online vendors by email. Where you purchased the Product from an authorized reseller at a physical location, the date of purchase is the date of the invoice issued to you at the physical location. - Page 11 The limited warranty does not apply: 1. To normal wear and tear; 2. If the Product was not purchased from Acuva or its authorized retailers; 3. To damage caused by misuse, corrosion, moisture or liquids, proximity or exposure to heat or external environment, accident, abuse, misuse, neglect, improper installation or misapplication;...
-
Page 12: Appendix A: Faucet Installation Instructions
Acuva Eco NX-Silver O W N E R ’ S P R O D U C T M A N U A L Appendix A: Faucet Installation Instructions 1. Drill a 3/4” hole into the counter-top where the Smart Faucet will be inserted.
Need help?
Do you have a question about the Eco NX-Silver and is the answer not in the manual?
Questions and answers