Table of Contents
Advertisement
1.
SAFETY INSTRUCTION .............................................................................................
2.
2.1
2.2
Alpha 607 & 608 Models .....................................................................................
2.3
Alpha 612 Models ...............................................................................................
3.
3.1.2 Alpha 607 & 608 Models .....................................................................................
3.1.3 Alpha 612 Models .............................................................................................
3.2
Alpha 604/607/608/612 Spare Parts ...................................................................... 10
3.3
Charger Assembly .................................................................................................
4.
RECEIVER OUTLINE
4.1. Alpha 604 Models External/Internal Assembly ....................................................
4.2
Alpha 607 & 608 Models Internal Assembly .......................................................
4.3 Alpha 612 Models Internal Assembly ...................................................................
5.
5.1 Alpha 604 Models
5.2 Alpha 607 Models .................................................................................................
5.3 Alpha 608 Models .................................................................................................
5.4 Alpha 612 Models .................................................................................................
6.
SYSTEM CONFIGURATIONS
6.1 How to Set ID Codes .............................................................................................
6.2 Transmitter RF Channel Setting .............................................................................
7.
7.1 How to Set Receiver ID Codes .............................................................................. 31
7.4 Frequency (RF) Channels Table .............................................................................. 36
8.
9.
9.1 Preparation For Installation ...................................................................................
9.2 Step-By-Step Installation .......................................................................................
9.3 System Testing .......................................................................................................
9.4 Receiver System Status LED Display.....................................................................
10.1 Charger Operation .................................................................................................
10.2 Battery Charger LED Status Light .........................................................................
11. TROUBLE SHOOTING.................................................................................................
12. SYSTEM SPECIFICATION ........................................................................................
13. PARTS LIST .................................................................................................................
T
A
B
L
E
O
T
A
B
L
E
O
.....................................................................................
.....................................................................................
.....................................................................................
.............................................................................. 32
.............................................................................. 32-35
.............................................................................. 37-38
.............................................................................. 38
F
C
O
N
T
E
F
C
O
N
T
E
- 1 -
N
T
S
N
T
S
Page
2
3
4
5
6-7
7-8
8-10
11
12-13
14-15
16-17
18
19-20
21
22-28
29
30
39
39-40
40
41-42
43
44
45
46-47
48
Advertisement
Table of Contents

Related Manuals for Fomotech Alpha 600 Series


Summary of Contents for Fomotech Alpha 600 Series
-
Page 1: Table Of Contents
Page SAFETY INSTRUCTION ..................... PUSHBUTTON CONFIGURATION Alpha 604 Models ..................Alpha 607 & 608 Models ..................Alpha 612 Models ....................TRANSMITTER OUTLINE 3.1.1 Alpha 604 Models ..................3.1.2 Alpha 607 & 608 Models ..................3.1.3 Alpha 612 Models ..................... 8-10 Alpha 604/607/608/612 Spare Parts .............. -
Page 2: Safety Instruction
The Alpha 600 series are relatively simple to use, however, it is very important to observe the proper safety procedures before, during, and after operation. When used properly, the Alpha 600 series will enhance safety, productivity and efficiency in the workplace. -
Page 3: Pushbutton Configuration
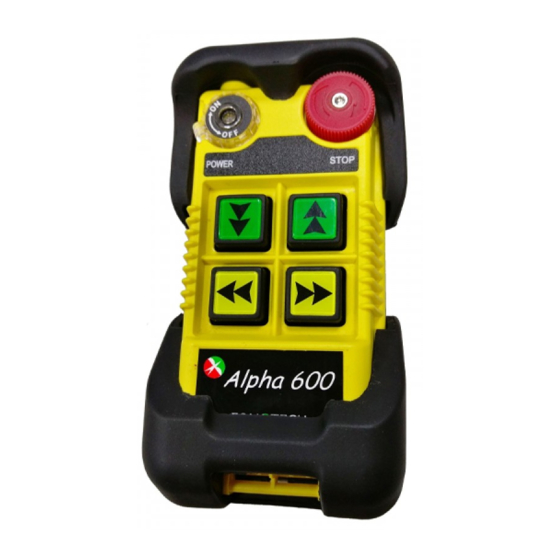
2.1 Alpha 604 Models 1. α604A (4) single speed pushbuttons 2. α604B (4) double speed pushbuttons POWER STOP a604 Below are some of many types of pushbutton configurations that are also available, please contact your dealer for more details. Interlocked (Can also be set to non-interlocked via an external programmer unit). - 3 -... -
Page 4: Alpha 607 & 608 Models
2.2 Alpha 607 & 608 Models 1. α607A (7) single speed pushbuttons 2. α607B (6) double speed pushbuttons + (1) single speed pushbuttons 3. α607AT (6) single speed pushbuttons + (1) SELECT I/II pushbutton 4. α607BT -- (6) double speed pushbuttons + (1) SELECT I/II pushbutton 5. -
Page 5: Alpha 612 Models
2.3 Alpha 612 Models 1. Alpha 612A → (12) one-speed pushbuttons 2. Alpha 612B → (11) one-speed pushbuttons + I/II select pushbutton* 3. Alpha 612C-1 → (6) two- speed + (6) one-speed pushbuttons 4. Alpha 612C-2 → (8) two-speed + (4) one-speed pushbuttons 5. -
Page 6: Transmitter Outline
3.1 Transmitter Outline 3.1.1 Alpha 604 3.1.1.1 SIZE:140mm X 68mm X 30mm 3.1.1.2 TX INTERNAL MODULE – Encoder board & Induction charging board 1) Encoder board 2) Induction charging board - 6 -... - Page 7 3.1.1.3 TRANSMITTER INTERNAL ASSEMBLY (1) Internal antenna (2) Status LED display (3) Battery contact (4) Transmitter induction charging port (5) Programming port (6) ID code dip-switch (7) JP2 setting pin (8) JP1 setting pin 3.1.2 Alpha 608 3.1.2.1 SIZE: 189mm X 68mm X 30mm (Fig.1) Transmitter Outline - 7 -...
- Page 8 3.1.2.2 TX INTERNAL MODULE – encoder board、electromagnetic induction charging board Encoder board Electromagnetic induction charging (Fig.4) (Fig.5) 3.1.2.3 TRANSMITTER INTERNAL ASSEMBLY (1) Internal antenna (2) Status LED display (3) Battery contact (4) Transmitter induction charging port (5) Programming port (6) ID code dip-switch (7) JP2 setting pin (8) JP1 setting pin (Fig.2) Front View...
-
Page 9: Alpha 612 Models
3.1.3 Alpha 612 3.1.3.1 SIZE: 235mm X 68mm X 30mm (Fig.1) Transmitter Outline 3.1.3.2 TX INTERNAL MODULE 1) Encoder Board 2) Induction charging board - 9 -... -
Page 10: Alpha 604/607/608/612 Spare Parts
3.1.3.3 TRANSMITTER INTERNAL ASSEMBLY (1) Internal antenna (2) Status LED display (3) Battery contact (4) Transmitter induction charging port (5) Programming port (6) ID code dip-switch (7) JP2 setting pin (8) JP1 setting pin (Fig.2) Front View (Fig.3) Back View 3.2 Alpha 604/607/608/612 Spare Parts (1) Charging cable (2) Charger... -
Page 11: Charger Assembly
3.3 Charge Assembly Electromagnetic charging loop board Charging board Battery Charger Assembly (Fig.6) - 11 -... - Page 12 SIZE:310mm X 134mm X 72mm HOIST F2 5A COM1 TROLLEY F3 5A COM2 BRIDGE F4 5A COM3 LV/AUX1 14 LV /AUX2 AUX1 AUX2 F5 5A COM4 MAIN MAIN COM5 L1(X1) POWER L2(X2) GRN/YEL Anti-vibration spring must be grounded MOD: I D: FREQ: CH .
- Page 13 (Fig. 15) Internal Parts Assembly Receiving RF module Secondary power AC fuse (0.50A) Primary power AC fuse (1.0A) System status LED display* External antenna port ID code dip-switch RF channel dip-switch Contact relay LED display Pushbutton #1 and #2 fuse (5.0A) 10) MAIN fuse (5.0A) 11) Contact output seat (CN3) 12) Low-voltage (LV) fuse (5.0A)
- Page 14 SIZE:310mm X 134mm X 72mm HOIST F2 5A COM1 TROLLEY F3 5A COM2 BRIDGE F4 5A COM3 LV/AUX1 14 LV /AUX2 AUX1 F5 5A AUX2 COM4 MAIN MAIN COM5 L1(X1) POWER L2(X2) GRN/YEL Anti-vibration spring must be grounded MOD: I D: FREQ: CH .
- Page 15 (Fig. 9) Internal Parts Assembly 1) Receiving RF module 2) External programming port 3) Secondary power AC fuse (0.50A) 4) Contact output seat (CN8) 5) Primary power AC fuse (1.0A) 6) AC power input seat (CN2) 7) Internal Antenna 8) System Status LED display* 9) External antenna port 10) ID code dip-switch 11) RF channel dip-switch...
- Page 16 SIZE:300mm X 230mm X 86mm (Fig. 17) External Parts Assembly Transparent top cover Mounting bracket with shock absorbers Light-gray colored base Cable gland / Cord grip - 16 -...
- Page 17 (Fig. 18) Internal Parts Assembly 1) Power LED display* 12) Pushbutton #1 and #2 relay fuse (5.0A) 2) SQ LED display** 13) Receiving RF module 3) Status LED display**** 14) External antenna port 4) DC power relay LED display*** 15) RF channel dip-switch 5) Programming port 16) ID code dip-switch 6) Jumper settings...
-
Page 18: Output Contact Diagrams
(Alpha 604A) (Alpha 604B) MAIN MAIN POWER POWER - 18 -... - Page 19 ( Alpha 607A) (Alpha 607B) HOIST HOIST F2 5A F2 5A COM1 COM1 TROLLEY TROLLEY F3 5A F3 5A E/W2 COM2 COM2 BRIDGE BRIDGE F4 5A F4 5A N/S2 COM3 COM3 LV/AUX1 14 LV LV/AUX1 AUX1 AUX1 F5 5A F5 5A COM4 COM4 MAIN...
- Page 20 ( Alpha 607AT) (Alpha 607BT) HOIST HOIST F2 5A F2 5A COM1 COM1 TROLLEY TROLLEY F3 5A F3 5A E/W2 COM2 COM2 BRIDGE BRIDGE F4 5A F4 5A N/S2 COM3 COM3 LV/SEL-I 14 LV LV/SEL-I /SEL-II /SEL-II SEL-I SEL-I SEL-II F5 5A SEL-II F5 5A...
- Page 21 ( Alpha 608A) (Alpha 608B) HOIST HOIST F2 5A F2 5A COM1 COM1 TROLLEY TROLLEY F3 5A F3 5A E/W2 COM2 COM2 BRIDGE BRIDGE F4 5A F4 5A N/S2 COM3 COM3 LV/AUX1 LV/AUX1 14 LV /AUX2 /AUX2 AUX1 AUX1 AUX2 AUX2 F5 5A F5 5A...
- Page 22 (Alpha 612A) – same as Alpha 580A+2 - 22 -...
- Page 23 (Alpha 612B) – same as Alpha 580B+2 - 23 -...
- Page 24 (Alpha 612C-1) – same as Alpha 580C-1+2 - 24 -...
- Page 25 (Alpha 612C-2) – same as Alpha 580C-2+2 - 25 -...
- Page 26 (Alpha 612D) – same as Alpha 580D+2 - 26 -...
- Page 27 (Alpha 612E-1) – same as Alpha 580E-1+2 - 27 -...
- Page 28 (Alpha 612E-2) – same as Alpha 580E-2+2 - 28 -...
-
Page 29: How To Set Id Codes
6.1.1 Set by programming tool 6.1.2 Set by encoder board JP1, 1 pin and dip-switch Setting Steps: (1) Rotate the transmitter power to OFF position (2) Disassemble shock-absorbing rubber (3) Put the transmitter pushbutton downward and disassemble transmitter bottom casing. (4) Set ID code with dip-switch and put short boot on 1 pin of JP1. -
Page 30: Transmitter Rf Channel Setting
Transmitter channel setting (select the channel you would like to operate. No exceed to channel limit) 6.2.1 Set by programming tool 6.2.2 Set by encoder board 2 & 3 pin of JP1 and dip-switch When setting frequency on TX board JP1, put short boot on 2 &... - Page 31 α α α α Top slot “1” Bottom slot “0” ID DIP-SW Set the ID codes needed on the decoder board dip-switch. For example: the ID codes set above 10000111. α α Please refer Fig. 18 receiver internal parts assembly (Page 17) for ID code 8-position dip-switch to set receiver ID code.
-
Page 32: Receiver Setting
7.2 Receiver RF Channel Setting There are 68 sets of user-adjustable receiving RF channels that can be set manually via a 8-position dip-switch located to the right of the receiving RF module. Change the receiving RF channel simply by resetting these 8-position dip-switch. - Page 33 Jumper Set table: in-plant setting (default). Power key to activate relay MAIN relay (After turning Open “on” the transmitter power and pressing the emergency Stop button) Open No auto shutdown time on Main relay The receiver MAIN will be deactivated after consecutive Short 5 minutes of standby time.
- Page 34 7.3.3 Alpha 612 Models Dip-Switch Function Table Model Pushbutton Dip-Switch Setting Description 1 & 2 → 1 Not Interlocked 3 & 4 DIP 1 → 0 Interlocked 5 & 6 → 1 Not Interlocked 7 & 8 DIP 2 → 0 Interlocked 612A →...
- Page 35 DIP 2,3 → 00 Momentary relay contact DIP 2,3 → 01 Latching/toggle relay contact DIP 2,3 → 10 Activate the 3 speed → 1 Latching/toggle relay contact DIP 4 → 0 Momentary relay contact Both 1 and 2 speed contact Both 1 and 2 speed...
-
Page 36: Frequency (Rf) Channels Table
FREQUENCY DIP-SWITCH SETTING CHANNEL 433.075 MHz 00000001 433.100 MHz 00000010 433.125 MHz 00000011 433.150 MHz 00000100 433.175 MHz 00000101 433.200 MHz 00000110 433.225 MHz 00000111 433.250 MHz 00001000 433.275 MHz 00001001 433.300 MHz 00001010 433.825 MHz 00001011 433.850 MHz 00001100 433.875 MHz 00001101 433.900 MHz... - Page 37 FREQUENCY DIP-SWITCH SETTING CHANNEL 434.400 MHz 00100010 434.425 MHz 00100011 434.450 MHz 00100100 434.475 MHz 00100101 434.500 MHz 00100110 434.525 MHz 00100111 434.550 MHz 00101000 434.575 MHz 00101001 434.600 MHz 00101010 434.625 MHz 00101011 434.650 MHz 00101100 434.675 MHz 00101101 434.700 MHz 00101110 434.725 MHz...
-
Page 38: Transmitter Operation & Status Light
& & 8.1 Transmitter Operating Steps 1. Make sure the two “AA” NiMH rechargeable batteries are installed correctly. Please note the polarity of the batteries. 2. Status lights_To operate the transmitter, please rotate the power key on the top-left corner clockwise to “on”... -
Page 39: Transmitter Status Light
Power status light STOP: press → lock STOP: Elevate clockwise → reset (Turn on the transmitter at any time) (emergency stop) 8.2 Transmitter Status Light Type Status Solution LED Indication Place transmitter into Charging Red light ON charger Power on when voltage is Red light flash ON_0.1/OFF_1.9 sec BATT<2.2V (until power off) -
Page 40: Receiver Installation
1. Required Tools for Receiver Installation: (1) Flat Head Screwdriver (-) (2) Phillips Head Screwdriver (+) (3) Multi-Meter (4) 14mm Wrench x 2 (5) Power Drill withφ10.5mm Drill-Bit 2. Check to ensure that your receiver is not set to the same RF channel and ID code as any other systems in operation at the same facility or within 300-meter distance. -
Page 41: System Testing
2 5 5 mm 4 - O10.5 2 7 8 mm (Fig. 21) Alpha 604, 607, 608 Models 2 5 5 mm 4 - O10.5 2 7 8 mm (Fig. 22) Alpha 612 Models 1. Connect the power source to the receiver and test the MAIN relay output by pressing the red emergency stop button (EMS) and observe that it properly opens and closes the main line disconnect contactor. -
Page 42: Receiver System Status Led Display
9.4 Receiver system Status LED Display LED status light Receiver system Status LED Display Type Led Indication Problem and Solution EEPROM error – reprogramming required. Constant red light. Incorrect receiver ID code setting (see note below). ON → 1.0 second ID code not matched on both the transmitter and OFF →... - Page 43 9.4.1 Alpha 612 Receiver System Status LED Display Led Indication Reason Solution Normal-voltage Power LED display Under-voltage Transmitted signals detected and received No transmitting signal detected SQ, Status LED display 1.Transmitter standby Turn on the transmitter BLINK 2.Interference Turn off the transmitter Normal operation Relay LED display Receiver defective...
-
Page 44: Battery Charger
10.1 Charger Operation Electromagnetic Induction Charge The electromagnetic induction charger with undisclosed metal charging contacts on transmitter provides immediate charging simply by sliding in the transmitter into the charger. No need to open the battery cover to replacing batteries. To avoid rain, high temperature, humidity and corroding air, please place or install the battery charger indoor with good ventilation. -
Page 45: Battery Charger Led Status Light
POWER Charging completed Charging Charging failed Slide-in transmitter into battery charger (transmitter vinyl protective cover has to be taken off) α604 α612 10.2 Battery Charger LED Status Light Item Status Condition Status Light Startup check Within 2 seconds after power is on Red + Green LED for 2 sec No battery inside transmitter battery Charging failed... -
Page 46: Trouble Shooting
Should the operator find the equipment not operating normally, please check the chart below for simple trouble shooting tips. Problem Possible Reason Solution Ensure the correct transmitter is Transmitter does Transmitter and the receiver are in use. The labels on the receiver not communicate not on the same RF channel and the transmitter will identify the... -
Page 47: System Specification
Transmitter Unit Source Voltage Ni-MH AA size battery 2.4V (no contact charging) Antenna Impedance Internal Antenna 50 ohms. External antenna is available. Dimension 604 Models 140mm x 68mm x 30mm 607, 608 Models 189mm x 68mm x 30mm 612 Models 235mm x 68mm x 30mm Weight 604 Models... - Page 48 Charger Unit Dimension 120mm x 105mm x 105mm Voltage 100~240V 50/60Hz Power Consumption Max7 Watt Operating Temperature 0℃~ +40℃ Heat Ventilation Temperature Control Fan Charging Current About 600mA @3V Charging Time About 5hrs @2500mA Charging Detection -ΔV + Temperature Receiver Unit Frequency Band BRX - 433 MHz Channel Spacing...
-
Page 49: Parts List
Transmitter Part No. 1. Encoder board (Alpha 607A) BEN607A Encoder board (Alpha 607B) BEN607B Encoder board (Alpha 607AT) BEN607AT Encoder board (Alpha 607BT) BEN607BT Encoder board (Alpha 608A) BEN608A Encoder board (Alpha 608B) BEN608B 2. A608 electromagnetic induction board ELE600 3.
Need help?
Do you have a question about the Alpha 600 Series and is the answer not in the manual?
Questions and answers