Advertisement
ATTACH YOUR RECEIPT HERE
Serial Number
Questions, problems, missing parts? Before returning to your retailer, call our customer
service department at 1-877-447-4768, 8:30 a.m. – 4:30 p.m. CST, Monday – Friday or log
on to customerservice@ghpgroupinc.com.
70-10-114
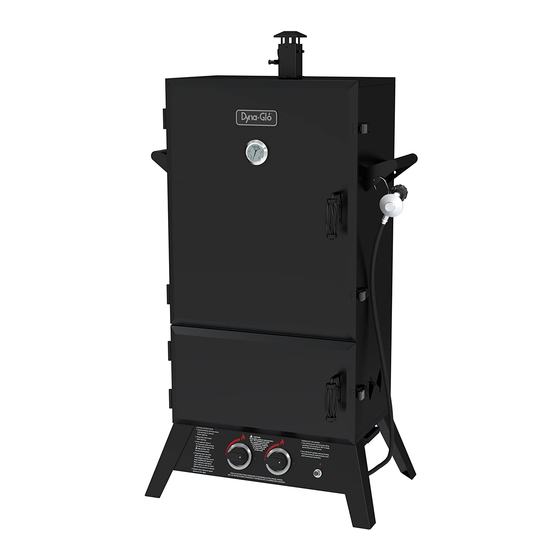
VERTICAL GAS SMOKER
Purchase Date
1
MODEL #DGW1904BDP-D
Français p. 29
Français p.
Español p. 57
Español p.
ANS Z21.89-2013
CSA 1.18-2013
Outdoor Cooking
Specialty Gas
Appliances
REV. 1/21/15
XX
XX
Advertisement
Table of Contents

Related Manuals for Dyna-Glo DGW1904BDP-D


Summary of Contents for Dyna-Glo DGW1904BDP-D
- Page 1 VERTICAL GAS SMOKER MODEL #DGW1904BDP-D Français p. 29 Français p. Español p. 57 Español p. ANS Z21.89-2013 CSA 1.18-2013 Outdoor Cooking Specialty Gas Appliances ATTACH YOUR RECEIPT HERE Serial Number Purchase Date Questions, problems, missing parts? Before returning to your retailer, call our customer service department at 1-877-447-4768, 8:30 a.m.
-
Page 3: Table Of Contents
TABLE OF CONTENTS Safety Information ......................... 4 Package Contents ......................... 7 Hardware Contents ........................8 Preparation ........................... 8 Assembly Instructions ......................... 9 Operation Instructions ........................14 Lighting Instructions ........................20 Care and Maintenance ........................23 Troubleshooting ..........................25 Warranty ............................26 Replacement Parts List ........................ -
Page 4: Safety Information
DANGER: Failure to follow these instructions could result in fire, explosion, or burn hazard which could cause property damage, personal injury or death. SAFETY INFORMATION Please read and understand this entire manual before attempting to assemble, operate or install the product. - Page 5 KEEP the fuel supply hose away from any heated surface(s). SAFETY INFORMATION • DO NOT store or use this appliance near gasoline or other combustible liquids or where other combustible vapors may be present. • DO NOT use this appliance as a heater. •...
- Page 6 SAFETY INFORMATION • Do not use the smoker if the burner fails to light or fails to remain lit. Under such conditions, gas should be turned off and the fuel cylinder should be disconnected. • Use in high wind conditions that result in poor burner operation such as blowing out and flaring should be avoided.
-
Page 8: Package Contents
HARDWARE CONTENTS shown actual size M6x12mm M4x10mm M6 Nut Screw Screw Qty. 4 Qty. 42 Qty. 6 PREPARATION Before beginning assembly of product, make sure all parts are present. Compare parts with package contents list and hardware contents above. If any part is missing or damaged, do not attempt to assemble the product. -
Page 9: Assembly Instructions
ASSEMBLY INSTRUCTIONS . 1 CAUTION: Remove the upper (P) and lower (Q) doors before beginning assembly. Attach rear legs (H) & right-front leg (M) & left –front leg (N) to smoker body (G) using twelve M6x12 screw (AA). Hardware Used M6x12 Screw . - Page 10 ASSEMBLY INSTRUCTIONS 3 . CAUTION: This unit is HEAVY! Do not attempt this step without assistance! With the assistance of a helper, stand the unit upright on its legs on a firm and level surface. ( Make sure that legs are attached). Place the upper (P) and lower (Q) doors back onto the hinges of the smoker body (G) and close the doors.
- Page 11 ASSEMBLY INSTRUCTIONS . Insert the cooking grate supports (F) into the corresponding holes inside the smoker body (G) starting from the bottom up. NOTE: There are 12 possible positions to install the cooking grate according to the need of the user. .
- Page 12 ASSEMBLY INSTRUCTIONS 7 . Attach lifting handle (B) to smoker body (G ) using four M6x12 screw (AA). Repeat on other side. Hardware Used M6x12 Screw 8 . Attach door handle (D) to upper door (P) using two M6x12 screw (AA) and two M6 nut (CC). Repeat for lower door (Q).
- Page 13 ASSEMBLY INSTRUCTIONS 10 . Slide the water bowl (O) onto the upper support bracket (K) inside the smoker body (G). 11 . Slide the cooking grates (E) onto the grate supports (F) inside the smoker body (G). Installing the Rib Rack (Optional) Place the rib rack (T) directly onto the desired grate before sliding the grate onto the supports.
-
Page 14: Operation Instructions
ASSEMBLY INSTRUCTIONS . Slide the grease cup (I) onto the grease cup support of the smoker body (G) bottom. Repeat on the other side. . Remove the igniter cap by turning it counter-clockwise. Insert the AAA battery (U) into the igniter body with positive (+) end facing out. - Page 15 OPERATION INSTRUCTIONS Any fuel supply cylinder used must be constructed and marked in accordance with specifications for propane cylinders of the U.S. Department of Transportation (DOT) CFR 49, or the Standard for Cylinders, Spheres and Tubes for the Transportation of Dangerous Goods, CAN/CSA B339. The appliance is to be used only with the 20-pound, vertical standing vapor withdrawal type tank and must include a collar to protect the cylinder valve.
- Page 16 STORE THE TANK IN A PROPER PLACE AS INDICATED IN THIS MANUAL.
- Page 17 OPERATION INSTRUCTIONS CHECKING FOR LEAKS After connections are made, check all connections and fittings for leaks with a soap solution. 1. With all valves closed, apply the leak check solution (50/50 mix of dishwashing soap and water) to all gas carrying connections and fittings. 2.
- Page 18 OPERATION INSTRUCTIONS Cooking Tip Line the water bowl with aluminum foil before each use. This will make it easy to clean and help your water bowl last longer. To make adding water easier and safer, use a clean watering can with a long spout. Adding Wood Chips To add wood chips before cooking, simply fill the wood chip box with your choice of flavoring hardwood chips.
- Page 20 SUGGESTED SMOKING AND MEAT TEMPERATURES Smoking Temperatures Acurate smoking temperatures are critical for safely cooking food when meat probes are not available. Please understand that using the factory installed temperature gauge is an acceptable WRROIRUVPRNLQJIRRGEXWLW·VQRWDOZD\VWKHLGHDOPHDQVRIPHDVXULQJWKHPRV WDFFXUDWHVPRNLQJ temperature because internal smoker temperatures can vary between the top and bottom cooking grates.
-
Page 21: Lighting Instructions
Suggested Safe Minimum Suggested Smoking Safe Minimum Food Smoking Food Temperatures Temperatures Temperatures Temperatures Game Meat, Poultry, Fish Chops, steaks and roasts Beef, veal and lamb (pieces and whole cuts) (deer, elk, moose, carribou/reindeer, antelope and pronghorn) Well done 225°F (107.2°C) 170°F (77°C) Medium-rare 225°F (107.2°C) - Page 22 1. Check all connections for leaks using the “soap water” test as explained on page 16 “checking for leaks.” 2. Open both of the smoker cabinet doors. Always keep the doors open during lighting. 3. Check for any blockage to each venturi tube or burner, damper setting, and ventilation setting.
- Page 23 OPERATION INSTRUCTIONS Match Lighting Procedure Check that both control knobs are turned to the “OFF” O position before beginning match light procedure. Warning : Always light your smoker with both doors open. 1 . Repeat steps 1 through 5 of the igniter lighting system (PAGE 20). 2 .
- Page 24 OPERATION INSTRUCTIONS Cooking Tip: Damper Adjustments WARNING : The dampers on the smoker body and the handle on the top damper housing may become very hot while cooking. Always wear a heat resistant glove when adjusting. • For best performance, rotate the smoker before lighting so that the front or back of the body is facing the wind.
-
Page 25: Care And Maintenance
CARE AND MAINTENANCE AFTER USE SAFETY AND MAINTENANCE WARNING • Use caution when lifting and moving the smoker to avoid strain injuries. Two people are recommended to lift or move the smoker. • DO NOT store or use the smoker near gasoline or other combustible liquids or where flammable vapors or liquids may be present. - Page 26 CARE AND MAINTENANCE Inspect the flames at the burner by looking through the observing hole on left side of the Burner and control unit “H”. A good flame should be blue with a yellow tip 1 to 2 in. high. If flames are excessively yellow and irregular, oil residue and food deposits may be collecting on the burner.
-
Page 27: Troubleshooting
TROUBLESHOOTING If you have any questions regarding the product, please call customer service at 1-877-447-4768, 8:30 a.m. – 4:30 p.m. CST, Monday – Friday. PROBLEM POSSIBLE CAUSE CORRECTIVE ACTION 1 .Clean the igniter electrode. The burner will not 1 . The igniter electrode may be light using the igniter covered with grease or residue. -
Page 28: Warranty
This warranty gives you specific legal rights, and you may have other rights that vary from state to state. GHP Group Inc. 6440 W. Howard St. Niles, IL USA 60714-3302 Item name: LP Gas Smoker Model #: DGW1904BDP-D Rated BTU (Per Burner): 10,000 BTU/Hr... -
Page 30: Replacement Parts List
REPLACEMENT PARTS LIST For replacement parts, call our customer service department at 1-877-447-4768, 8:30 a.m. – 4:30 p.m. CST, Monday – Friday. Printed in China...
Need help?
Do you have a question about the DGW1904BDP-D and is the answer not in the manual?
Questions and answers