Table of Contents
Advertisement
Quick Links
Advertisement
Table of Contents

Related Manuals for BZB Gear BG-CAM-USB4K


Summary of Contents for BZB Gear BG-CAM-USB4K
- Page 1 HD Conference Camera User Manual BG-CAM-USB4K...
-
Page 2: Table Of Contents
Contents Product Description Foreword ------------------------------------ Notice ------------------------------------ Supplied Accessories ------------------------------------ Performance Characteristics Tech parameters ------------------------------------ ------------------------------------ Camera parameters Quick Start Interface definition ------------------------------------ Interface diagram ------------------------------------ Installation instructions ------------------------------------ Remote Control Button Description Remote control instructions ------------------------------------ Common Operation Instructions Common operation instructions ------------------------------------ Dial switch setup ------------------------------------... -
Page 3: Foreword
Attention 1. Foreword Thanks for choosing our conference cameras. Please read this manual carefully before using the product. 2. Notice • Avoid damage from vibration and moisture during storage and installation. • Handle the camera parts. Please do not touch the camera lens by hand to avoid scratching the lens. -
Page 4: Performance Characteristics
Performance Characteristics 1. Camera technical parameters Electric Communication Input Voltage DC12V Baud 9600/38400bps Power Protocol VISCA/PELCO-D/PELCO-P Decoder internal Address Set 0~64 Operation Surroundings Operating Horizontal Rotation ±175° 0°~+50° Environment Vertical Rotation 120° Operating Temp 0~95% Rotation Speed 100°/s non-condensing Physics Installation Method Preset Point: 9 for remote control,... -
Page 5: Quick Start Interface Definition
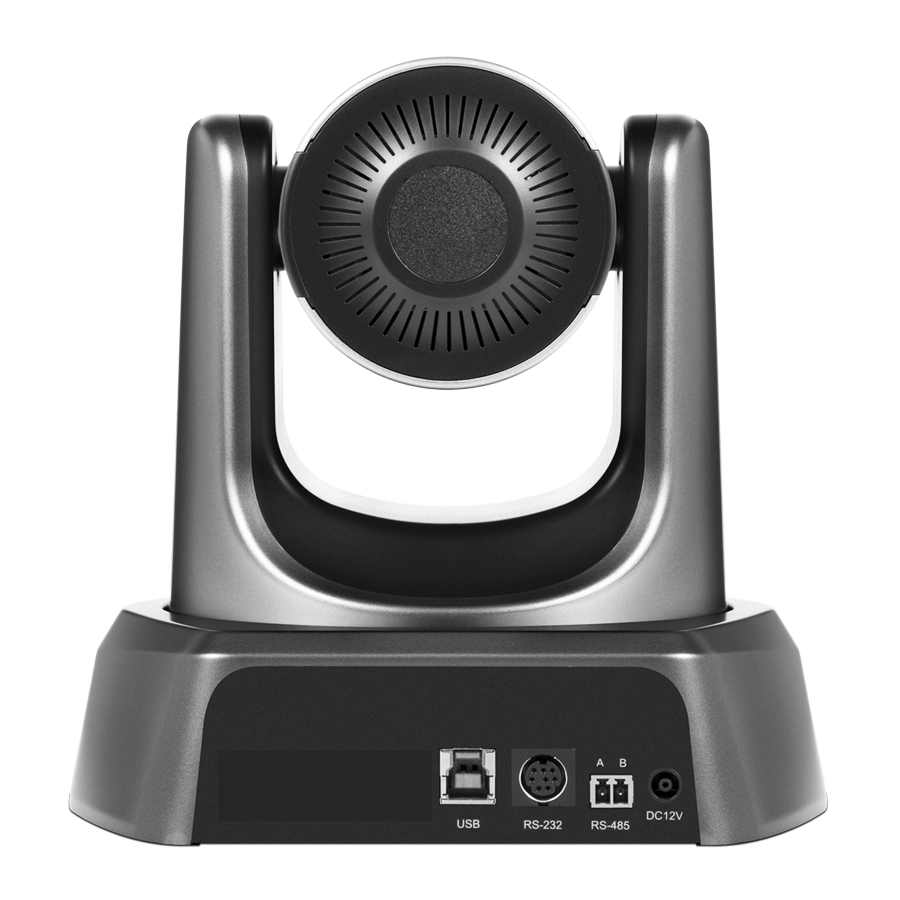
Quick Start 1. Interface definition Pan & Tilt Stand by indicator IR remote indicator 4. Power indicator ② ③ ④ (1) USB (2) RS232 (3) RS-485 (4) DC 12V... -
Page 6: Interface Diagram
2. Interface diagram 3. Installation instructions Surface Installation Put the camera on the desk flatly, and make sure the camera in level. If want to put the camera on oblique surface, please make sure the angle of inclination less than 15 degree for ensure camera pan and tilt working in normal operation. -
Page 7: Remote Control Button Description
Remote Control Button Description Remote Control Launch Window 【 POWER 】 Standby Button, pressing it, camera CAMERA SEL EC T goes into Standby Mode; pressing again, camera goes Power ON. 【P/T Reset 】Camera Pan/Tilt reset Function R EV same with ⑧(P/T RESET) 【CAMERA SELECT】Choose the camera number RESET PRESET... - Page 8 【 Camera Pan/Tilt Reset 】 : Camera Pan/Tilt reset ; MENU. (10) (11)Slow Zoom Key 【Zoom SLOW+】T:Zoom in at low speed 【ZOOM SLOW-】W:Zoom out at low speed (12) Fast Zoom Key 【ZOOM FAST +】:Zoom in at fast speed 【ZOOM FAST -】:Zoom out at fast speed (13) Manual Focus Mode 【MANUAL FOCUS】:Start manual focus function 【FAR】:Manually far focus button, clearer for the...
-
Page 9: Common Operation Instructions Common Operation Instructions
Common Operations Introductions 1. Camera Select Refer to the dial-up at the back of camera and choose camera address number that you want to control(1-3) 。 2. Camera Direction Control Turning up Turning down HOME Turning to left Turning to right *Note: Press direction key to move the camera. -
Page 10: Control Interface
3. Camera Focusing Mode Control 【AUTO】Switch the focus mode to AUTO 【MANUAL】Switch the focus mode to MANUAL AUTO 【FAR】Far focus manually MANUAL FOCUS 【NEAR】Near focus manually 4. Camera Zoom Control Press any one of the 4 【 ZOOM 】 to make the zoom functioning. These 4 keys are not applicable for fixed focus camera. -
Page 11: Camera Menu Setup
Camera Menu Setup Menu Description Operate remote control, press 【 MENU 】 to enter main menu of video camera; Level I Menu - MAIN MENU: Display Lens System Level II Menu - Image: Exposure ImageE.n HDMI Output 1080P50 Mirror HDMI output: Support 1080P60/50/30/25, 720P60/50, 1080i 60/50. Mirror: Support Off /Left/Right/Up/Down image adjust. - Page 12 Level III Menu -Exposure Exposure Mode Shutter Exposure Mode: Support Auto/Manual mode. Shutter priority: adjust the shooting speed. Level III Menu -WB Mode WB Mode : Support Auto / Manual mode. Level III Menu -Image Enhancement Image Enhancement Denoise Sharpen Gamma Defog Col Tone...
- Page 13 Denoise: 2D noise reduction /3D noise reduction switch Sharpen: Sharpness adjustment function Gamma: Gamma adjust switch Defog: Defogging: the defogging strength is calculated automatically according to the manual/automatic specified strength coefficient. Sat: Adjust the image color effect. Col Tone: Color tone adjustment interface. The video output result is independent of the color temperature.
- Page 14 Focus mode: Support auto and manual 2 modes Range of focus: Determined by the lens used in the model. Zoom save: When the camera is turned on, restarting the camera will initialize to the position which was shut down in last time. Level II Menu –...
- Page 15 Dial-up SW1(1,2,3,4,5,6): Baud rate set DIP-1 DIP-3 PTZ Add. DIP-2 DIP-4 DIP-5 DIP-6 ..Dial-up SW2(1/2/3): Protocol set Protocol DIP-1 DIP-2 Baud DIP-3 VISCA 9600 PELCO-D 38400 PELCO-P Dial-up 3 IR transfer (IR PASS), DIP-4 reserve IR Add. DIP-5 DIP-6 DIP-4 RESERVE PS: RS-485 and RS232 Pins distribution...
-
Page 16: Troubleshooting
Troubleshooting -The video of camera cannot be displayed on the screen -Check the power, data, and video connections -Camera does not Pan, Tilt or zoom. -Menu was displayed on monitor – exit menu and retry -Image quality is poor while using in low-light conditions -Press【BACK LIGHT】on remote control or menu (ON/OFF) to adjust backlight effect -Remote control works intermittently or not at all -Check batteries... -
Page 17: Warranty
Warranty BZBGEAR wants to assure you peace of mind. All BZBGEAR cameras and camera-related products include our Stress-Free Three-Year Warranty. For complete warranty information, please visit BZBGEAR.com/warranty. For questions, please call 1.888.499.9906 or email support@bzbgear.com. Mission Statement BZBGEAR manifests from the competitive nature of the audiovisual industry to innovate while keeping the customer in mind.
Need help?
Do you have a question about the BG-CAM-USB4K and is the answer not in the manual?
Questions and answers