Chapters
Table of Contents

Subscribe to Our Youtube Channel
Related Manuals for grabner TRIMARAN


Summary of Contents for grabner TRIMARAN
- Page 1 TRIMARAN BESEGELUNG SAILING RIG ADVENTURE / SL SPEED EIGNER-HANDBUCH OWNER´S MANUAL Besitzer/Name: Owner/name: PLZ, Ort: Post code, town: Straße, Nr.: Street, nr: Telefon Nr.: Telefon:...
-
Page 2: Table Of Contents
Sie bitte alle Kapitel sorgfältig durch - Sie er- WARNHINWEISE sparen sich dadurch Ärger und verlängern die Lebensdauer Ihrer Besegelung. Sie werden bestimmt mit Ihrer TRIMARAN- ACHTUNG Besegelung sehr zufrieden sein. Wir freuen Bitte lesen Sie vor dem ersten Gebrauch... -
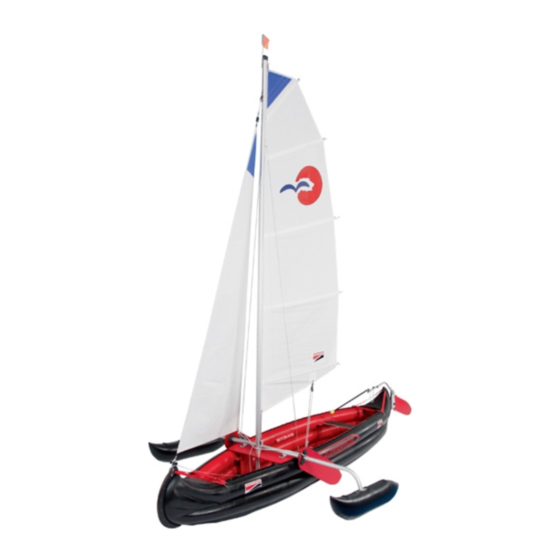
Page 3: Produktabbildung
Verklicker masthead fly Masttopp mast top Mast mast Großsegel main sail Drehgelenk furling swivel Segellatte batten Vorsegel foresail Wanten shroud Fockschot jib sheet Großschot Befestigungskasten main sheet fixing frame unit Steuerruder rudder Rollfocktrommel furling drum Schwert leeboards Ausleger outrigger Ausleger schwimmer Querjoch outrigger float... -
Page 4: Aufbau
AUfBAU Bauen Sie die Besegelung genau in der nachstehenden Reihenfolge auf. BEfESTIGUNGSkASTEN ► ► Stellen Sie nun den Befestigungskasten ► ► Nehmen Sie die Grundplatte und entfer- in Ihr nicht aufgepumptes Boot - Die ne Sie die 4 Rändelmuttern. Seite des Kastens mit dem Mastfuß und ►... - Page 5 ► ► Entfernen Sie die 4 Rändelmuttern auf der Oberseite der Deckplatte. ► ► Stecken Sie nun das Querjoch auf die vier Schrauben und schrauben die Rän- delmuttern nur leicht auf - Die beiden Schottklemmen müssen Richtung Heck zeigen. Der Einbau des Befestigungskastens in das aufgepumpte Boot ist nicht mög- Seitenleiste ADVENTURE SL lich.
- Page 6 TAkELAGE STEUERRUDER ► ► Stecken Sie die 3 Mastteile zusammen, ► ► Durchbohren Sie die beiden markierten dass die Arretierungen einrasten. Stellen auf der Heckschutzleiste mit ei- ► ► Ziehen Sie das Großfall, mit dem Ende nem 8,5 mm Bohrer (nicht mitgeliefert). ohne Karabiner, von hinten nach vorne, ►...
- Page 7 ► ► Schäkeln Sie die Wanten, links und ► ► Schrauben Sie das Querjoch , mit den rechts, an den Ringmuttern von Quer- 4 Rändelmuttern, fest am Befestigungs- joch an. kasten an. ► ► Pumpen Sie das Boot auf Betriebsdruck auf.
- Page 8 ► ► Knoten Sie das Drehgelenk an einem Ende vom Fockfall an und hängen den oberen Karabiner vom Vorsegel am Drehgelenk ein. ► ► Hängen Sie den Karabiner vom Großfall an der oberen Öse vom Großsegel ein. ► ► Ziehen Sie das Großsegel in die Nut vom Mast ein.
- Page 9 ► ► Bei ADVENTURE befestigen Sie den Großschotblock, mit dem Schäkel, am D-Ring am Bootsboden. ► ► Bei ADVENTURE SL und SPEED knüp- fen Sie die beigefügte Leine quer zwi- schen den Sitzbrettbeschlägen ein und befestigen den Großschotblock an die- ser Leine.
-
Page 10: Abbau
► ► Schieben Sie den nicht aufgeblasene SCHWERT UND AUSLEGER Auslegerschwimmer mit der hinteren La- sche, von hinten auf den langen Teil der ► ► Stecken Sie die Schwerter, schräg nach- Auslegerplatte bis er am Rohr ansteht - hinten/unten mit dem Kunststoffring nach das Ventil am Schwimmer ist vorne. -
Page 11: Hinweise Zum Segeln
Schwung nach oben drücken bis es ben Sie den Befestigungskasten ausei- am Bolzen in den Beschlag einrastet. nander. ► ► Verpacken Sie die Trimaran-Besegelung in die Packtasche (Sonderzubehör). WICHTIGER HINWEIS Die schwarzen Kunststoff-Einrastteile an den Schwertern können bei starker Sonnen- einstrahlung (hoher Temperatur) weicher werden. -
Page 12: Pflege Und Lagerung
► ► Achtung bei ablandigem Wind. PfLEGE UND LAGERUNG ► ► Informieren Sie sich über örtliche Vor- schriften ► ► Halten Sie die Verbindungen von den ► ► Prüfen Sie Wetterberichte, örtliche Strö- Mastteilen immer sauber. Wischen Sie mungen, Gezeiten und Windverhältnis- die Verbindungen mit einem sauberen Tuch ab und schmieren sie im Bedarfsfall ►... - Page 13 Werkzeug VORRANGREGELN ► ► Eine Boots - Abschleppleine ► ► Segelboote haben Vorrang gegenüber ► ► Reserveleinen, Bändsel, Schäkel und Motorbooten Klebeband für Notreparaturen. ► ► Hingegen haben Sie Nachrang gegen- ► ► Messer und Feuerzeug über Einsatzfahrzeugen, Vorrangfahr- ► ►...
-
Page 14: Garantie Und Gewährleistung
Transportschäden vom Händler zu Ih- Segels nen. ► ► Wenn andere als die von GRABNER au- torisierten Service-Stellen Reparaturen oder Umbauten während der Garantie- Jetzt steht Ihren ersten Segeltörn nichts zeit vornehmen. mehr im Weg. Wir wünschen Ihnen viel Freu- ►... - Page 15 WICHTIGE HINWEISE Mehrkosten nicht anzuerkennen und rückzubelasten. ► ► Geldansprüche sind ausgeschlossen, ausgewechselte Teile sind Eigentum der Firma GRABNER. Die Rechte aus dieser Garantie sind nicht auf andere Personen übertragbar. GERECHTfERTIGTE REkLAMATIONEN- GARANTIEfäLLE WERDEN VON DER ► ► Wird eine Besegelung oder Segelteil...
-
Page 16: Legend
DEAR WATER-SPORT ENTHUSIAST! LEGEND Congratulation on the purchase of your new Information and Notices TRIMARAN-sailing rig! May you enjoy it for many pleasant hours of leisure, and during NOTICE your holiday! Disregard of the instructions may diminish This information brochure is intended to help... -
Page 17: Assembly
ASSEMBLy When assembling, observe the fol- lowing sequence. fIxING fRAME UNIT ► ► Now place the fixing frame unit into your ► ► Remove the 4 knurled nuts from the base not yet inflated boat. The side of the plate. frame unit with mast foot stub and mast ►... - Page 18 ► ► Remove the 4 knurled nuts on the upper side of the top panel. ► ► Now position the bar onto the four bolts and attach the the knurled nuts, but not yet tight. - Both sheet cleats must point towards the stern.
- Page 19 RUDDER RIGGING ► ► Slot the 3 mast sections together, they ► ► Drill the holes at the positions marked on must click into place. the stern mount strake, using a drill bit ► ► Feed the main-halyard end without the 8.5 mm (not supplied).
- Page 20 ► ► Shackle the shrouds to port and star- ► ► Fasten the the bridge-yoke to the fixing board to the eye bolt nuts of the bridge- frame unit by means of the 4 knurled nuts yoke. ► ► Inflate the boat to operating pressure. ►...
- Page 21 ► ► Attach the furling swivel (knotting it) to the foresail halyard, and clip the carbine of the foresails head to the swivel. ► ► Clip the main halyard carbine to eye at the head of the mainsail. ► ► Hoist the main sail by feeding the bolt rope into the mast track.
- Page 22 ► ► Attach the mainsheet block of the AD- VENTURE by means of the shackle to the D-Ring bonded to the floor. ► ► With the ADVENTURE SL and SPEED attach the mainsheet block to the line laid across between the seat board fixing eyelets to port and starboard.
-
Page 23: Dismantling
► ► Slot the none inflated outrigger float with LEEBOARDS AND OUTRIGGER the rear lug from the rear over the out- ► ► Slip the leeboards in a between aft and rigger arms long gusset till it touches the downward pointing angles over the tubu- tube. -
Page 24: Useful Hints On Sailing
IMPORTANT NOTICE ► ► Stow the trimaran-sailing rig into the pack The black plastic retention brackets of the bag (special accessory). leeboards may, under extended exposure to the sun ashore (high temperature) turn softer, diminishing retention property, thus allowing the blade to be released unintended. -
Page 25: Care And Storage
► ► Explain to your passengers the basics of CARE AND STORAGE sailing. ► ► Ensure that in the event of an emergency ► ► Always keep mast connections clean. one of your passengers is able to skipper Cleanse with a clean cloth, and if need the boat. - Page 26 ► ► Suitable weather clothing for fine and RIGHT Of WAy RULES poor weather. ► ► Motorboats and those with mechanical ► ► Air-pump, paddle, repair kit and tools propulsion give way to sailing boats. ► ► One boat - towing rope. ►...
-
Page 27: Guarantee And Warranty
GUARANTEE reefing reducing the sail area GRABNER GMBH provide a guarantee co- rig (running the connection gear com- vering the period of 2 years from the date of / standing prising mast, boom stays purchase. - Page 28 (cost of repair at the place of vacation, recovering- towing costs, loss of objects, ..) Repair of replacement of the parts is a matter for the GRABNER company to decide. PROCEDURE Of GUARANTEE WARRANTEE In the event of a justified mater of guarantee,...
Need help?
Do you have a question about the TRIMARAN and is the answer not in the manual?
Questions and answers