Table of Contents
Advertisement
Quick Links
Advertisement
Table of Contents

Related Manuals for U.S. Solid USS-DBS47


Summary of Contents for U.S. Solid USS-DBS47
- Page 1 Instruction Manual USS-DBS47/48 Analytical Balance...
-
Page 2: Table Of Contents
Table of Contents 1. Introduction........................1 1.1 Safety Precautions..................... 1 2. Design and Function....................3 2.1 Components...................... 3 2.2 Keyboard......................5 2.3 Display panel..................... 6 3. Installation........................7 3.1 Unpacking and delivery inspection..............7 3.2 Selecting the location..................8 3.3 Installing components..................9 3.4 Leveling the balance..................9 3.5 Connecting the power..................11 4. -
Page 3: Introduction
1. Introduction Thank you for choosing the U.S. Solid USS-DBS47/48 Electronic Analytical Balance. The U.S. Solid USS-DBS47/48 Electronic Analytical Balance is precise and reliable. It provides a high level of operating convenience and response sensitivity to facilitate determination of the weight of your samples. U.S. - Page 4 stability in operation of the balance, be sure to ground the balance. • Avoid getting the balance wet as it is not water resistant. Any leakage of liquid into the balance may damage the balance or cause an electric shock to the user. •...
-
Page 5: Design And Function
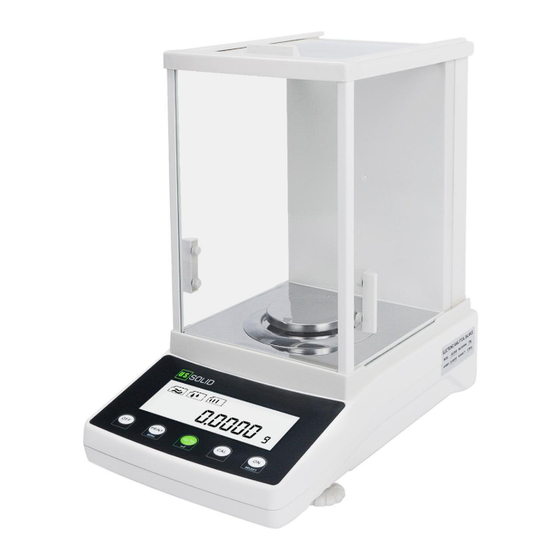
2. Design and Function 2.1 Components 1: Weighing chamber 6: Glass door 2: Weighing pan 7: Handle of glass door 3: Anti-draft ring 8: Balance main body 4: Display panel 9: Leveling foot 5: Keyboard... - Page 6 1: RS-232 connector 2: Level bubble 3: Power inlet...
-
Page 7: Keyboard
2.2 Keyboard Description Turn the power off Output the displayed values to an electronic printer, computer, or other external devices Tare the balance Select or set displayed item Performs automatic internal calibration Turn the power on Enter menu item selection Enter mode item selection... -
Page 8: Display Panel
2.3 Display panel Description Weight value Weight unit Indicates positive values Indicates negative values Stabilization indicator Display speed Stability Automatic calibration time mode... -
Page 9: Installation
· 1 Power Cable · 1 Calibration Weight · 1 Glove · 1 Instruction Manual · 1 Quality Certification Check the instrument for damage in transit. Immediately inform the U.S. Solid customer service if you have any complaints or parts are missing. -
Page 10: Selecting The Location
3.2 Selecting the location Measurement performance of your balance depends largely on the surrounding environments. Please follow these guidelines to make sure the proper environmental conditions are met: • Select a firm, horizontal location that is free from vibrations. • Make sure that the ambient temperature is between 5°C and 30°C, the relative humidity is around 50% and that non-condensing conditions are met. -
Page 11: Installing Components
3.3 Installing components 1. Place the balance main body on the installing location. 2. Push the side glass door open. 3. Gently attach the pan on the center axis of the weighing chamber. 4. Push the side glass door close. 3.4 Leveling the balance Accurate horizontal positioning necessary for repeatable measurements and exact results. - Page 12 Position of air bubble Adjustment method Turn both feet clockwise down Turn both feet counterclockwise Turn left foot counterclockwise, right foot Left clockwise Turn left foot clockwise, right foot Right counterclockwise...
-
Page 13: Connecting The Power
3.5 Connecting the power Warning: • To prevent electric shock, be sure to use the 3-pin power cord with equipment grounding connector. • Check to make sure the voltage indicated on the analytical balance data label matches the local line voltage. Do not connect the balance to the power source if it does not match. -
Page 14: Settings
4. Settings 4.1 Display speed If the operating environment meets the requirements, the display speed of the balance can be adjusted to reduce the time required for the balance to stabilize, thereby improving work efficiency. Icons Description Highest speed High speed Normal speed Low speed Depending on the environment in which the instrument is used,... -
Page 15: Stability
2. Press “O/T” to enter the selection of display speed mode. 3. Press “ON” to select required speed and confirm by pressing “O/T”. 4.2 Stability According to different operating environments, the balance is kept in a relatively stable state by adjusting its stability. It is recommended that the balance be adjusted appropriately in an environment that guarantees its normal operation. -
Page 16: Restore Factory Defaults
1. Press the “ON” button several times in succession until the “STAB” is displayed. 2. Press “O/T” to enter the selection of stability. 3. Press “ON” to select required stability and confirm by pressing “O/T”. 4.3 Restore factory defaults If the balance is improperly set or operated, all settings can be restored to factory defaults, which will ensure that the balance is suitable for most operating habits and environments. - Page 17 2. Press “O/T” to confirm and an audible signal will sound. 3. Then return to the splash screen, the factory defaults have been restored. * The setting is only applicable to situations where settings are confusing due to incorrect operation. Factory defaults should NOT be performed frequently.
-
Page 18: Calibration
• Changes in the location of use (including moving in the same room). • Changes in ambient conditions. • Prior to each use. The USS-DBS47/48 Analytical Balance offers three calibration methods. 5.1 Internal calibration Install the balance as instructed and ensure it is sufficiently warmed-up. -
Page 19: Automatic Internal Calibration
5.2 Automatic internal calibration The USS-DBS47/48 Analytical Balance offers four kinds of automatic calibration time mode to choose from: “10MIN” “30MIN” “60MIN” and “OFF”. Respectively, these modes indicates that that the balance is automatically calibrated either every 10 minutes, every 30 minutes, every 60 minutes or the automatic calibration is off. -
Page 20: External Calibration
5.3 External calibration The balance must be fully warmed up for one hour to stabilize the weighing before calibration. Procedure: 1. Zero the balance in the weighing state. 2. Press the “ON” button several times in succession until the “E-CAL” is displayed. -
Page 21: Weighing And Applications
6. Weighing and Applications 6.1 Weighing Note: Please warm up for at least one hour and calibrate before using. 1. Zero the balance in the no-load state. 2. Open the glass door of the weighing chamber and place the weighing sample on the weighing pan, then close the glass door. -
Page 22: Unit Of Weight
6.2 Unit of weight The USS-DBS47/48 Analytical Balance has multiple sets of weight units. The unit selection function can be used to meet the unit requirements in various usage situations. 1. Press the “ON” button several times in succession until the “UNIT” is displayed. -
Page 23: Counting Function
6.3 Counting function The U.S. Solid USS-DBS47/48 Analytical Balance has a built-in counting function that meets various industrial counting requirements, especially the counting function for small components. To ensure the accuracy of the counting function for small components, it is necessary to ensure that the weight of all samples is consistent, and that the weight of a single object is ≥0.5mg. - Page 24 3. Press “ON” to select the quantity and put the corresponding quantity of samples. Press “O/T” to confirm and “COU ---PCS” will be displayed. 4. The operation can be started when the “COU ---” disappears and the corresponding number appears. 5.
-
Page 25: Percent Weighing
6.4 Percent weighing The U.S. Solid USS-DBS47/48 Analytical Balance has a built-in percent weighing function. 1. Zero the balance in the weighing state. 2. Press the “ON” button several times in succession until “PCT” is displayed. 3. Press “O/T” and “PCT 100PCT” will be displayed. -
Page 26: Maintenance
7. Maintenance 7.1 Precautions The U.S. Solid USS-DBS47/48 Analytical Balance is a precision mechatronics intelligent measuring instrument, which must be carefully maintained and treated. 1. Do not use sharp objects (such as pens) to click the button, use only your fingers. -
Page 27: Cleaning
7.2 Cleaning • Turn off the power switch and remove power cord during maintenance. • Make sure that no dust or liquid enters the balance housing. • Do not use any aggressive cleaning agents (solvents, abrasive cleaning agents, etc.) or organic solvents to clean the balance. Clean the balance using a piece of lint-free cloth which has been wet with a mild detergent (soap) only. -
Page 28: Troubleshooting
8. Troubleshooting 8.1 Troubleshooting Problem: Display remains off after switching on. Possible causes: Power cord is not connected • Power line fuse blown • Power transformer damaged • Instrument faulty • Problem: Weight display is constantly changing or unstable. Possible causes: •... -
Page 29: Error Code
8.2 Error code Error code display Description Err. Calibration operation error Err. 1 Counting setting error Err. 2 The weighing pan is not placed correctly Err. 3 Sample weight exceeds range... -
Page 30: Technical Data
9. Technical Data Model USS-DBS47 USS-DBS48 Capacity 120 g 220 g Readability 0.0001g (0.1mg) Repeatability ±0.0002g Linearity deviation ±0.0003g Stabilization time Within 3 seconds Operating temperature 63.5℉- 72.5℉(17.5℃ - 22.5℃) Pan size Φ80mm Interface RS232 Power 110V 60Hz AC Dimensions 340×215×350 mm... - Page 31 Contact Feel free to visit our website: www.ussolid.com You can email us at service@ussolid.com You can call one of our friendly customer service representative at +1(800) 209-4177...
Need help?
Do you have a question about the USS-DBS47 and is the answer not in the manual?
Questions and answers