
Summary of Contents for Setra Systems Lite
- Page 1 Installation & Operating Guide Setra Systems, Inc. 159 Swanson Road, Boxborough, MA 01719 800.257.3872 • www.setra.com...
- Page 2 The material in this document is for information purposes only and is subject to change without notice. Setra Systems assumes no responsibility for any errors or for consequential damages that may result from the use or misrepresentation of any of the material in this...
-
Page 3: Table Of Contents
3.1 Prepare wall for mounting ..................6 3.2 Install pressure pickup port ..................6 3.3 Plumbing ........................6 3.4 Wiring Setra Lite ......................7 3.5 Completing the installation ..................8 4.0 Servicing Setra Lite ......................9 ..4.1.Configuration ......................9 4.2 Removal ........................10... -
Page 4: Introduction
POS or NEG room mode. The Setra Lite sensor has Setra’s accuracy and reliability that you can trust. Setra Lite is about the size of a standard light switch and just as simple to install. It fits in a single-gang US electrical box, international 86-box or international round back-box, and is powered by 24VAC or 24VDC. -
Page 5: Rough-In Installation
5. 250 ohm resistor, if wiring inputs for 4-20 mA current loops 2.3 Unboxing the unit When first opening the Setra Lite box, the faceplate and lens are in a protective bag on top. Set aside these parts for final installation. -
Page 6: Installation Overview
Note: Reference-side pressure pickup is integrated into the main body of Setra Lite - no additional Pressure Pickup Port is required for reference side. 2. Run tubing to Setra Lite electrical box, being careful not to crimp tubing in conduit or within walls 3. -
Page 7: Wiring Setra Lite
1/8”ID x 1/4"OD tubing between the pressure pickup and the Setra Lite. 2. Push the open end of the 1/8” ID soft silicone tubing onto port on the rear of the Setra Lite. 3.3.1 Considerations to avoid kinked or damaged tubing Pull tubing runs in a manner that protects the tubing from being damaged, cut, or crimped. -
Page 8: Completing The Installation
Lite. 2. Connect wiring for power and analog output (if required) 3. As you push the Setra Lite unit into the electrical box, push the tubing into the conduit tube or into the wall cavity. 4. When wiring is complete, push Setra Lite into the enclosure and secure with two (2) mounting screws. -
Page 9: Servicing Setra Lite
4.0 Servicing Setra Lite 4.1 Configuration Configuration of Setra Lite (including sensor zeroing) can be performed by removing the front lens from the unit and configuration setting via the 3 buttons located below the LCD display. To remove the front lens, grab the front lens from the left and right side edges, and pull the lens away from the wall. -
Page 10: Removal
4.2 Removal In the event Setra Lite needs to be removed for service or recalibration, first remove the front lens. To remove the front lends, grab the front lens from the left and right side edges, and pull the lens away from the wall. -
Page 11: Operation
5.0 Operation Once Setra Lite is installed and powered-up, configuration and operation can begin. Setra Lite can be easily configured via 3 buttons located below the LCD display after removing the front lens. 5.1 Removal With the unit powered on, grab the lens by the left and right edge, then pull away from the unit. -
Page 12: Configuration.menus
5.2 Configuration menus This section will describe the function of each of the configuration menus. 5.2.1 Zero Press and hold the RIGHT button (“”) to zero the onboard pressure sensor. The unit contains an onboard valve to automatically equalize the pressure differential across the sensor. Zeroing is complete when the screen reads "ZERO DONE". - Page 13 Press and hold the RIGHT button (“”) to adjust the alarm door delay (i.e. number of seconds before the LED ring will turn red when pressure alarm limits are exceed); the screen text will flash 3 times to indicate that the setting is ready to be adjusted. Use the LEFT ("") and MIDDLE ("") buttons to adjust between 000 and 999 seconds.
- Page 14 5.2.6 Digits Press and hold the RIGHT button (“”) to adjust the number of decimal places displayed on the LCD screen; the screen text will flash 3 times to indicate that the setting is ready to be adjusted. Use the LEFT ("") and MIDDLE ("") buttons to adjust between 0 ("0.000"), tenths ("0.000"), hundredths ("0.000"), or thousandths ("0.000").
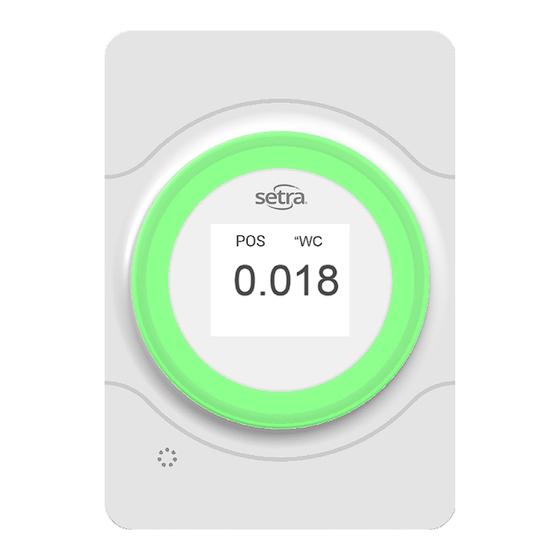
- Page 15 3 times to indicate return to the main configuration selection screens. 5.3 Operation Once installed, powered up, and configured, Setra Lite will operate as configured. 5.3.1 LED light ring Under normal operation with pressure within the configured alarm limits, the LED light ring will glow green.
- Page 16 For temporary instances where the Red/Green LED light ring status is not needed (e.g. room is opened for extended cleaning), Setra Lite can be placed into STANDBY mode by pressing the lens 3 times in a quick succession. The LED light ring glows yellow in STANDBY mode.
-
Page 17: Returns
No representative or person is authorized to give any warranty other than as set out above or to assume for SETRA any other liability in connection with the sale of its products. For all CE technical questions, contact Setra Systems, USA. EU customers may contact our EU representative Hengstler GmbH, Uhlandstr 49, 78554 Aldingen, Germany (Tel: +49-7424-890; Fax: +49-7424-89500). - Page 18 Setra Systems, Inc. 159 Swanson Road, Boxborough, MA 01719 800.257.3872 • www.setra.com...
Need help?
Do you have a question about the Lite and is the answer not in the manual?
Questions and answers